Control moisture in your earthen pit by implementing proven techniques. Start with strategic clay pot placement 18 inches from edges for ideal water delivery. Install natural drainage systems using French drains and perforated PVC pipes. Apply organic matter through careful mulch layering, maintaining 2-4 inches depth. Break up hardened clay using deep tillage at 35-50cm depth. Construct contoured walls with proper reinforcement and waterproofing. Use both natural clay and synthetic moisture barriers for protection. Add berms and swales to divert surface water. Monitor temperature and air circulation. Compact soil in 4-6 inch layers. These foundational steps will open the door to mastering earthen pit management.
Strategic Clay Pot Placement
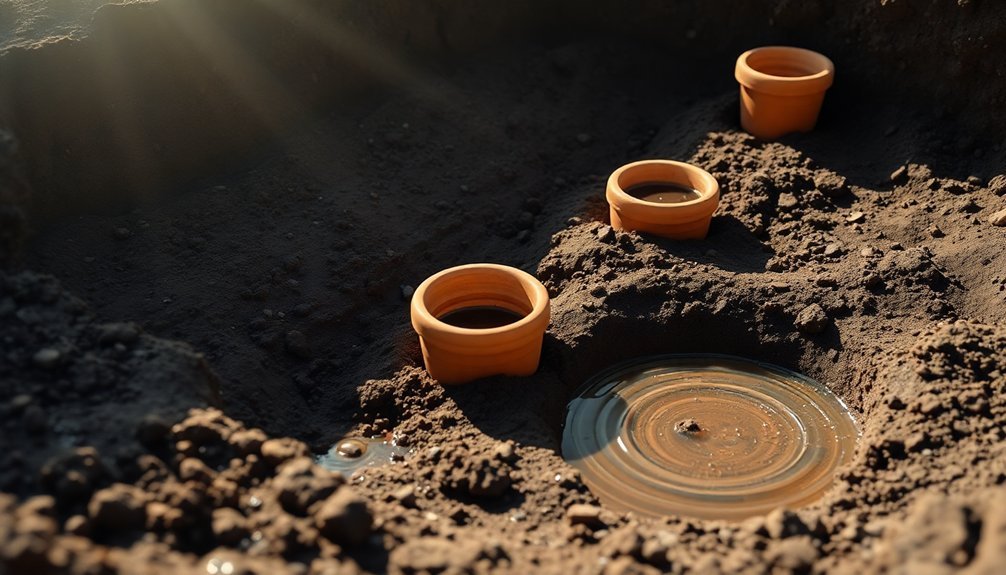
Setting up clay pots correctly makes all the difference in controlling moisture in earthen pits. You'll want to bury each pot as deep as possible, stopping just at the upper lip to prevent soil from falling in while minimizing water loss to the atmosphere.
Position your pots about 18 inches away from seeds or seedlings to guarantee ideal water delivery to the growing root systems.
When you're working with vegetable gardens or orchards where plants are widely spaced, clay pots prove especially effective. Each pot has a 15-litre capacity for sustained plant hydration. They're particularly valuable in challenging conditions like saline soil or desert environments, making them perfect for land restoration projects.
You'll find they work exceptionally well in sandy and undulating terrain due to their controlled water release.
As you place your pots, remember that the soil will settle over time, so initial deep placement helps maintain proper positioning. The porous nature of the clay allows water to seep out based on your plants' needs, saving 50-70% of water compared to traditional irrigation methods.
You'll need to guarantee you're using unglazed, porous clay pots to achieve proper water seepage and ideal moisture control.
Deep Tillage Bottom Layer
You'll need to break through hardened clay layers at the pit's bottom using deep tillage techniques that penetrate 35-50cm below the surface.
By loosening these compacted layers when soil moisture is at 30-50% field capacity, you're creating ideal conditions for increased water retention and proper drainage.
Your crop roots will grow deeper into the newly loosened soil, accessing previously unavailable water and nutrients while improving overall pit productivity. Using a spring-loaded shank ripper helps prevent equipment damage when breaking through tough compacted layers.
Breaking Hardened Clay Layers
Breaking hardened clay layers requires specialized deep tillage equipment and proper timing to effectively penetrate compacted soil.
You'll want to use deep rippers with curved tines that can reach depths of 35-50cm while minimizing draft requirements. To reduce the force needed, consider using shallow leading tines, which can decrease draft by up to 18% on clay soils. Solonetzic soils are particularly challenging and widespread in Saskatchewan, covering approximately 1.8 million hectares.
Timing is essential when breaking through these layers. You'll get the best results when the soil moisture is between 30-50% of field capacity.
Don't attempt deep tillage when the soil is too wet, as this can cause smearing rather than fracturing. Dry conditions are ideal for maximum shattering of hardpan layers.
You can enhance the effectiveness of your deep tillage by integrating it with other soil management practices.
Consider adding organic matter or using deep-rooted cover crops in your rotation. If you're using a paraflow, you'll benefit from its wave-like motion that loosens the hardpan while minimizing soil mixing.
This approach helps improve moisture penetration and allows roots to access water beneath the compacted layer.
Increasing Water Retention Capacity
After breaking through hardened clay layers, improving water retention becomes your next priority.
You'll need to perform deep tillage when the soil moisture is just right – moist enough for penetration but dry enough that a ribbon of soil breaks before reaching 5 inches when pressed between your fingers.
For ideal water retention, you'll want to focus on the bottom layer using deep rippers with curved shanks.
These tools create wider slots in the subsoil without excessive mixing, which helps maintain soil structure. If you're working with silty clay loam or duplex soils, you'll see particularly good results from this method, as it enhances natural drainage patterns.
Don't forget that timing is essential.
You'll get maximum soil shattering when conditions are dry, but avoid working in saturated soil as this causes compaction and smearing.
To maintain the benefits long-term, incorporate organic matter and consider using gypsum.
If you follow up with no-till practices and controlled traffic, your deep tillage efforts can improve water retention for up to 20 years.
Remember that the soil can re-compact over time, so you'll need to monitor conditions and manage traffic carefully.
Promoting Root Growth Depth
For successful root development, identifying root-limiting layers must be your first step before deep tillage. Use a spade or soil probe to dig holes up to 18 inches deep, looking for platy soil structure and horizontally growing roots that indicate compaction.
You'll notice these areas stay wetter longer and may require different timing for deep tillage than the rest of your field.
When you're ready to break up the restrictive layer, operate equipment at ideal soil moisture (less than 30-50% field capacity). Choose low-disturbance subsoiling equipment that won't disturb surface residue, and work just below the compacted zone, typically 12-18 inches deep.
Don't go deeper, as this wastes power and can harm soil structure.
- Select silty clay loam soils for best results, as they respond well to deep tillage with 4-5% yield improvements.
- Monitor soil moisture carefully – working wet soil causes more harm than good.
- Control traffic patterns after tillage to maintain benefits longer, especially if you're implementing no-till practices.
To extend the benefits, incorporate deep-rooted crops in your rotation and add organic matter through manure or cover crops.
This approach helps maintain soil structure and prevents re-compaction over time.
Natural Drainage Systems
Through effective natural drainage systems, you can control moisture in earthen pits while maintaining environmental harmony.
You'll need to assess your soil type and terrain to determine the most suitable drainage solution.
For clay-rich soils, consider implementing a mole drainage system. You'll use a mole plough with a torpedo foot to create underground channels, but make sure you've got the right gradient and watch for stones that could disrupt installation.
If you're dealing with varied soil conditions, you'll want to combine this with collector pipes and backfill using washed sand.
French drains offer another reliable option. You'll need to dig trenches with proper gradient, install perforated PVC pipes wrapped in silt stockings, and cover them with crushed stone.
For isolated wet spots, install dry wells or soakaways. You'll want to test the percolation rate first – aim for a one-inch drop in water level every three minutes.
If you're managing surface water, incorporate catch basins and grated openings into your system.
You can connect these to underground pipes that direct water to designated drainage areas.
For persistent moisture issues, consider adding a sump pit with a pump in the lowest section of your pit.
Contoured Wall Construction
Proper contoured wall construction represents a critical element in managing earthen pit stability. When you're dealing with moisture control, you'll need to carefully select your wall construction method based on your site's geological conditions and excavation depth.
For deep pits, bored pile walls offer excellent stability, with diameters from 60cm to 150cm that can reach depths of 30m.
You'll want to focus on three key aspects when constructing contoured walls:
- Choose appropriate shoring systems based on your soil conditions – whether it's bored pile walls for deep excavations, sheet pile walls for moderate depths, or soldier pile walls with steel girders for added rigidity.
- Incorporate proper reinforcement by installing reinforcement cages and using high-quality concrete poured from bottom to top.
- Install adequate anchoring systems to minimize head deformations and guarantee wall stability, especially in deeper excavations.
Remember to integrate waterproofing materials into your wall design for moisture control. If you're working in areas with high groundwater levels, consider using secant pile walls with overlapping columns to create a water-tight seal.
Don't forget to implement regular quality assurance testing to monitor wall position and structural integrity throughout construction.
Organic Matter Integration
When you're working with earthen pits, you'll need to carefully manage organic matter through strategic mulch layering and compost application.
You should apply mulch in thin, uniform layers around the pit's edges to control moisture while avoiding excess organic material that could compromise structural stability.
For compost integration, you'll want to restrict applications to the surrounding soil rather than the pit walls themselves, maintaining a buffer zone of at least 2 feet from the pit's edge.
Mulch Layering Techniques
Successful mulch layering requires a systematic approach that combines multiple organic materials to create an effective moisture control system.
You'll want to start with a foundation layer of large stumps or logs, followed by a weed barrier like cardboard or newspaper. This base structure helps retain moisture while preventing unwanted plant growth from below.
When applying your mulch layer, maintain a consistent depth of 2-4 inches across the surface, ensuring you don't pile it against plant stems.
Before laying down your mulch, make sure the soil beneath is already moist to maximize water retention benefits. You'll need to integrate a layer of nutrient-rich compost beneath the mulch to support microbial activity.
Here are three critical steps for ideal moisture control in your earthen pit:
- Apply an even layer of organic mulch (wood chips, straw, or bark) while avoiding contact with plant stems.
- Monitor and adjust mulch thickness seasonally, maintaining the 2-4 inch ideal depth.
- Water thoroughly after application to activate the moisture retention properties and help settle the materials.
Remember to check regularly for proper decomposition and avoid over-mulching, which can create waterlogged conditions that harm plant growth.
Compost Application Methods
Effective compost application starts with a well-prepared earthen pit located near your cattle shed and water source.
You'll want to position your pit at an elevated level to prevent rainwater from entering, especially during monsoon season. Make sure your pit has sloping walls and a 90-cm sloped floor to avoid waterlogging.
Layer your organic materials systematically, starting with 10-15 cm of farm waste, straw, or vegetable refuse.
Add a 5-cm layer of wet animal dung over each organic layer, then sprinkle water to maintain 50-60% moisture content. You'll enhance decomposition by adding a slurry mixture of dung, urine-earth, and inoculum from a 15-day-old composting pit.
Turn your compost three times during the process: first after 15 days, again after another 15 days, and finally after a month.
During each turning, check moisture levels – the material should feel damp but not waterlogged. If you're working in a high-rainfall area, construct a temporary shed over your pit.
This controlled decomposition process will create nutrient-rich compost that improves your soil's structure, water retention, and resistance to erosion.
Air Circulation Design
In earthen pits, proper air circulation design starts with strategic duct placement and ventilation rates. You'll want to position ducts under the center aisle in total-slotted-floor buildings or adjacent to the pit in partly-slotted-floor buildings.
When sizing your ducts, maintain an air speed of 600 feet per minute, and include small openings at regular intervals to draw air from the pit.
Your ventilation system's success depends on precise calculations for your specific operation. You'll need to account for 36 to 44 cubic feet per minute per pig to create an effective downward draft, while considering seasonal adjustments and animal-specific requirements.
- Calculate your total ventilation needs based on animal numbers (for example, 800 cfm for 160 pigs across 8 pens).
- Position your fans to create ideal pressure differences across the floor, preventing gases from rising into animal zones.
- Consider using wall fans instead of pit fans, as they can provide similar benefits with reduced complexity and up to 20% lower emissions.
For enhanced performance, you might want to incorporate air treatment technologies like biofilters or scrubbers, which can cut emissions by more than 50%.
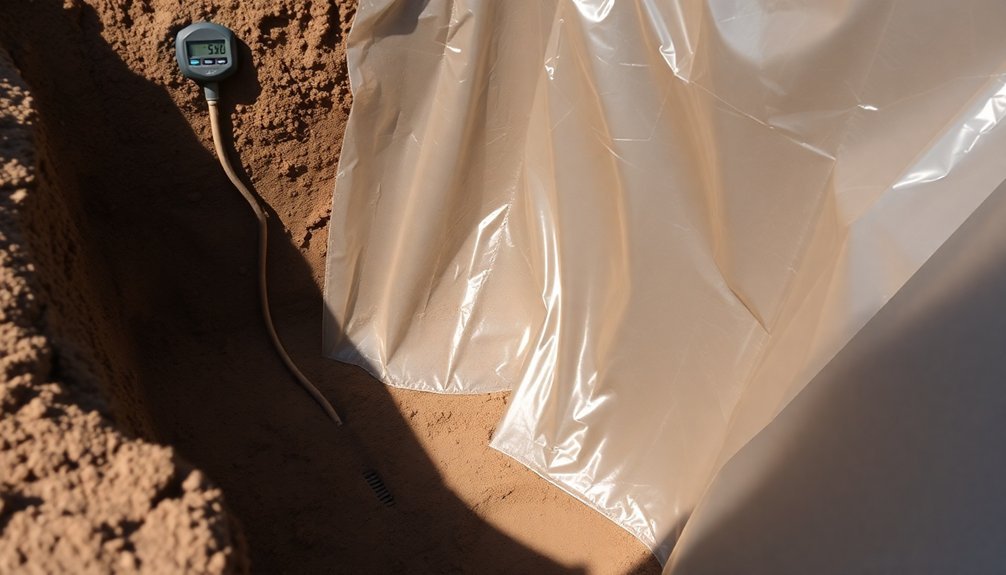
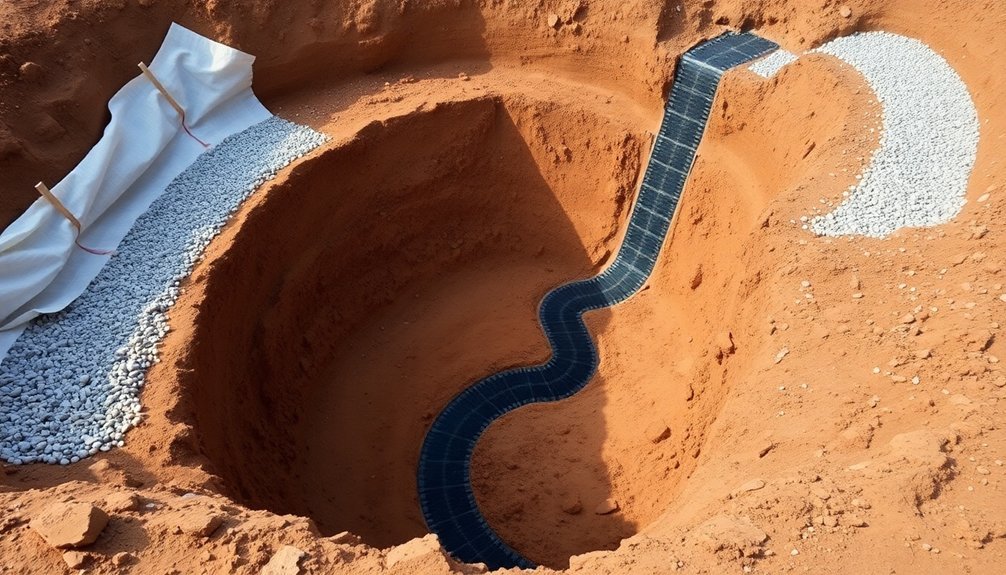
Moisture Barrier Materials
You'll find natural clay sealants provide an effective foundation layer when properly compacted with ideal moisture content.
Synthetic barriers, including polyethylene and EVOH materials, offer specialized protection against water vapor and soil gases at varying thickness requirements.
For maximum effectiveness, you can implement layered protection systems that combine natural and synthetic barriers with proper drainage components.
Natural Clay Sealants
Natural clay sealants provide essential moisture control for earthen pits while maintaining the material's eco-friendly qualities. You'll find several effective options, including Tung oil, hemp oil, and walnut oil, each offering unique benefits for sealing your earthen surfaces.
These natural solutions help prevent water seepage, protect structural integrity, and enhance the longevity of your pit.
When selecting a sealant, you'll want to evaluate the specific moisture control requirements of your project:
- Tung oil delivers superior waterproofing and durability, though it'll darken your clay surface.
- Hemp oil offers better breathability and a milder effect on color, making it ideal for projects requiring moderate moisture control.
- Walnut oil provides a balanced approach with a slight sheen and moderate protection.
You can apply these sealants to both interior and exterior surfaces, though shellac should only be used indoors due to its sensitivity to moisture.
For best results, verify your chosen sealant allows appropriate moisture exchange while still maintaining effective barrier properties.
Remember that different areas of your pit may require varying levels of protection, so you might need to combine different sealants based on exposure and usage patterns.
Synthetic Barrier Options
While natural clay sealants offer organic solutions, synthetic moisture barriers provide superior protection and long-lasting performance for earthen pits. You'll find advanced options featuring dual-layer waterproofing systems that combine HDPE, sodium bentonite, and polypropylene materials. These synthetic barriers deliver exceptional puncture resistance and self-healing capabilities under hydrostatic conditions.
| Feature | Benefit |
|---|---|
| Dual Layer System | Enhanced waterproofing with HDPE and bentonite protection |
| Thickness | 20-40 mil layers for durability |
| Installation Flexibility | Vertical or horizontal application options |
| Seam Requirements | 4" minimum overlap, nailed every 2' |
| Temperature Range | Effective down to 40°F (20°F for LOW TEMP versions) |
When installing synthetic barriers, you'll need to prepare surfaces carefully by removing protrusions larger than 1/4" and detailing openings exceeding 1". Install the membrane with the HDPE surface facing the drainage board, and verify proper shingling of seams for water shedding. These barriers excel in below-grade applications, providing both waterproofing and vapor control. You'll achieve ideal results by pairing the membrane with appropriate drainage systems like MEL-DRAIN™ 5035.
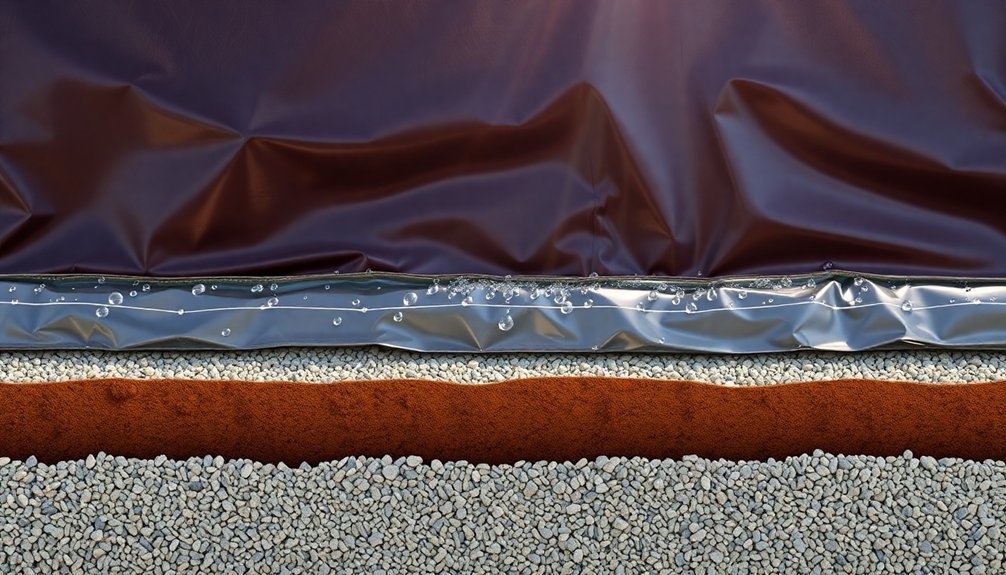
Layered Protection Systems
A thorough layered protection system forms the backbone of effective moisture control in earthen pits.
You'll need multiple protective barriers working together to prevent water infiltration and maintain structural integrity. Start with a robust foundation that includes a 6- to 10-mil polyethylene layer placed over at least 4 inches of gravel, creating an effective capillary break and vapor diffusion retarder.
For maximum protection, you'll want to implement these critical layers:
- Install dual liner systems with leak detection capabilities between layers to immediately identify any breaches.
- Apply a continuous vapor barrier with a perm rating below one, extending 6 inches up walls and overlapping 12 inches at seams.
- Use reinforced shotcrete or concrete diaphragm walls combined with geotechnical anchors for enhanced stability.
Don't forget to incorporate proper drainage slopes away from foundations and implement secondary containment systems to prevent fluid overflow.
You'll need to regularly monitor the system using vertical inclinometers and measuring cells to guarantee continued effectiveness.
Consider using closed-loop systems where possible to minimize environmental risks and reduce the volume of drilling fluids that require containment.
Soil Compaction Techniques
Proper soil compaction techniques guarantee the stability and longevity of your earthen pit by reducing air pockets and increasing density.
You'll need to select the right compaction method based on your soil type and pit dimensions. For sandy soils, consider jetting with pressurized water, while cohesive materials like clay respond better to mechanical compaction using jumping jacks or vibratory rollers.
Monitor your soil's moisture content carefully – it's essential for achieving peak compaction. You can use simple field tests like the soil ribbon or hand ball test to check moisture levels. If the soil's too dry, use a water truck to reach the ideal moisture content. If it's too wet, wait for drier conditions before proceeding.
Always compact your soil in layers of 4-6 inches to guarantee even density throughout the pit.
Don't skip this step – uneven compaction can lead to future settling issues. Use appropriate equipment for your space: vibratory plates work well for small areas, while trench compactors are ideal for confined spaces.
Check your compaction density regularly using a tile probe or penetrometer to verify you're achieving the required specifications.
Surface Water Diversion Methods
Several effective surface water diversion methods can protect your earthen pit from excess moisture and potential damage.
You'll find that berms, swales, catch basins, and dry wells each serve unique purposes in controlling water flow around your pit.
When you're dealing with surface runoff, consider installing a berm – a small vegetated hill that redirects water away from critical areas.
Swales offer another solution by creating shallow depressions that follow the land's natural contour, using rocks to slow water flow and enhance soil absorption.
- Install catch basins at low spots to collect surface water and channel it through buried drainpipes to a suitable outlet.
- Build dry wells filled with gravel to capture and store water until it naturally infiltrates into permeable soil layers.
- Combine methods by using grassy swales to direct water toward catch basins or dry wells for maximum effectiveness.
You can enhance these systems by adding vegetation to berms, using landscaping blankets in swales, and ensuring proper fabric lining in dry wells.
Remember to position these features strategically based on your property's natural slope and drainage patterns.
Temperature Control Mechanisms
Beyond managing surface water, maintaining ideal temperature in earthen pits requires understanding multiple heat exchange mechanisms. You'll need to take into account both conduction through the earth and evaporative cooling processes to effectively control temperatures. The earth's mass acts as a natural heat exchanger, but its effectiveness can diminish if thermal saturation occurs from high air flow or extreme temperature differences.
You can enhance temperature control by incorporating porous materials like clay that facilitate evaporative cooling. When these materials absorb water, the evaporation process naturally cools the surrounding air. To maximize this effect, you'll want to guarantee proper air circulation using strategically placed fans, which help manage both temperature and humidity levels.
For best results, you'll need to carefully select and arrange your insulation materials. Place vapor control layers appropriately based on your climate – on the inboard side in cold conditions and the outboard side in hot conditions.
Monitor air flow rates carefully, as they affect both convection and heat transfer efficiency. Remember that excessive air flow can lead to thermal saturation, while insufficient flow might result in humidity buildup and potential condensation issues.
Frequently Asked Questions
How Long Does a Clay Pot Irrigation System Typically Last Before Replacement?
You'll need to replace your clay pot irrigation system when it loses water release efficiency, typically within 2-3 years. However, you can extend its life through regular maintenance like baking and cleaning.
Can Earthen Pits Be Effectively Waterproofed Without Using Synthetic Materials?
You can effectively waterproof earthen pits using natural materials like clay-lime plaster and black soap solutions. Mix local soil with clay, cow manure, and lime, then apply multiple coats for ideal water resistance.
What Are Signs That Moisture Levels in an Earthen Pit Are Dangerously High?
You'll notice soil compaction, waterlogged plants with yellowing leaves, leaks or seepage around pit edges, unstable pit walls, and reduced soil porosity. Watch for overflow risks after rain and signs of compromised pit integrity.
How Does Freezing Weather Affect the Structural Integrity of Earthen Pits?
When freezing occurs, you'll find your earthen pit's stability actually increases as the pore water freezes to ice. However, you'll need to watch for frost heave, which can cause unwanted lifting and structural stress.
Should Earthen Pits Be Completely Covered During Heavy Rainfall Periods?
Yes, you'll want to completely cover your earthen pits during heavy rainfall. It prevents water accumulation, reduces hydrostatic pressure, protects against soil erosion, and maintains the pit's structural integrity while keeping surrounding soil stable.
In Summary
You'll find that proper moisture control in earthen pits requires a balanced approach using all these techniques. By combining strategic clay pot placement, deep tillage, and natural drainage with proper compaction and barrier materials, you're creating an efficient system. Don't forget to monitor temperature and surface water regularly. When you've implemented these methods correctly, you'll maintain ideal moisture levels for your specific needs.


Leave a Reply