
Making perfect wild berry jam starts with careful foraging and proper identification of safe berries. You'll need to clean your harvest thoroughly in a vinegar-water solution, then sort out any damaged fruits. Next, prepare your berries by removing stems and leaves, then crush them gently. Mix in the right ratio of sugar and pectin based on your berries' natural sweetness and ripeness. Cook the mixture at a steady boil while stirring, then test for proper setting using the cold plate method. Once ready, pour into sterilized jars with proper headspace, process in a water bath, and store in a cool place. These essential steps will guide you toward jam-making mastery.
Foraging Fresh Wild Berries
Successfully foraging wild berries requires careful preparation and knowledge to guarantee both safety and sustainability. Before heading out, research local berry species and their identifying characteristics, and equip yourself with a reliable field guide or identification app. Wear sturdy shoes when foraging to protect your feet in rough terrain.
Don't forget to pack essential gear like collection baskets, protective gloves, and long-sleeved clothing.
When you're in the field, focus on identifying berries through their distinctive features. Look for key characteristics such as leaf arrangement, berry color, and plant structure. You'll find wild strawberries in sunny meadows, blueberries on acidic mountain slopes, and elderberries near stream edges.
Always distinguish between similar-looking species, as some can be toxic.
As you harvest, follow responsible foraging practices to protect both yourself and the environment. Never take more than 20% of berries from a single area, and use gentle picking techniques to avoid damaging the plants.
Rotate your harvesting locations to prevent overexploitation, and only pick fully ripe berries. Remember to check local regulations before foraging on public lands, and stay away from polluted areas or protected zones without proper permission.
Cleaning and Sorting Your Harvest
You'll need to start by carefully removing stems and leaves from your freshly picked wild berries.
The abundant rainfall this season has resulted in an exceptional berry harvest worth taking time to properly clean.
Next, wash your berries in a vinegar-water solution, gently agitating them to remove dirt, bugs, and debris.
Finally, sort through your cleaned berries to separate the ripe, undamaged ones from any that are bruised, moldy, or underripe.
Remove Stems and Leaves
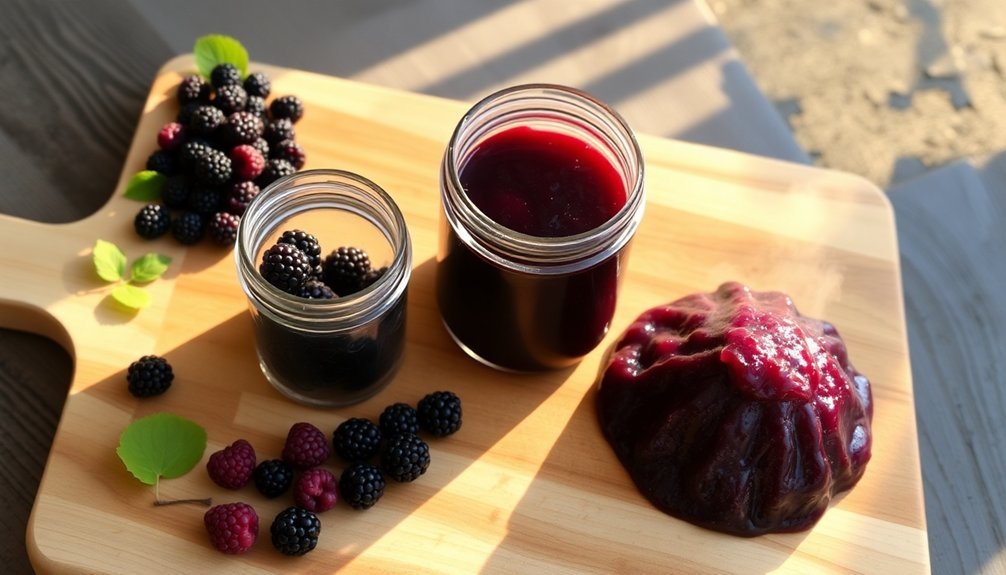
The cleanliness of your wild berries sets the foundation for exceptional jam. You'll need to meticulously remove stems, leaves, and any moldy pieces before proceeding. Inspect each berry carefully under good lighting, discarding those that show signs of rot or damage. For best results with salmonberries, look for fruits ranging from light orange to deep purple in color.
Don't forget to check for bugs and other small contaminants that might compromise your jam's quality.
Set up your workspace with the right tools before you begin. You'll want a potato masher, fine mesh sieve, and clean gloves nearby. Use a cutting board or sanitized surface to sort through your berries, keeping a compost bin close for discarded materials.
If you're dealing with particularly small debris, a magnifying glass can help guarantee thorough cleaning.
Once you've removed all debris, organize your cleaned berries by measuring and transferring them to your cooking vessel. Spread them evenly to prepare for the next steps in your jam-making process.
Keep freshly cleaned batches separate from new ones to maintain cleanliness. If you're working with multiple varieties, label your containers clearly with the type and quantity of berries to stay organized.
Wash Berries Thoroughly
With your berries now free of stems and leaves, proper washing becomes the next key step in creating exceptional wild berry jam.
You'll want to time this step carefully, washing your berries just before you're ready to start cooking to prevent excess moisture and potential mold growth.
Begin by preparing a vinegar solution using 3 parts water to 1 part vinegar, which will effectively eliminate bacteria and pathogens.
If you're concerned about pesticides, you can alternatively use a saltwater bath by mixing 1 teaspoon of salt per cup of warm water – just remember to let it cool before adding your berries.
Place your berries in a colander and dip them into your chosen cleaning solution.
Follow this with a cold water rinse to guarantee all cleaning agents are removed.
You'll need to handle delicate varieties like raspberries and blackberries with extra care during this process.
After washing, pat the berries dry thoroughly with paper towels.
If you're not making your jam immediately, spread the berries on a paper towel-lined tray and let them air dry in the refrigerator for 1-2 hours to remove any remaining moisture before proceeding with your jam-making process.
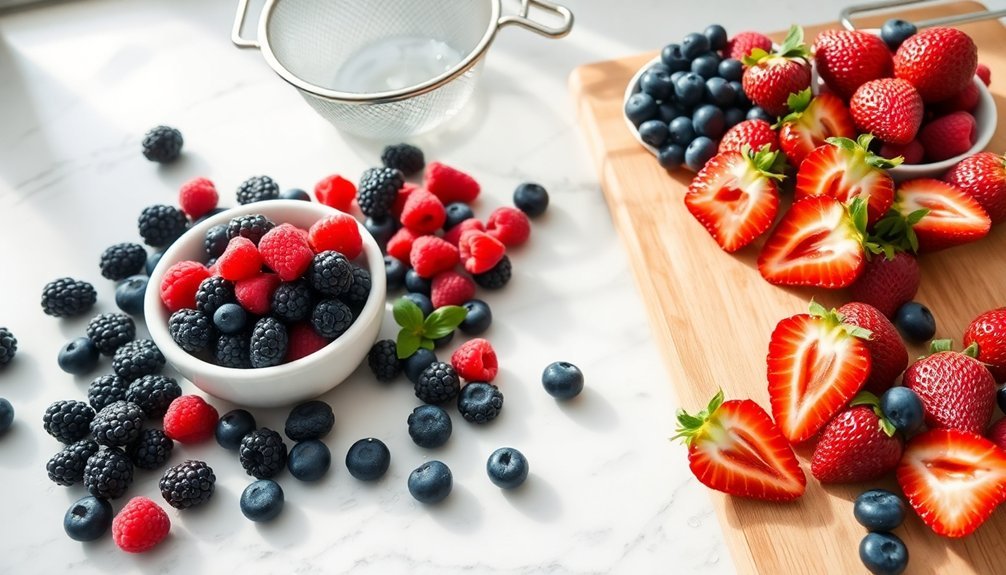
Sort Good From Bad
Prior to starting your jam-making process, sorting through your freshly harvested berries becomes crucial for achieving the ideal consistency and flavor. You'll want to examine each berry carefully, looking for the perfect balance of ripeness while removing any that could compromise your jam's quality.
When sorting your berries, aim for a mix of ripeness levels to achieve maximum pectin content and flavor balance. Select berries that display vibrant colors and firm texture, while discarding any that show signs of mold, excessive softness, or wrinkles. Remember that overripe berries can lead to unwanted flavors and textures in your final product.
- Remove soft, wrinkled, or damaged berries immediately to prevent spoilage
- Sort berries by size to guarantee even cooking throughout
- Discard any berries showing signs of mold or rot
- Keep a mix of slightly under-ripe and ripe berries for balanced flavor
- Remove stems, leaves, and debris before proceeding
After sorting, handle your selected berries gently to prevent bruising. You'll want to store them properly in the refrigerator until you're ready to begin cooking.
If you're combining different berry varieties, now's the time to create your preferred mix for a more complex flavor profile.
Preparing Berries for Cooking
Before diving into jam-making, proper berry preparation guarantees your final product will have the best flavor and consistency. Start by washing your berries thoroughly in cold water to remove any dirt or debris. Be gentle during this process to prevent damaging the delicate fruit, and drain them carefully once clean.
Once washed, spread your berries in a single layer on a baking sheet or plate lined with paper towels or tea towels. This prevents them from becoming soggy while you're preparing them.
Next, examine each berry carefully, removing stems, leaves, and any fruit that shows signs of mold or spoilage. If you're using strawberries, don't forget to hull them and remove the tough part below the stem.
When it's time to process the berries, you'll either mash them for measurement or keep them whole, depending on your recipe's requirements. For strawberries, quarter them to guarantee even cooking.
If you're mashing, do so after washing and picking them over to get an accurate measurement. Store your prepared berries in the refrigerator if you're not using them immediately, but remember that using them soon after purchase yields the best results.
Measuring Sugar and Pectin
Now that your berries are clean and prepped, precise measurements of sugar and pectin will determine your jam's success. For traditional recipes, you'll need 6 cups of sugar for every 9 cups of mashed berries, though this ratio can change if you're using jam sugar.
The timing of sugar addition is vital – add it at the right moment to prevent fruit breakdown and guarantee proper setting.
Understanding your fruit's natural pectin content will guide your measurements. While blackberries contain higher pectin levels, strawberries might need additional pectin for proper gelling. If you're using commercial pectin or jam sugar, follow the package instructions carefully, as these products often combine sugar and pectin in specific ratios.
- Use granulated white sugar for traditional recipes or jam sugar for easier setting
- Maintain proper sugar-to-fruit ratios (6:9 for traditional, 1:1 for jam sugar)
- Add sugar at the recommended time to prevent mushy fruit
- Test fruit's natural pectin content before adding commercial pectin
- Balance sugar, pectin, and acid levels for ideal gelling
Measure precisely – reducing sugar or miscalculating pectin can result in runny jam or improper setting.
Remember to stir frequently after adding sugar to prevent burning.
The Perfect Berry Sugar Balance

Achieving the perfect berry-to-sugar balance requires understanding your chosen berries' natural characteristics. When you're working with sweet, ripe berries, you'll need less sugar, typically following a 3:1 ratio of berries to sugar.
However, if you're using tart or underripe berries, you'll want to adjust this ratio by adding more sugar to achieve the right flavor balance.
You can create a more complex flavor profile by mixing different berry varieties. For instance, combine strawberries, raspberries, and blackberries for a balanced taste, or add blueberries to increase pectin content without darkening your jam.
Remember that riper berries contain less pectin but offer more natural sweetness, while tart berries might need extra sugar to compensate.
Don't forget to incorporate lemon juice – about two tablespoons will suffice. It's not just for flavor; it helps develop pectin and guarantees food safety, especially if you're planning to can your jam.
As you cook, taste-test your mixture and adjust the sweetness accordingly. If you're using frozen berries, you may need to modify your sugar ratios slightly, as freezing can affect their natural sweetness.
Mastering the Cooking Process
You'll need to control your heat carefully throughout the cooking process, keeping the mixture at a steady rolling boil without letting it bubble over.
Watch for key setting signs like thickened texture and reduced foaming while testing frequently with the frozen plate method.
Your total boiling time will vary based on the berries' natural pectin content, but expect to cook the mixture for 15-25 minutes until it reaches the proper gel stage.
Heat Control Basics
Successful jam-making hinges on precise heat control throughout the cooking process.
You'll start by heating your berry and lemon juice mixture over medium to medium-high heat until it reaches a boil. Once boiling, reduce the heat to maintain a gentle simmer that allows the berries to release their juices and break down naturally.
When you add sugar, lower the heat to prevent burning. Stir continuously until the sugar dissolves completely, then increase the heat gradually to return to a controlled boil.
You'll need to adjust your heat settings frequently during the 15-50 minute cooking period to maintain the right consistency and prevent overflow.
- Keep heat at medium-low when dissolving sugar to prevent crystallization
- Maintain a gentle boil during the initial berry breakdown phase
- Adjust heat settings gradually to avoid sudden temperature changes
- Monitor the pot's edges for signs of scorching or burning
- Reduce heat immediately if the mixture starts to foam excessively
Remember to lower the heat when adding final flavorings like vanilla or herbs near the end of cooking.
Your goal is to maintain steady, even heat that promotes proper gel formation without scorching your jam.
Watch for Setting Signs
Now that you've mastered heat control, recognizing when your jam has reached its setting point becomes your next challenge. You'll need to monitor multiple signs to achieve the perfect consistency.
Start by tracking the temperature with a digital thermometer, aiming for 220°F as your target. Remember that altitude affects the setting point, so test your water's boiling point first and add 8-9 degrees to determine your ideal temperature.
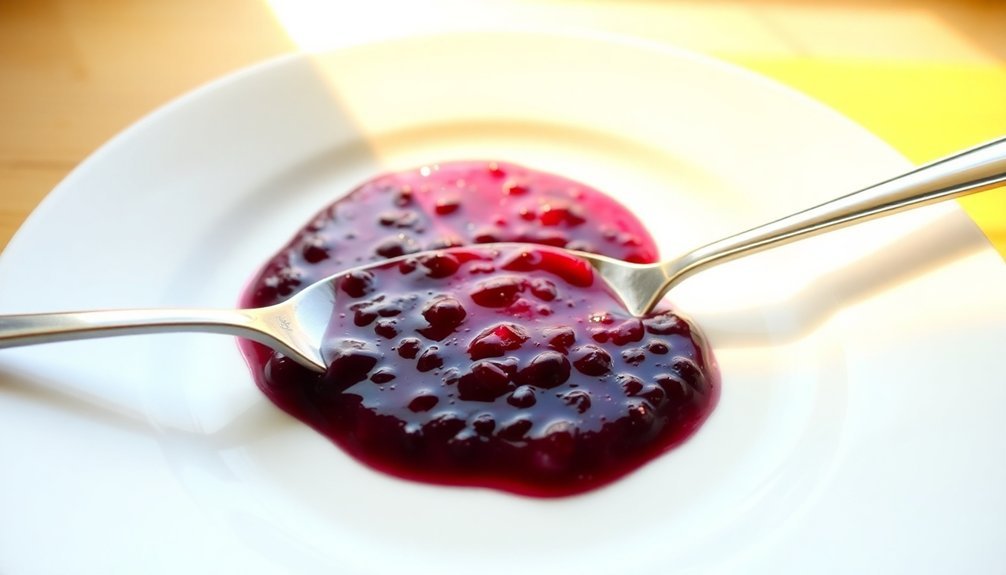
While cooking, perform the plate test by dropping a small amount of jam onto a pre-chilled plate. If it forms a skin and holds a line when you draw through it, you're there.
The sheet test offers another reliable indicator – lift your spoon high above the pot and watch how the jam falls. It should form a thick sheet rather than runny drops.
Keep an eye on visual cues as well. Your jam will thicken noticeably, coating the pot's sides and reducing by at least a third in volume.
Watch for changes in bubble behavior and notice how the jam's droplets become slower and thicker when falling from your spoon. When these signs align, your jam's ready for jarring.
Timing Your Boil Length
During the critical cooking phase, mastering your jam's boil length makes the difference between runny syrup and rubber-like preserves. You'll need to adjust your cooking time based on the types of berries you're using. High-pectin fruits like blackberries and gooseberries require just 5-10 minutes of boiling, while low-pectin varieties such as strawberries and blueberries need 20-30 minutes to reach the proper consistency.
Start by bringing your berry mixture to a boil over medium-high heat, then reduce to a simmer to prevent scorching. Remember to account for your elevation – at sea level, you're aiming for 220°F (104°C), but you'll need to subtract one degree for every 500 feet above sea level.
- Use a deep pot to handle foaming and expansion
- Stir frequently to prevent sticking and guarantee even cooking
- Monitor temperature with a candy thermometer
- Adjust timing for mixed berry combinations (10-15 minutes average)
- Watch for proper consistency while maintaining a steady simmer
Once you've reached the appropriate boiling time, remove the pot from heat and prepare for the canning process, letting it cool slightly before filling your sterilized jars.
Testing for Proper Set
You can also try the sheet test by lifting your stirring spoon above the pot.
If the drops are runny like rain, keep cooking. When the jam forms a thick sheet that hangs together, it's ready.
Remember to turn off the heat while testing to prevent overcooking, and don't hesitate to test multiple times.
Different berries may require varying cooking times, so be patient and thorough with your testing method.
Sterilizing Your Canning Equipment
Before filling your jars with perfectly set jam, proper sterilization of your canning equipment will guarantee your wild berry preserves stay fresh and safe. Start by washing all your mason jars and lids thoroughly with hot, soapy water.
Don't dry them after washing – keep them wet until you're ready for the sterilization process.
Place your clean jars right-side up on the rack in your boiling-water canner. Fill both the canner and jars with hot water until it's one inch above the jar tops. Bring the water to a boil and process for 10 minutes if you're below 1,000 feet elevation. For higher elevations, add one minute for each additional 1,000 feet.
While the jars are sterilizing, prepare your lids by boiling them separately for 5 minutes.
- Use a jar lifter or tongs to remove hot jars – avoid using oven mitts
- Keep the hot sterilization water for processing your filled jars later
- Don't towel dry the sterilized jars to prevent contamination
- Ascertain all equipment is free from dust and debris before starting
- If your processing time will be less than 10 minutes, sterilization is mandatory
Filling and Processing Jars
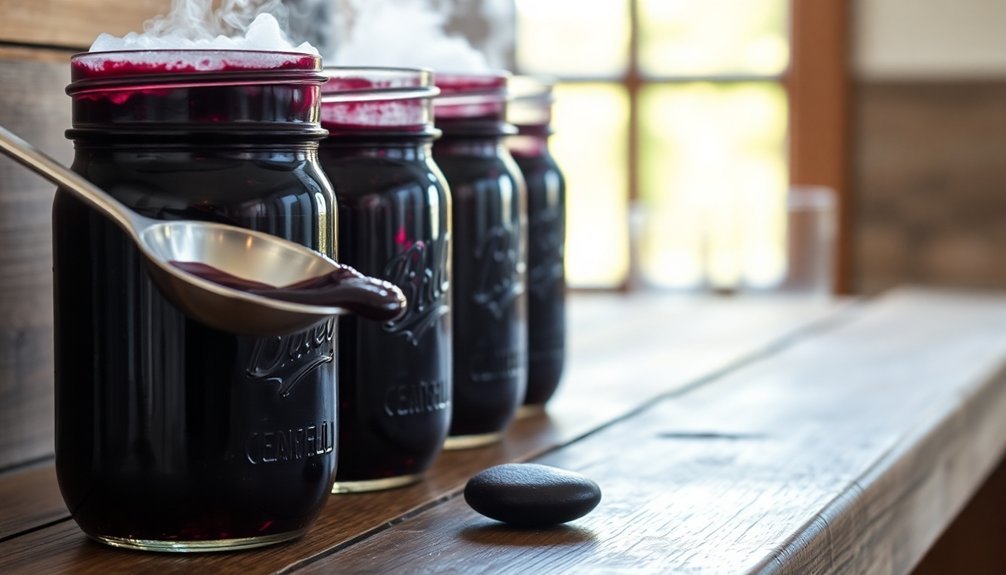
Before you begin filling your sterilized jars, wipe each rim with a clean, damp cloth to guarantee there's no residue that could prevent proper sealing.
You'll need to leave precisely 1/4 inch of headspace at the top of each jar when adding your hot jam, which you can measure using the canning funnel's edge as a guide.
Once filled, secure the lids firmly but not overly tight, screwing the bands to "finger-tight" to allow proper venting during processing.
Clean Jars Before Filling
The process of cleaning and sterilizing jars is critical for safe jam preservation. Before you begin, examine each jar carefully for chips or cracks that could compromise your preserves.
Start by washing your jars thoroughly in hot, soapy water, then rinse them under hot tap water. If you've got a dishwasher with a sterilization cycle, that's an excellent alternative to manual washing.
Once your jars are clean, you'll need to sterilize them properly. Fill each jar with boiling water from your kettle, or place them in a boiling water canner for a more thorough sterilization.
Don't forget to sterilize the lids and rings separately in a small saucepan of boiling water. Keep everything hot until you're ready to fill the jars with jam to prevent thermal shock and cracking.
- Check jars for defects and damage before beginning
- Wash jars thoroughly with hot, soapy water and rinse well
- Sterilize jars using boiling water or canner method
- Keep sterilized jars hot until ready to fill
- Place lids and rings in separate pot of boiling water
Remember to wipe jar rims clean with a damp paper towel before applying the lids, and don't overtighten the bands when securing them.
Proper Headspace Measurement
Now that your jars are properly sterilized, accurate headspace measurement becomes your next essential focus. For your wild berry jam, you'll need to measure the space between the top of the product and the jar rim using either a dedicated headspace measuring tool or a clean ruler. This measurement is vital for ensuring your jam seals properly and maintains its quality during storage.
You'll want to fill each jar with your hot jam (maintaining temperature above 180°F) and measure the headspace before adding the lid. If you've added too much or too little jam, adjust the level immediately and re-measure.
Remember, incorrect headspace can lead to serious problems – too little space may cause the jam to bubble out during processing, while too much can result in discoloration and improper sealing.
Once you've achieved the correct headspace, wipe the jar rim clean to remove any sticky residue. Place the lid on firmly but don't overtighten the band – this allows air to escape during processing.
Transfer your filled jars to your preheated canner, ensuring they're properly positioned on the rack for adequate heat distribution during processing.
Secure Lids Firmly
Properly securing lids on your wild berry jam jars requires careful attention to both temperature and technique.
Before you begin sealing, keep your flat metal lids in hot, nearly boiling water to guarantee the sealing compound remains pliable. As you work with each jar, carefully inspect the rim and wipe it clean with a damp cloth to remove any sticky residue or food particles that could prevent a proper seal.
When you're ready to seal, remove a lid from the hot water and center it on your jar with the sealing compound facing down. Add the metal screw band and tighten it to "fingertip tight" – just enough to secure the lid without overtightening, which could prevent proper venting during processing.
Don't be tempted to retighten the bands after processing, as this could break the seal.
- Center hot lids on clean jar rims immediately after wiping
- Position sealing compound side down against the glass
- Secure metal bands with moderate "fingertip tight" pressure
- Avoid overtightening to allow proper venting during processing
- Leave bands at initial tightness after processing completes
Storing Your Finished Jam
Successfully storing wild berry jam depends on three main methods: refrigeration, freezing, or canning.
If you're planning to eat your jam within a month, refrigeration is your simplest option. Store it in 8 oz mason jars, and you'll get the best flavor during the first 10 days, though unopened jars can last up to three months. Remember that your jam might need 24-48 hours to fully set in the fridge.
For longer storage, you can freeze your jam in proper containers with 1/4 inch headspace, where it'll keep well for up to 12 months. When you're ready to use it, thaw it overnight in your refrigerator.
If you prefer room temperature storage, canning is your best choice, offering up to 18 months of shelf life. Process your sterilized jars in a boiling water bath for about 10 minutes, adjusting for your altitude.
Whatever method you choose, always use clean, sterilized equipment and properly seal your containers.
Label and date each jar, and store canned versions in a cool, dark place. For refrigerated jars, you'll want to use them within three weeks of opening for the freshest taste.
Frequently Asked Questions
Can I Use Honey or Artificial Sweeteners Instead of Sugar?
Yes, you can use both honey and artificial sweeteners instead of sugar. You'll need less honey since it's naturally sweeter, and if you're using artificial sweeteners, make sure to pair them with no-sugar pectin for proper setting.
What Happens if I Accidentally Add Too Much Pectin?
If you add too much pectin, your jam will become overly thick and gel-like. It'll affect the texture and flavor, but you can fix it by adding more fruit or mixing it with a less-pectinated batch.
Why Did My Jam Develop Crystals After a Few Months?
Your jam likely developed crystals because you've used too much sugar, didn't dissolve it completely during cooking, or stored it in fluctuating temperatures. These conditions can trigger sugar crystallization over time in your preserves.
Can I Reprocess Jam That Didn't Seal Properly?
Yes, you can reprocess unsealed jam. You'll need to reheat it, add fresh pectin and sugar, then fill clean jars with new lids. Process them again in a boiling water bath for safety.
How Do I Fix Jam That Turned Out Too Runny?
You can fix runny jam by recooking it with additional pectin and sugar. For every 4 cups of jam, add 1/4 cup sugar and 1 tablespoon pectin, then boil until thickened.
In Summary
You'll find wild berry jam-making is a rewarding blend of tradition and creativity once you've mastered these essential steps. Whether you're picking blackberries, raspberries, or a mix of wild fruits, you've now got the knowledge to create perfect preserves every time. Store your jars in a cool, dark place and you'll enjoy the taste of summer throughout the year ahead.


Leave a Reply