You'll find seven effective off-grid storage methods for preserving your harvest without electricity. Start with simple bucket and trash can storage using straw mulch and proper drainage, or create an under-porch system with ventilation pipes. Consider building with earthbags for a permanent solution, or convert your crawlspace into a cool storage area. Your basement's north corner can become an efficient root cellar, while the sand and cooler method offers a portable option. For larger needs, try a buried chest freezer converted into underground storage. These time-tested solutions will transform how you approach food preservation and self-sufficiency.
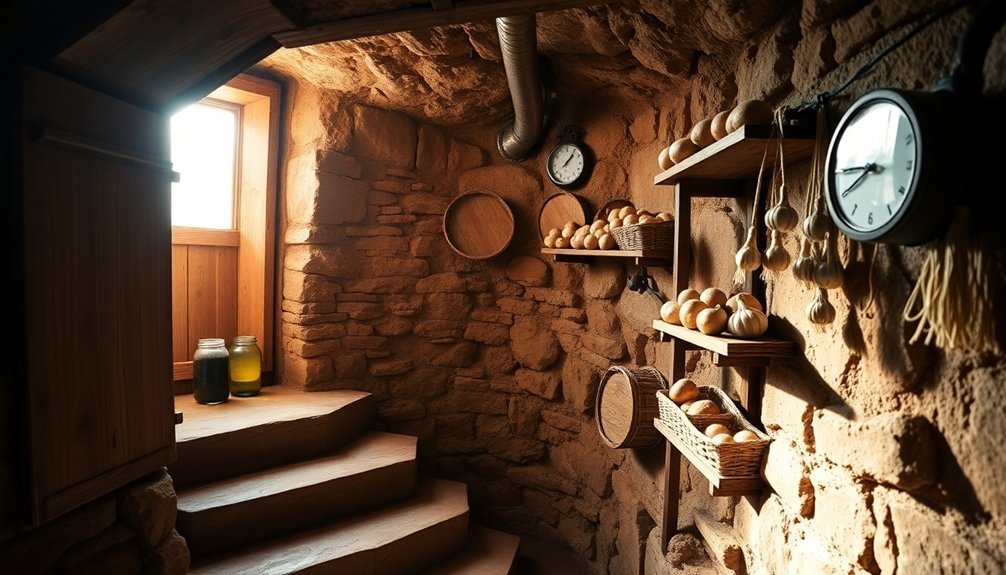
Bucket and Trash Can Storage
Many homesteaders and off-grid enthusiasts have discovered that bucket and trash can storage offers a practical, cost-effective solution for preserving vegetables without electricity.
You'll need to start by selecting an ideal location on the north side of your house or in a shaded area where temperatures remain cool and stable. Sustainable food storage can significantly reduce your reliance on modern refrigeration methods.
To create your storage system, drill drainage holes in your bucket or trash can, then dig a hole slightly larger than your container. Line the bottom with straw mulch for insulation, and once you've placed your container, pack more straw around the sides.
You'll want to surround the top with stones to help with drainage and prevent water accumulation.
When storing your vegetables, don't wash them first – this helps maintain their natural moisture. Layer your produce with hay or straw for insulation, keeping potatoes in darkness to prevent sprouting.
You can store root vegetables like carrots, beets, and turnips together, while alliums such as onions and garlic need drier conditions.
Monitor the temperature to maintain it between 32-40°F with 80-90% humidity for best preservation. This method works particularly well for root vegetables, cabbages, and fermented foods.
Building With Earthbags
You'll need polypropylene bags, barbed wire, and moistened soil to start your earthbag construction project, keeping costs remarkably low compared to traditional building methods.
The filling process requires consistent measurement of soil per bag and careful stitching with wire to maintain uniformity, while stacking demands precise placement with two strands of barbed wire between courses for stability. This technique has proven to deliver superior thermal efficiency compared to standard brick construction.
Working systematically from the foundation up, you can save money by sourcing local materials and turning bags inside out for upper courses to create smoother walls.
Fill and Stack Process
Building an earthbag structure requires a methodical fill and stack process that begins with proper foundation preparation. You'll need to dig a trench down to mineral subsoil, fill it with stone or gravel, and start with doubled woven bags filled with gravel for your base courses. A sheetmetal slider helps position each new course without damaging the bags below.
Fill each bag to about 90% capacity using a consistent number of buckets per bag to maintain uniform sizing. You'll want to sew the bags closed with 15-gauge wire, and for upper courses, turn earth-filled bags inside out to eliminate protruding corners.
When filling bags with soil, keep it slightly moist and tamp the contents after each bucket addition. Stack your bags in a running bond pattern, similar to bricklaying, offsetting each course by half a bag's width. Place two strands of 4-point barbed wire between courses to prevent slippage and resist outward pressure.
You'll need to temporarily secure the wire with bricks or stones as you work. Tamp each bag after placement, focusing on high points first. Check frequently to verify walls stay plumb and level, and repeat the tamping process multiple times to achieve solid, even walls throughout the structure.
Essential Material Requirements
The foundation of a successful earthbag project starts with gathering the right materials before your first bag touches the ground.
You'll need various sizes of gravel and rocks, starting with 2-4" river jacks for layering, ¾" river gravel for the foundation, and #2 river gravel for the first course of bags. Don't forget a 6-mm plastic moisture barrier to protect your structure's base.
For the bags themselves, choose polypropylene bags for their superior strength. You'll fill these with moist, compacted earth containing clay, though you can also use alternative materials like crushed volcanic stone or perlite for insulation.
Four-point, 12.5-gauge galvanized barbed wire is essential for securing the bags together, while rebar provides additional structural support.
Your finishing materials should include earthen plaster or cement stucco, reinforced with chicken wire for better adhesion. You'll also need baling twine to secure bag courses and treated 2×8 boards for the bond beam.
Don't overlook safety equipment – leather gloves and safety glasses are must-haves. For tools, a tamper is essential for properly compacting the earth mixture within each bag.
Cost-Saving Construction Tips
Smart planning and efficient construction methods can dramatically reduce the costs of your earthbag project. You'll find significant savings by eliminating the need for a conventional concrete foundation, instead opting for a simple rubble trench foundation with gravel or stones.
If you're building a dome structure, you can cut costs further by avoiding expensive roofing materials altogether.
To maximize efficiency, organize your workflow carefully. You'll want to pre-mix and pre-sift your materials, and consider using a cement mixer despite the initial investment – it'll save countless hours of manual labor.
With a small team, you can expect to place about 30 bags in 3.5 hours, so plan your timeline accordingly. Source local materials whenever possible, but factor in transportation costs to your budget.
Keep costs low by utilizing volunteer labor and free local materials where available. At roughly $16 per square foot, earthbag construction offers substantial savings compared to conventional building methods.
Remember to account for essential elements like plastic sheeting for moisture protection, barbed wire between layers, and rebar for structural support – these smaller expenses are vital for long-term stability and shouldn't be skipped to save money.
Under-Porch Storage Systems

Creating an under-porch storage system offers a practical solution for off-grid food preservation. You'll want to choose a shady location and install a hatch door in your porch floor for easy access.
Guarantee proper ventilation by drilling holes and installing PVC pipes to maintain consistent air circulation throughout the space.
Select storage containers that match your needs, such as 5-gallon buckets, wooden crates, or repurposed freezers. You can even bury old refrigerators under the porch for additional insulated storage.
Line your containers with straw or hay for insulation, and drill drainage holes to prevent moisture buildup.
You'll need to maintain specific environmental conditions for ideal food preservation. The earth's natural cooling properties help maintain stable temperatures, while ground contact provides necessary humidity.
Keep your storage area dark and regularly check ventilation systems to prevent mold growth.
Remember to store compatible produce together – don't mix apples with potatoes, as they can cause premature spoilage.
Use airtight containers to protect against pests and moisture, and inspect your stored items regularly to remove any spoiled produce that could affect the rest of your harvest.
Converting Your Crawlspace
Converting a home's crawlspace into a root cellar starts with thorough preparation and assessment.
You'll need to verify that your space is adequately sized and accessible, while checking for proper ventilation, insulation, and moisture levels. Before beginning, gather essential tools like shovels, buckets, concrete, and a power cutter.
Start by cutting through any obstructing walls and digging out the space to create a level floor.
You'll want to reinforce the walls and floor with concrete to guarantee structural integrity and moisture control. Install adjustable vents strategically to create a natural flow of cold air in and warm air out, maintaining temperatures just above freezing.
Your crawlspace cellar will need proper humidity control, typically between 80-90%, to keep produce fresh.
Install insulation using materials like foam board or straw bales to maintain stable temperatures. You'll need to manage seasonal changes by adjusting vents – closing them during winter to prevent freezing and opening them in fall to let cold air in.
Keep your converted space organized and clean, using appropriate storage mediums like peat moss or damp sand.
Check your stored items monthly and remove any spoiled produce promptly to maintain ideal preservation conditions.
Basement Storage Solutions

Basement cold storage offers a practical solution for preserving food without electricity. By converting a corner of your basement into a root cellar, you'll create an excellent environment for storing vegetables, fruits, and preserves throughout the year.
The key is selecting the right location – preferably a northern-facing exterior corner with high soil coverage on the outside.
To create an effective storage space, you'll need to focus on these essential elements:
- Insulation: Apply foam board insulation to walls and ceiling, protected by Block Bond or similar material.
- Ventilation: Install adjustable vents to maintain proper airflow and control humidity levels around 90%.
- Temperature control: Monitor conditions with a thermometer and hygrometer to maintain ideal storage conditions.
- Organization: Build humidity-resistant shelving to maximize space and separate produce types.
When constructing your basement storage area, use concrete blocks to section off the space, leaving room for insulation between the top of the walls and floor joists.
Consider creating separate compartments for different produce types, as various fruits and vegetables require different storage conditions.
Install an insulated metal door for easy access while maintaining temperature stability.
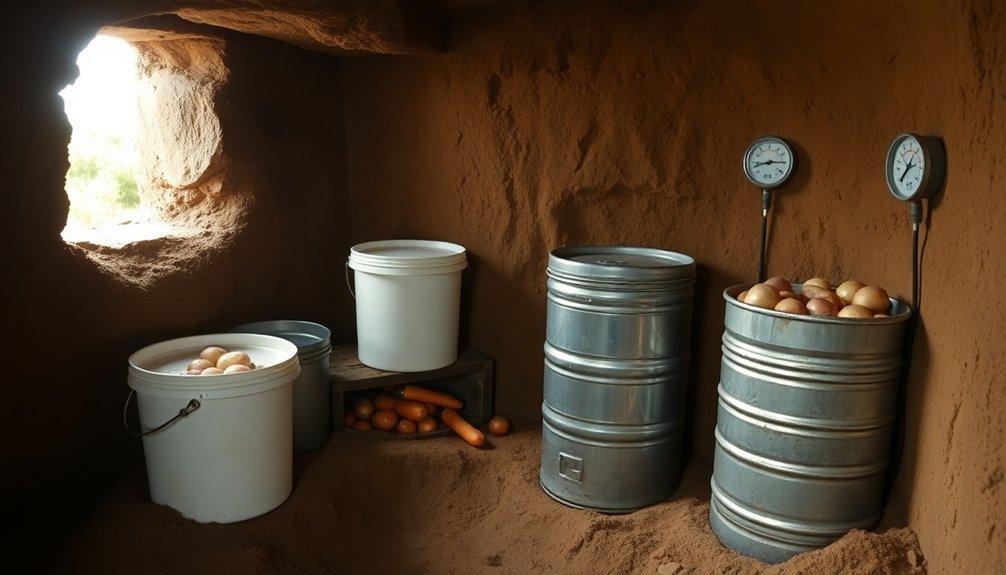
Sand and Cooler Method
You'll find remarkable success storing root vegetables by layering them in old coolers with damp sand, ensuring each vegetable has its own space to prevent moisture transfer and decay.
This method won't break your budget since you can use recycled coolers or inexpensive Rubbermaid containers, making it an economical choice for long-term food storage.
To maximize your storage success, alternate thin layers of slightly moistened sand with single layers of vegetables, maintaining about an inch of space between each piece of produce.
Layering Techniques For Success
Proper layering stands at the heart of successful sand storage, especially when using coolers or insulated containers to preserve root vegetables.
You'll need to start with slightly damp sand – not wet enough to clump, but moist enough to maintain humidity. Begin by removing all leafy tops from your vegetables, as these can accelerate spoilage and take up valuable space.
Create alternating layers, ensuring vegetables don't touch each other to prevent decay spread. You'll want to maintain consistent temperatures between 32-40°F and humidity levels of 85-95% for ideal preservation. Keep your storage container in a dark, cool area of your home, such as a mudroom or north-facing room.
For maximum success, follow these critical steps:
- Place a 2-inch base layer of damp sand at the bottom of your container.
- Arrange vegetables with about 1 inch of space between each item.
- Cover completely with another layer of sand, roughly 1 inch deep.
- Repeat the process until you're about 2 inches from the top.
Monitor your storage regularly, removing any spoiled items immediately.
Remember to maintain good ventilation while keeping the environment dark and checking moisture levels periodically.
Cost-Effective Storage Solutions
Two remarkably affordable storage methods combine sand and coolers to create an efficient preservation system for your harvest. The sand storage method requires just fine, washed play sand, containers, and basic materials like cardboard boxes or wooden crates.
You'll need to maintain temperatures between 32-40°F and relative humidity of 90-95% for root vegetables.
For the cooler method, you can repurpose old coolers or refrigerators by adding ventilation holes and PVC pipes. You'll either bury the cooler or place it in a cool, dark location like your garage or basement.
Both methods work exceptionally well for root vegetables such as carrots, beets, and parsnips, with storage lasting up to five months.
To implement either method, don't wash your produce before storage, and guarantee vegetables are mature and unblemished.
Layer them carefully in sand, maintaining space for air circulation. When using coolers, proper ventilation prevents moisture buildup.
Remember to keep apples separate from root vegetables, as they release ethylene gas.
These methods aren't only cost-effective but also require minimal maintenance once set up properly.
Buried Chest Storage

A repurposed chest freezer can serve as an effective underground storage solution for your off-grid food preservation needs.
You'll want to select a shady location on the north side of your house, guaranteeing proper drainage and stable soil conditions. Before installation, properly handle the freezer's compressor to prevent refrigerant leakage, and drill ventilation holes for earth contact.
When setting up your buried chest storage, follow these essential steps:
- Dig a hole slightly larger than the freezer dimensions, guaranteeing the final ground level will sit just below the top edge.
- Install ventilation pipes at two heights – one near the ground for cool air intake and another near the ceiling for warm air exhaust.
- Add gravel around the buried freezer for improved drainage, then backfill with soil.
- Create an insulated cover using natural materials like straw or hay, and disguise it with a pallet or appropriate covering.
You'll need to maintain proper humidity levels and keep different produce types separated to prevent unwanted ripening.
Don't wash vegetables before storage, and remember to monitor conditions regularly to guarantee your stored food remains fresh throughout the season.
Frequently Asked Questions
How Long Can Fresh Vegetables Typically Last in a Properly Maintained Root Cellar?
You'll find that properly stored root vegetables can last between 3-8 months in your root cellar. Potatoes stay fresh longest at 6-8 months, while carrots and parsnips last 4-6 months, and beets 3-4 months.
What Vegetables Should Never Be Stored Together in Root Cellar Systems?
You shouldn't store potatoes with onions, as they'll cause each other to spoil quickly. Keep ethylene-producing tomatoes and cucumbers away from sensitive vegetables, and separate strong-smelling cabbage from other produce.
Can Solar-Powered Ventilation Systems Be Effectively Used in Root Cellar Designs?
Yes, you'll find solar-powered ventilation highly effective for root cellars. It'll help control temperature, manage humidity, and improve air circulation while reducing energy costs and providing reliable off-grid temperature management year-round.
How Do You Prevent Mold Growth in Root Cellars During Humid Seasons?
You'll need to maintain proper airflow, remove spoiled produce quickly, keep your humidity below 95%, use moisture-absorbing materials like sawdust, and guarantee good ventilation through a two-vent system to prevent mold growth.
What Natural Pest Deterrents Work Best for Protecting Stored Produce?
You'll find peppermint oil on cotton balls, crushed cloves, and garlic are highly effective natural deterrents. Place these around your stored produce, and complement them with bay leaves to keep pests away.
In Summary
You'll find these seven storage methods invaluable for preserving food without electricity. Whether you choose the simplicity of bucket storage or commit to building an earthbag cellar, each option offers unique benefits for your off-grid lifestyle. Start with what works for your space and budget, then expand your storage capacity as needed. Remember, proper temperature and moisture control remain key to successful long-term food preservation.


Leave a Reply