Building an earth pit root cellar starts with selecting a cool, shaded north-facing location with good drainage. You'll need to dig at least 10 feet below ground, incorporating a gravel bed and French drain system. Gather essential materials like plastic sheeting, sandbags, and rebar before constructing foundation walls with concrete blocks or earthbags. Install proper ventilation by placing intake vents low and exhaust vents high for natural airflow. Don't forget to waterproof walls and maintain temperatures between 32-40°F (0-5°C). Understanding each construction phase will help you create an efficient food storage system that lasts for generations.
Choosing Your Root Cellar Site

Success in building a root cellar begins with selecting the perfect location. You'll need to find a spot that's cool, shaded, and away from direct sunlight to maintain temperatures between 32-40°F (0-5°C).
Choose higher ground that doesn't collect water after rainfall and isn't prone to flooding. If possible, build your cellar into a hillside to take advantage of natural insulation and stability. The site should be at least 10 feet underground and below the frost line to guarantee consistent temperature control. Above-ground alternatives can work if you pile soil and rocks around the structure for insulation.
Before digging, verify there aren't any underground utilities in the area. Consider convenience when choosing your location. You'll want the cellar close enough to both your home and garden for easy access during harvest and throughout the year.
The path to your cellar should accommodate wheelbarrows and allow for smooth transport of produce. The ideal site should have soil that promotes good drainage while maintaining humidity levels of 85-95%.
Ascertain the ground can support proper structural integrity for the walls and foundation, as they'll need to bear the weight of the earth above. Avoid rocky areas if extensive digging is required.
Tools and Materials Needed
Now that you've selected the perfect site, gathering the right tools and materials will set you up for a smooth building process.
You'll need basic digging tools like shovels and a tamper, plus a 4-foot level to guarantee proper alignment. For cutting materials, you'll want a rebar cutter or reciprocating saw with a metal blade, and a small sledgehammer for driving stakes.
Your main construction materials include dirt with clay content, 6-mm plastic sheeting, and sandbags for the earthbag walls. Setting aside roughly 600 sandbags will ensure you have enough materials to complete your root cellar construction.
Four-pointed barbed wire and 3/8-inch rebar provide essential structural support between layers. If you're adding a wooden frame, get treated 2×8 boards along with a drill and 3-inch deck screws.
Don't forget the finishing materials: cement stucco or earthen plaster, plus chicken wire or mesh for reinforcement.
For safety and efficiency, you'll need leather gloves, safety glasses, and wire cutters. A bottomless bucket helps when filling sandbags, and you'll need water to achieve proper soil moisture content.
These materials guarantee your root cellar will be sturdy, weatherproof, and long-lasting.
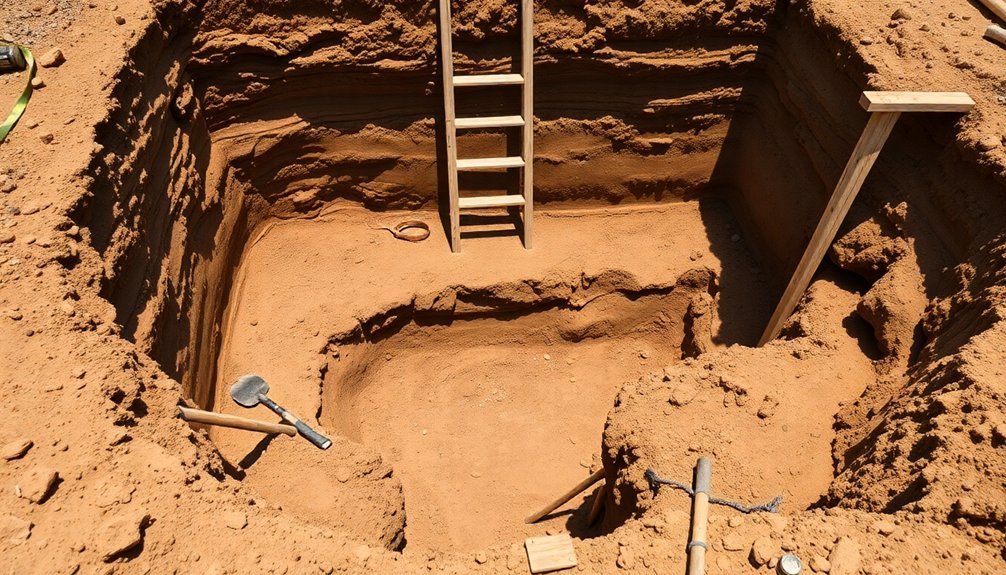
Ground Preparation and Excavation

Proper ground preparation and excavation lay the foundation for a successful root cellar. You'll want to select a shady location, preferably on the north side of your property, where drainage is good and the water table isn't an issue. Clear all vegetation and debris from your chosen site before beginning excavation. During initial digging, be aware that you may encounter groundwater at varying depths, as one project found groundwater at 55 inches deep.
Dig your cellar at least 6 feet deep, ensuring you're below the frost line for your area. You'll need to level the bottom surface completely and dig extra depth around the door area for additional protection. Remember to account for drainage by incorporating a gravel bed and perforated drainpipe system.
| Task | Purpose | Key Consideration |
|---|---|---|
| Site Selection | Temperature Control | Choose north-facing, shaded area |
| Ground Clearing | Preparation | Remove all vegetation and debris |
| Excavation | Foundation | Dig below frost line, minimum 6 feet |
| Drainage Setup | Moisture Control | Install gravel bed and drainpipes |
As you backfill, tamp the soil firmly but gently, leaving 2-3 feet below the projected surface for proper drainage. Your cellar's floor should sit higher than the outside ground level to prevent water from flowing in. Install drain pipes that lead to daylight, ensuring water flows away from your structure.
Building Strong Foundation Walls
Strong foundation walls hold up your entire root cellar, making this phase essential to the structure's longevity. Start by digging your footer trench at least 46 inches deep to extend below the frost line. Create forms using 2-by-8 lumber and pour a 16-inch-wide concrete footer. Insert reinforcing rods while the concrete's wet, then allow it to cure for 3-7 days.
Choose your wall material based on your needs: concrete blocks, poured concrete, or earthbags. If you're using concrete blocks, plan your layout in 8-inch increments. For poured walls, install horizontal rebar every foot and vertical rebar every 2 feet.
With earthbag construction, fill bags with moistened dirt and secure them with barbed wire and rebar. Design your walls with 45-degree angle extensions or arches to distribute weight evenly. Don't forget to extend the walls above the entrance for added protection.
Apply a waterproof barrier to block walls to prevent seepage. Cap your walls with a bond beam, and reinforce corners with additional rebar that bends around the angles. Finally, apply a layer of concrete and stones over arches and corners for maximum stability.
Drainage System Installation

After securing your foundation walls, an effective drainage system will protect your root cellar from water damage and maintain ideal storage conditions.
Install a French drain system around the exterior walls, laying perforated drainpipe on a gravel bed that slopes away from the structure. Cover the pipe with heavy roofing paper or 6-mil plastic sheeting to prevent silt clogging.
For interior drainage, guarantee your cellar floor sits higher than the outside soil level. Use crushed stone or dirt flooring instead of concrete, and install floor drains that connect to daylight. Layer plastic sheeting over the gravel floor to control rising moisture.
Waterproof your walls inside and out with tar or specialized compounds. Place your foundation footers below the frost line and backfill with tamped soil. Add gravel at ground level around the foundation for enhanced drainage.
Don't forget to install rain gutters on your topside structure and design your roof to prevent water pooling. Cover rigid roof insulation with polyethylene sheeting and plant grass to control runoff.
You'll need to inspect and maintain your drainage system regularly to guarantee it's working properly.
Ventilation and Temperature Control
You'll discover that proper ventilation in your root cellar relies on the simple principle of cool air sinking and warm air rising, which creates a natural flow when you position intake vents low and exhaust vents high.
For best performance, you'll want to place your vents on opposite walls, using 4-inch ductwork to guarantee efficient air movement throughout the space.
During different seasons, you can adjust your cellar's temperature by opening vents at night to capture cool air and sealing them during warmer periods, while maintaining the ideal storage range between 32°F and 40°F.
Natural Air Flow Basics
Effective natural airflow relies on two fundamental principles: the movement of cool air downward and warm air upward. You'll need to position your air intake vent near the floor and your outlet vent close to the ceiling to maximize this natural flow. This dual-vent system creates a continuous circulation that's essential for your root cellar's success.
When you're planning your vent placement, remember that cool air will naturally sink to the bottom of your cellar while warm air rises to exit through the upper vent. This movement helps control both temperature and humidity levels, preventing the buildup of ethylene gas and vegetable odors that can affect your stored foods.
You'll want to monitor the temperature variations within your cellar, as the area near the ceiling will naturally be warmer than the floor area. Place thermometers at different heights to track these variations.
During warmer months, you can enhance the natural airflow by borrowing cold air from nighttime temperatures. The small size of your cellar will make it easier to maintain consistent airflow patterns, helping you achieve the ideal storage conditions of 32-40°F for long-term storage.
Optimal Vent Placement Guide
Proper vent placement stands as the cornerstone of a well-functioning root cellar's ventilation system. You'll need to install your inlet vents low to the ground and outlet vents high up near the ceiling, creating a natural flow that draws cool air in while pushing warm air out.
| Vent Type | Placement | Purpose |
|---|---|---|
| Inlet | Floor level | Draws in cool air |
| Outlet | Ceiling level | Expels warm air |
| Vertical Stack | Through roof | Maximizes airflow |
| Horizontal | Opposing walls | Alternative solution |
For best results, you'll want to position your vents on opposite sides of the cellar. Vertical ventilation through the ceiling offers the best performance, but if that's not possible, you can install horizontal vents on opposing walls. Your inlet vent should capture cool air that naturally sinks, while your outlet vent releases rising warm air.
You can enhance your system's efficiency by adding controls that open vents at night to capture cooler air and close them during the day. In dry climates, you'll need to monitor humidity levels, as increased ventilation might require additional moisture control through porous materials and water systems.
Seasonal Temperature Adjustments
Managing seasonal temperature shifts in your root cellar requires strategic adjustments throughout the year.
You'll need to adapt your ventilation and cooling methods as seasons change to maintain ideal storage conditions. During spring, open your vents at night to capture cooler air, and close them in the morning to trap that coolness inside.
In fall, focus on insulating walls and sealing gaps to prevent cold air infiltration while maintaining proper humidity levels.
Temperature control is essential for preserving your stored produce. You'll want to keep the environment above freezing but cool enough to prevent spoilage. The natural soil temperature at 4ft deep (around 40°F) provides a stable foundation, but you'll need additional measures during extreme weather.
- Implement night cooling by opening vents after sunset and closing them at dawn
- Use ice blocks or cold water containers during warm spells, filling roughly one-third of your cellar's volume
- Monitor temperatures in different areas using multiple thermometers
- Adjust vent openings based on the temperature difference between inside and outside
Remember to check insulation regularly and maintain humidity levels between 85-95% for ideal storage conditions.
Move produce away from vents during extreme temperature swings to prevent freezing or overheating.
Sealing and Final Construction Steps

The success of your root cellar hinges on thorough sealing and precise final construction steps. Start by applying DryLok or similar waterproof coating to your interior walls, guaranteeing complete coverage to prevent water infiltration. Install rain gutters above to redirect water away from your cellar's exterior walls.
| Component | Action | Purpose |
|---|---|---|
| Floor | Lay gravel, compact with sand | Promotes drainage, stability |
| Walls | Apply waterproof coating | Prevents water infiltration |
| Ventilation | Install PVC pipes with screens | Maintains air circulation |
| Door | Add insulated door with seals | Controls temperature/humidity |
You'll need to place plastic sheeting over your compacted gravel floor to prevent ground moisture from rising. Build custom shelves using furring strips, making sure they're positioned to allow proper air circulation around stored items. Don't forget to seal all vents and doors properly, using weather stripping and appropriate sealants.
For final touches, install your ventilation system with screened pipes and bends to prevent water entry while allowing air flow. Add a powered fan if needed, and set up your temperature and humidity monitoring system. Regular maintenance checks will guarantee your root cellar maintains ideal storage conditions year-round.
Frequently Asked Questions
How Long Can Different Types of Vegetables Last in a Root Cellar?
You'll find your vegetables can last varying periods: root veggies like carrots and beets stay fresh 5-6 months, onions and garlic up to 9 months, while potatoes and sweet potatoes store well for 6-9 months.
Can I Store Canned Goods and Preserves Alongside Fresh Produce?
You can store canned goods with fresh produce, but you'll need separate zones to manage different temperature and humidity needs. Keep canned items slightly warmer and drier than your fresh vegetables.
What's the Ideal Distance Between a Root Cellar and House Plumbing?
You'll want to keep your root cellar at least 10 feet from house plumbing to prevent freezing pipes and moisture issues. It's also wise to stay clear of septic lines and water mains.
How Do I Prevent Rodents and Insects From Entering My Root Cellar?
You'll need to seal all entry points, use natural deterrents like peppermint oil and bay leaves, keep your cellar clean and dry, and store food in metal containers with tight-fitting lids to prevent pest invasions.
Should I Install Electrical Lighting in My Root Cellar?
Yes, you'll want electrical lighting in your root cellar for safety and convenience. Install moisture-resistant LED lights with a GFI outlet, or consider solar-powered options. Motion sensors help conserve energy while providing visibility.
In Summary
You've now got all the steps to build a functional earth pit root cellar. With proper drainage, ventilation, and sealing, you'll have an efficient storage space that maintains ideal temperature and humidity levels year-round. Remember to check your local building codes and get necessary permits before starting. Once completed, you'll enjoy fresh produce storage through winter and reduce your dependence on modern refrigeration.


Leave a Reply