Spring houses were nature's refrigerators before modern cooling technology. You'll find these stone structures built over natural springs, where settlers used flowing water's constant 50°F temperature to keep food fresh. They'd place milk, butter, and other perishables in shallow channels or on stone shelves while the cool water circulated below. The thick stone walls added extra insulation, maintaining steady temperatures year-round for dairy processing and food storage. Many settlers even built their spring houses before their main homes, proving how essential these structures were for survival. The clever engineering behind these natural cooling systems holds fascinating lessons about sustainable preservation methods.
Origins of Early Spring Houses

Why did early settlers prioritize natural springs when choosing where to build their homes? The answer lies in their critical need for a reliable, year-round water source. When you consider that wells hadn't yet become common, you'll understand why springs were so valuable for early settlement decisions.
Natural springs offered settlers the perfect combination of clean, running water and natural cooling properties. You'd find these springs producing a constant flow of fresh water that remained cool throughout the year, making them ideal for both immediate use and food storage purposes. These natural water sources maintained a consistent temperature around 50°F. Before the advent of modern refrigeration, you couldn't preserve perishable foods without a consistent cooling method.
Once settlers located a suitable spring, they'd carefully plan their entire homestead around it. You'll notice that spring houses were often the first structures built, even before the main house or barn. This strategic placement wasn't just about convenience – it was vital for protecting the water source from contamination.
The spring's location would ultimately determine where you'd position your home, livestock areas, and other farm buildings to guarantee the water remained pure for drinking, cooking, and preserving food.
Stone and Brick Construction Methods
When building a spring house, you'll need to start with a robust foundation using either stone or brick, typically creating a stemwall that's anchored securely into the ground.
You'll want to mix your mortar to the proper consistency and apply it evenly between your chosen materials, ensuring each stone or brick is firmly set. Installing a drain rock trench beneath the foundation perimeter helps manage groundwater and prevent moisture issues.
The joints between materials must be carefully filled and smoothed to prevent water infiltration and maintain structural integrity, while allowing for proper drainage where needed.
Building Sturdy Foundations
Building a spring house starts with careful site preparation and a solid foundation that can stand up to constant moisture.
You'll need to begin with thorough soil testing to determine the ground's composition and water table level, which will guide your foundation choices. After testing, excavate the site to your planned specifications and compact the soil thoroughly to prevent future settlement issues.
For the foundation itself, you'll want to use materials that can withstand constant dampness. Stone and brick are your best options, as wood will quickly deteriorate in these conditions. Consulting with a geotechnical engineer for proper soil analysis will ensure your foundation design meets site-specific requirements.
Install a proper drainage system using perforated pipes and gravel beds to manage water flow. You'll need to grade the surrounding land to guarantee water runs away from the structure while protecting your water source.
When constructing the foundation, start by installing sturdy formwork and reinforcement bars. Layer your stone or brick carefully with appropriate mortar, guaranteeing each course is level and properly bonded.
Don't forget to incorporate a water channel with gravel and a small collection pool to manage spring flow. These elements work together to create a foundation that'll support your spring house while managing moisture effectively.
Mortar and Joint Techniques
A spring house's durability hinges on proper mortar selection and joint techniques during stone and brick construction. You'll want to use cement-lime mortars for their proven reliability, guaranteeing you mix the proper cement:lime:sand ratios for peak strength.
In cold weather conditions, store your materials in a warm, dry place and pre-warm your bricks to maintain temperatures above 4°C during construction.
For water resistance, which is vital in a spring house, you'll achieve the best results with concave joints. These joints, created with a curved steel tool, provide superior protection against water penetration.
If you're working with mixed masonry, combining stones and bricks, pay special attention to your joint consistency and mortar application thickness.
You can enhance your mortar's performance by considering newer options like nanomaterial-enhanced mixtures for enhanced strength or polyurethane mortars for better moisture resistance.
When applying the mortar, keep your layers thin to guarantee proper adhesion, especially in cooler temperatures.
Remember that your choice of joint technique and mortar color will greatly impact both the structure's water resistance and its final appearance.
Water Management and Flow Design
You'll need to carefully manage your spring house's water flow by incorporating properly sized channels that direct water toward collection areas while maintaining a consistent slope of 1/8" to 1/4" per foot.
Your spring channels should include natural filtration elements like graded gravel beds that help purify the water as it moves through the system.
To optimize flow control, you'll want to position your inlet pipes above both discharge and overflow outlets, which prevents unwanted backup and guarantees smooth water movement throughout the structure.
Water Flow Control Systems
Modern spring houses rely on sophisticated water flow control systems to maintain ideal conditions and efficient operation.
You'll find multiple components working together, including flow meters that monitor water movement and pressure transmitters that keep track of system conditions. VFD pumps play an essential role by adjusting flow rates based on real-time demands, while back-pressure control valves regulate the system's pressure before water returns to storage.
The control strategy typically employs PID control loops for precise management of either pressure or flow.
You'll need to carefully consider which approach works best: a single PID loop that switches between pressure and flow control, or two separate loops with distinct tuning parameters. It's significant to acknowledge that running both controls simultaneously can lead to conflicts, as the loops may work against each other.
When you're selecting components, consider factors like installation requirements, accuracy needs, and maintenance implications.
The system should include appropriate output options such as BACnet or MODBUS for seamless integration with other components, ensuring your spring house maintains consistent performance and ideal conditions.
Spring Channel Construction Methods
Through careful engineering, effective spring channel construction begins with proper alignment and cross-sectional design.
You'll want to position channels alongside the drainage area and choose either a parabolic or trapezoidal cross-section. Keep the bottom width between 4 to 8 feet, and maintain side slopes no steeper than 3H:1V for easy maintenance.
When you're managing water flow, install check dams at calculated intervals based on the channel slope. They'll help break up steeper gradients and increase water retention time.
Make sure the ponded water from one dam doesn't reach the toe of the upstream dam. You'll need to include overflow pipes for excess water management and maintenance access.
For channel stability, select grass types that can withstand water flow and require minimal maintenance.
Install gravel or stone diaphragms at pavement edges and use flow spreaders at curb cuts to distribute water evenly.
Don't forget to protect the spring's collection area by redirecting surface water and installing French drains if needed.
It's essential to construct a watertight spring box with a secure cover to prevent contamination from insects, animals, and surface runoff.
Natural Filtration Techniques
Building on proper channel construction, natural filtration systems form the backbone of effective spring water management. You'll need to create sequential layers of natural materials, each serving a specific purpose in your filtration process. Start with coarse gravel at the bottom, followed by progressively finer materials like sand and organic matter.
| Material | Function | Maintenance |
|---|---|---|
| Sand & Gravel | Traps sediments and debris | Clean or replace annually |
| Charcoal | Removes odors and impurities | Replace every 6 months |
| Clay | Absorbs toxins and metals | Check for cracks quarterly |
| Plant Roots | Supports beneficial microbes | Trim roots as needed |
To maximize filtration efficiency, you'll want to incorporate settling basins before the main filtering layers. These basins allow sediment to settle naturally before water enters the filtration system. Install collecting walls to direct water flow and prevent unwanted runoff from entering your system. Remember to maintain proper slope throughout your filtration setup to prevent water from backing up. You'll need to clean your spring box regularly and monitor water quality to guarantee your natural filtration system continues functioning effectively.
Daily Dairy Processing Tasks
Daily dairy processing requires three essential tasks: milking, health monitoring, and proper milk storage.
You'll need to begin each day by feeding and watering your cows before milking. Once you've confirmed they're well-nourished, you must inspect each cow's udders, clean them thoroughly, and attach the milking machines correctly to prevent injury.
Throughout the day, you'll monitor your cows' health by checking their feeding habits and watching for any signs of illness. If you notice problems, you'll need to separate affected cows and work with veterinarians for treatment.
You must also maintain clean, dry bedding and provide shelter from harsh weather to keep your herd healthy.
For milk storage, you'll need to maintain strict temperature control at around 4°C to prevent bacterial growth.
You'll test milk quality both on-farm and before processing, confirming it meets safety standards.
As you manage your storage areas, you'll implement a first-in, first-out system and keep storage spaces sanitized to avoid contamination.
You'll also coordinate with tanker trucks for efficient milk transportation, often using electronic tracking systems to optimize delivery schedules.
Seasonal Food Storage Solutions

Ancient food preservation methods have shaped our understanding of seasonal storage solutions. Before modern refrigeration, you'd need to use multiple preservation techniques throughout the year to maintain your food supply. These time-tested methods included drying, curing, fermenting, and cold storage solutions that date back thousands of years.
You'll find that drying was particularly effective in the Middle East, where sun and wind provided natural dehydration. In areas with less sunlight, you could use "still houses" with fire to achieve similar results.
When preserving meats, you'd rely on curing and salting, creating brines that kept food moist while preventing harmful organisms from growing. For vegetables, you'd often turn to fermentation and pickling, which not only preserved food but also created beneficial vitamins and prevented diseases like scurvy.
Cold storage remained essential for maintaining fresh produce. You could store foods in root cellars, caves, or cool streams, where temperatures stayed between 32˚F and 60˚F.
Icehouses became popular in the 19th century, allowing you to store both ice and food without requiring electrical energy. These natural cooling methods relied on stable ground temperatures and seasonal cold weather.
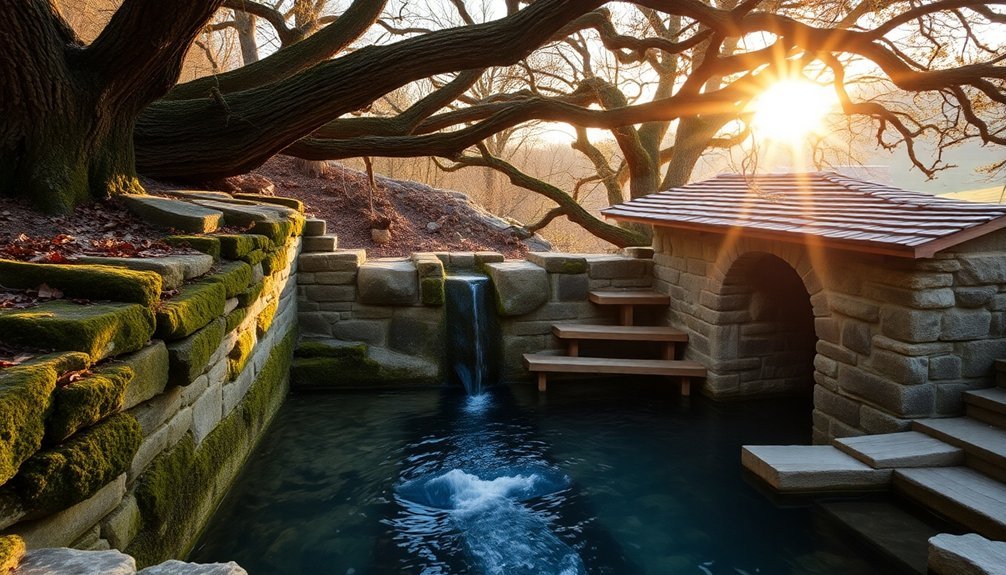
Natural Temperature Control Mechanisms
You'll find that spring houses harness the natural cooling power of continuously flowing spring water, which maintains a fairly constant temperature year-round.
The stone walls of these structures provide excellent thermal mass, absorbing cool temperatures from the water and surrounding earth while deflecting external heat.
The combination of cool spring water and stone's natural insulating properties creates an effective refrigeration system that doesn't require any mechanical intervention.
Spring Water Cooling Principles
Through ingenious natural temperature control mechanisms, spring houses harness the cooling power of natural spring water to maintain a consistent interior temperature in the mid-50°F range.
You'll find these structures strategically positioned directly on top of natural springs or near creek banks, often built against hillsides to maximize natural insulation.
The cooling system works through a carefully designed channel that runs along the interior walls. As the spring water flows through this channel, it creates a natural convection process that helps maintain the cool environment.
You're fundamentally utilizing the constant temperature of the spring water, which circulates throughout the structure to reduce the internal temperature.
When you combine this water cooling system with the building's earthen insulation, you'll get an incredibly effective cold storage solution.
The small size of these structures – typically no larger than a single room – helps maintain temperature control by minimizing heat transfer from the outside environment.
You can store various perishables like dairy products, meats, and fruits in containers such as milk pails and stoneware crocks, and the consistent cool temperature helps prevent spoilage without any need for mechanical refrigeration.
Stone Thermal Properties
The stone construction of spring houses plays an important role in their temperature control capabilities. When you're building a spring house, the thermal properties of different stones greatly impact their performance. Limestone and sandstone, with their moderate thermal conductivity, help maintain stable temperatures, while granite's higher conductivity can transfer cooling effects more quickly.
| Stone Type | Thermal Conductivity (W/mK) | R-Value (1" thickness) |
|---|---|---|
| Limestone | 1.26-1.33 | 0.067-0.114 |
| Granite | 1.73-3.98 | 0.038-0.083 |
| Sandstone | 1.83-2.90 | 0.050-0.079 |
| Marble | 2.07-2.94 | 0.049-0.070 |
You'll find that thicker stone walls increase the R-value, providing better insulation. The natural insulating properties of stone, combined with the hillside construction typical of spring houses, create an effective cooling system. The stone's ability to resist thermal shock is also vital, as it prevents cracking from temperature fluctuations between the cool spring water and warmer outside air. When you're selecting stone for a spring house, consider limestone or sandstone for their balanced thermal properties and resistance to decomposition at typical operating temperatures.
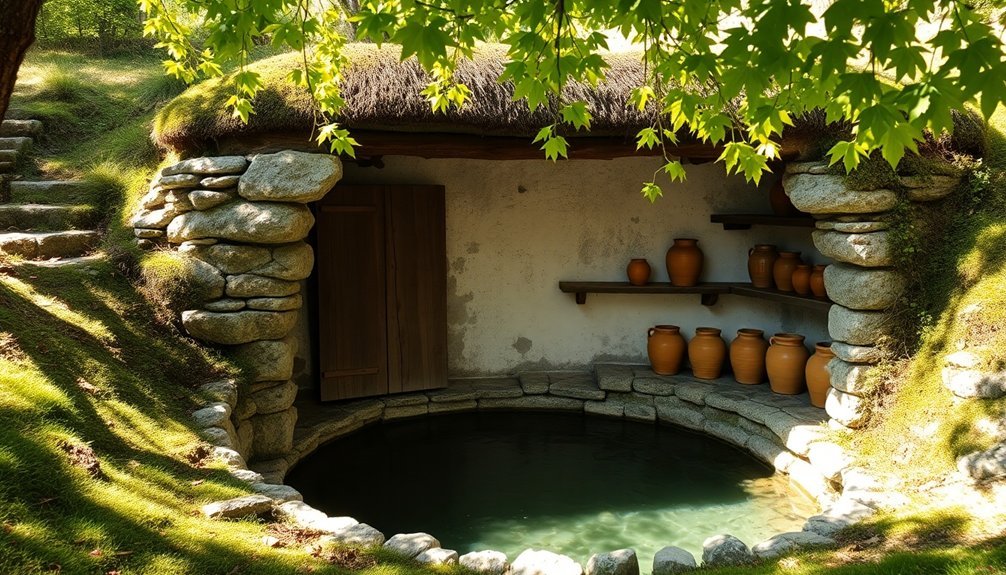
Spring House Layout Features

Spring house layouts balance practicality with efficiency, incorporating essential features that support food preservation and dairy processing.
You'll find that these structures typically include a main cooling room where stone-lined channels or tanks direct spring water to maintain consistent temperatures. Within this space, you'll see carefully positioned shelves designed for milk pans and cream separation.
The layout often features two distinct areas: a spring room where the water enters and circulates, and a separate food storage area for keeping various perishables cool.
If you're examining a two-story spring house, you'll notice the upper level serves multiple purposes, from additional storage to dairy processing workspace or even living quarters. The interior's design guarantees proper water flow while providing ample space for essential tasks like churning and salting butter.
You'll find the floor plan accommodates both functional and practical needs, with concrete flooring reinforced to prevent cracking and strategic placement of work areas.
The layout's efficiency is enhanced by the retaining wall that protects the spring source, while the elevated position prevents flooding and guarantees proper drainage.
Essential Tools and Equipment
Essential tools and equipment play a vital role in maintaining a functional spring house. You'll need both hand tools and power equipment to keep the structure in good condition and perform necessary repairs.
Start with basic hand tools like a hammer for securing loose elements, a screwdriver set for various fasteners, and pliers for gripping and adjusting components. A utility knife and tape measure will help you make precise cuts and measurements during maintenance work.
For more substantial repairs, you'll want power tools such as a cordless drill for woodworking tasks and a handsaw for trimming lumber. When working on plumbing elements, keep a pipe wrench and plunger nearby to address water flow issues.
Don't forget to equip yourself with essential safety gear, including safety goggles, ear protection, and dust masks when using power tools or working in dusty conditions.
To guarantee proper installation and maintenance of shelving and storage areas, you'll need a level and combination square. A stud finder will help you locate solid mounting points, while a caulking gun and putty knife are essential for sealing gaps and maintaining the spring house's moisture control.
Year-Round Preservation Techniques

Successful year-round preservation in a spring house relies on multiple time-tested techniques that work together to maintain your food's freshness.
You'll need to combine different preservation methods throughout the seasons to maximize your spring house's effectiveness.
In summer, you can use your spring house to cool freshly preserved berries and cherries that you've transformed into jams, jellies, and syrups.
During fall, you'll want to store your canned tomatoes, marinara sauces, and fermented vegetables while utilizing the natural water flow to maintain consistent temperatures.
To optimize preservation, you'll need to monitor conditions regularly.
Check your thermometer and hygrometer every couple of weeks, and adjust humidity by channeling more spring water when needed.
You can introduce cold objects to lower temperatures or use ventilation to manage moisture levels.
For long-term storage, organize your preserved goods in wooden crates with ventilation holes.
You'll want to stack them carefully to allow proper air circulation.
Remember to inspect your stored items regularly and remove any that show signs of spoilage to prevent contamination of other preserved foods.
Historical Farm Life Applications
Historical farms relied heavily on spring houses as crucial components of their self-sufficient operations. You'd find these structures strategically placed near farmhouses and barns, making them easily accessible for daily tasks like storing fresh milk, churning butter, and aging cheese. They weren't just storage facilities; they were essential hubs of farm activity that supported both food preservation and production.
If you'd visited a working farm in those days, you'd have seen farmers and their families making multiple trips to the spring house throughout the day. They'd use these buildings to keep their dairy products cool, preserve meats, and store vegetables from their gardens. During summer months, you'd find the spring house's cool interior offering welcome relief from the heat while protecting precious food stores from spoilage.
The spring house's integration into farm life went beyond simple storage. You'd often see tenant workers using the space as part of their daily routines, and some spring houses even included additional living quarters or work areas upstairs.
These structures represented the resourcefulness of historical farmers who maximized every natural resource available to them.
From Past to Present
Time brought dramatic changes to the humble spring house as technological advances reshaped how we preserve food.
You'll find that the transformation began with the introduction of ice delivery services, which offered a more convenient alternative to spring house cooling. As mechanical refrigeration emerged in the mid-1800s, followed by home refrigerators in the early 20th century, spring houses gradually lost their essential role in food preservation.
The shift from spring houses to modern refrigeration brought several significant changes to daily life:
- You no longer needed to rely on seasonal and local produce, as refrigerated transport made fresh foods available year-round.
- Modern bulk tanks revolutionized dairy farming, making traditional spring house cooling obsolete.
- Your food preservation options expanded beyond traditional methods like salting and smoking.
Frequently Asked Questions
How Long Did It Typically Take to Construct a Spring House?
You'll typically spend 2-3 months building a spring house, depending on your materials, size, and weather conditions. If you're using fieldstone and working alone, it could take even longer.
Did Native Americans Use Similar Structures Before European Settlers Arrived?
You'll find Native Americans used natural formations like lava tubes and cold caves instead of built structures. They'd cover these with sagebrush mats and store meat at constant cold temperatures throughout the year.
Could Spring Houses Be Built in Areas Without Natural Springs?
You can build a spring house without natural springs by channeling water from nearby streams, or using alternative cooling methods like hillside construction, thick stone walls, and ventilation systems for effective food storage.
What Happened to Food Items During Flooding of Spring Houses?
During flooding, your food items would become contaminated by sewage, chemicals, and debris in the flood water. You'd need to discard any exposed items, especially those in permeable containers, regardless of their appearance.
Were Spring Houses Ever Used as Hiding Places During Wars?
While you'll find no direct historical evidence of spring houses being used as wartime hiding places, their isolated locations and lack of windows could've made them possible hideouts, though this wasn't their intended purpose.
In Summary
Today, you'll find many restored spring houses dotting historic farmland across America, serving as reminders of our ancestors' ingenuity. While you won't need them for modern food storage, these structures tell an important story of survival and resourcefulness. When you visit one, you're connecting with generations of farmers who relied on nature's cooling power before electricity changed everything. They're living history lessons in sustainable preservation methods.


Leave a Reply