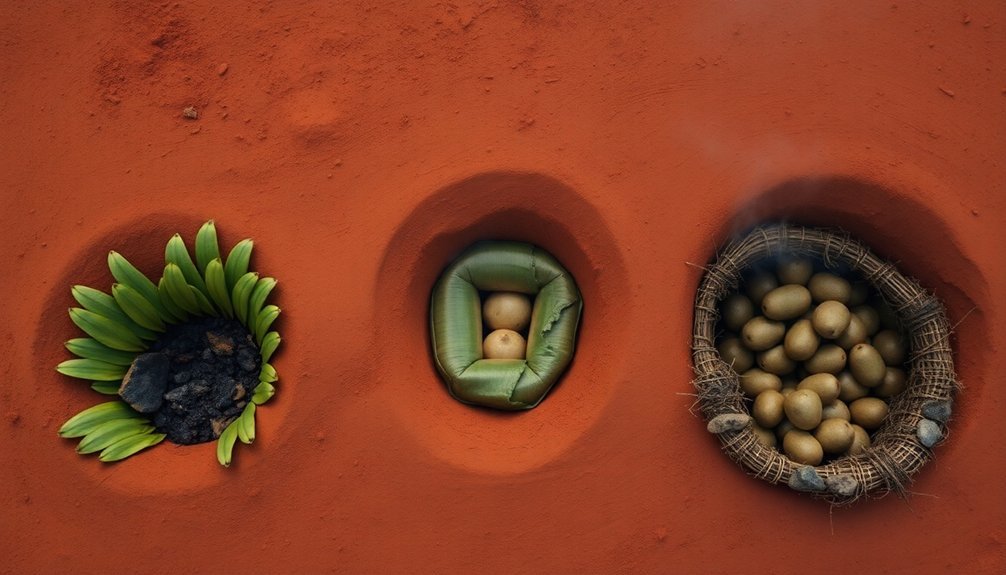
Time-tested pit fermentation techniques span cultures worldwide, offering unique ways to preserve and enhance food flavors. You'll find Hawaiian Kalua pit cooking using volcanic stones and ti leaves, while Nordic cultures developed buried fish preservation methods lasting months. Polynesian earth ovens master the art of fermenting taro and breadfruit, and Samoan Umu cooking infuses distinct smoky flavors into meats and vegetables. Traditional Chinese buried pickle practices create perpetual brines, as African communities perfect underground grain storage. From Mexican barbacoa to Maori hangi, these ancient methods combine earthen elements with precise timing. Each technique holds centuries of wisdom waiting to be discovered.
Hawaiian Kalua Pit Cooking
Anyone who's experienced authentic Hawaiian Kalua pit cooking knows it's a remarkable feat of traditional culinary engineering.
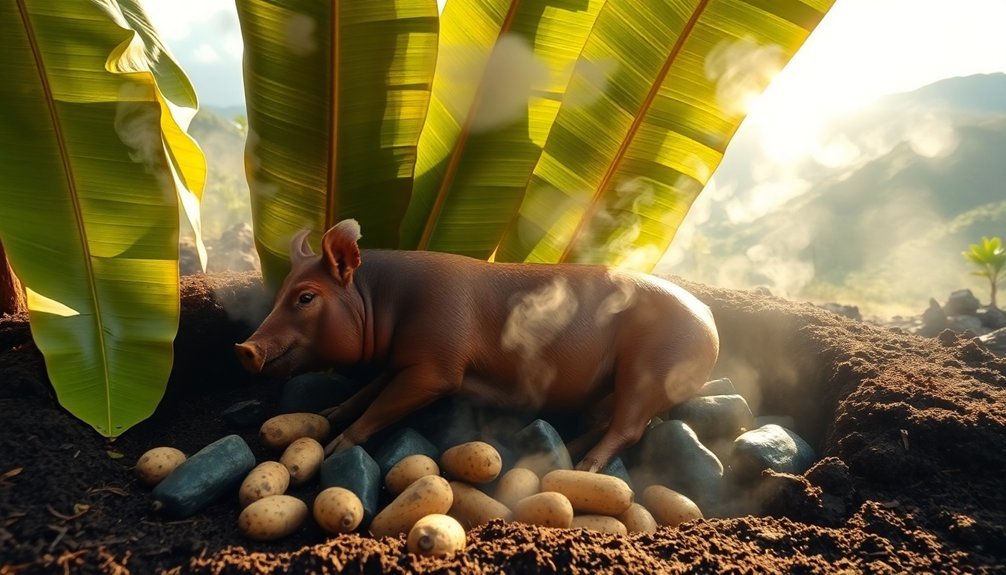
At its core, this method relies on an underground oven called an Imu, typically dug 2-4 feet deep and sized to accommodate both the pig and heating stones. The cooking process typically takes 6 to 8 hours to achieve the perfect tenderness.
You'll find the process begins with heating river rocks or lava stones using hardwood, often kiawe, which provides the signature smoky flavor.
The pig, seasoned simply with Hawaiian sea salt, is wrapped in ti or banana leaves before being placed in the Imu.
You'll need to cover the pit with vegetation, wet burlap, and a tarp to trap the heat and steam.
If you're attempting Kalua pork at home, you can use modern alternatives like slow cookers or instant pots.
You'll still want to wrap the meat in banana leaves and use liquid smoke to replicate the traditional earthen flavors.
While these methods are convenient, they don't quite capture the communal spirit of traditional Imu cooking, which remains a centerpiece of Hawaiian luaus and cultural celebrations.
Polynesian Earth Oven Fermentation
You'll find that Polynesian earth oven fermentation begins with carefully layered volcanic stones and green vegetation, much like traditional pit preparation for regular cooking.
When fermenting taro and ti roots, you'll need to wrap them tightly in banana leaves and let them cook at lower temperatures for extended periods, sometimes up to several days longer than regular earth oven cooking.
The process requires precise control of moisture and heat through strategic placement of leaves and stones, helping preserve these traditional techniques that have sustained Polynesian communities for generations. Known locally as the ahimaa cooking method, this earth oven technique remains integral to festive gatherings and special celebrations throughout The Islands of Tahiti.
Traditional Pit Preparation Methods
Throughout the Pacific Islands, traditional pit fermentation methods represent more than just cooking techniques—they embody centuries of cultural heritage and spiritual significance. Known by different names like Lovo, Umu, Imu, and Hāngī, these earth ovens are integral to community celebrations and ceremonial gatherings.
The practice reflects the deep connection between breath and land, as seen in the te reo Māori meanings of hā (breath of life) and ngī (essence of the land).
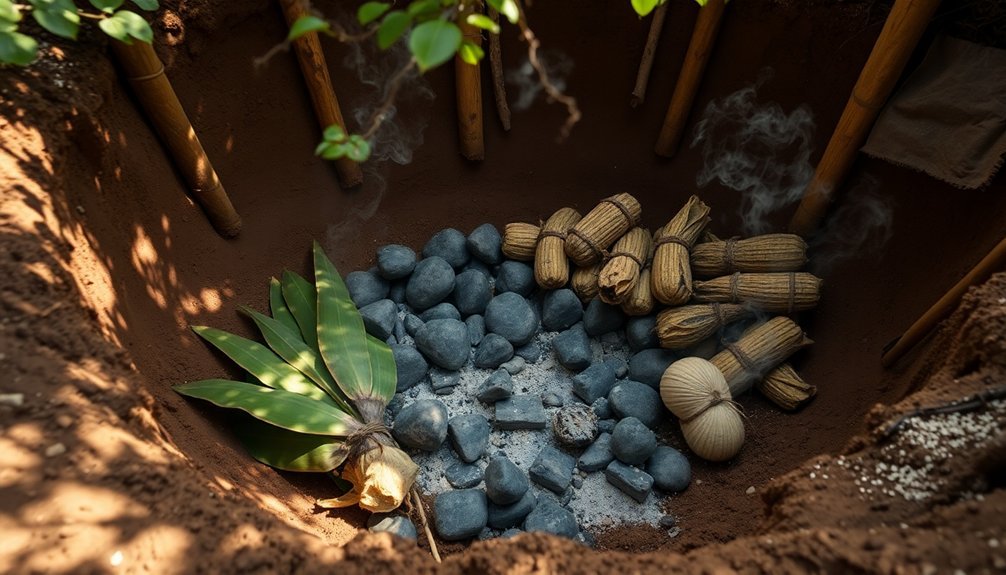
You'll begin by digging a pit roughly one foot deep with gently sloping walls for easy access. Line the bottom with heat-retaining basalt rocks, then build a fire directly on top. Once the rocks are nearly red-hot, you'll remove any unburned wood and let the fire smolder down.
Next, you'll layer green vegetation like Salal and Sword Fern over the hot rocks—these plants create essential moisture for the cooking process. Place your food items, including root vegetables and meats, on top of this vegetative bed.
To seal in the heat and steam, you'll add more layers of vegetation and sometimes water before covering everything with burlap or leaves. Finally, seal the pit with soil. Your food will cook slowly for several hours, or even a full day, developing rich, complex flavors through this time-honored process.
Taro and Ti Fermentation
While pit fermentation methods span across the Pacific, the Polynesian ti oven stands out as a remarkable feat of culinary engineering.
You'll find these distinctive ovens begin with a deep pit filled with coconut trunks, firewood, and carefully selected uniform-sized rocks that guarantee even heat distribution during the cooking process.
When you're preparing ti roots, you'll need to spend about a week digging them up before pounding them with wooden clubs on flat stones.
You'll then pack the roots tightly in baskets to retain heat. Using long chestnut branches with hooks, you'll arrange hot rocks to form a cooking surface, where you'll place the baskets of ti roots, covering them with banana or ti leaves. The cooking process can last anywhere from two days to a week.
You'll discover that ti ovens weren't just cooking vessels but held significant cultural importance.
They're primarily used during high-status occasions and community feasts, where chiefs direct the proceedings.
The cooked ti roots serve multiple purposes: they're a valuable food source during famines, hold medicinal properties, and in Hawaiian culture, the plant itself is considered a symbol of peace and spiritual protection.
Cultural Preservation Techniques
In accordance with ancient Polynesian traditions, earth oven fermentation represents one of the Pacific's most enduring cultural preservation methods.
You'll find that the process begins with digging a large pit and layering it with volcanic stones, coconut husks, and branches. Once you've heated the stones overnight until they're red hot, you'll create a bed of green leaves for the food.
You'll notice how the technique preserves both food and cultural heritage, as men traditionally oversee the earth oven's construction while maintaining ecological balance through the use of indigenous materials.
When you're wrapping foods in banana leaves and placing them between layers of hot stones, you're participating in a practice that's been perfected over generations.
The method's effectiveness extends beyond mere cooking – it's essential for making traditional dishes safe to eat. You'll use it to remove toxic substances from starchy foods like taro and breadfruit while preparing classic ma'a Tahiti meals.
The process takes patience, as foods can ferment for up to 48 hours, but you'll find the results worth waiting for, as the earth oven preserves natural juices and enhances flavors.
Nordic Buried Fish Preservation
Nordic cultures mastered fish preservation through burial techniques that date back to Viking times and earlier.
You'll notice their methods relied heavily on salt combined with extended storage periods, often lasting several months, to achieve proper fermentation.
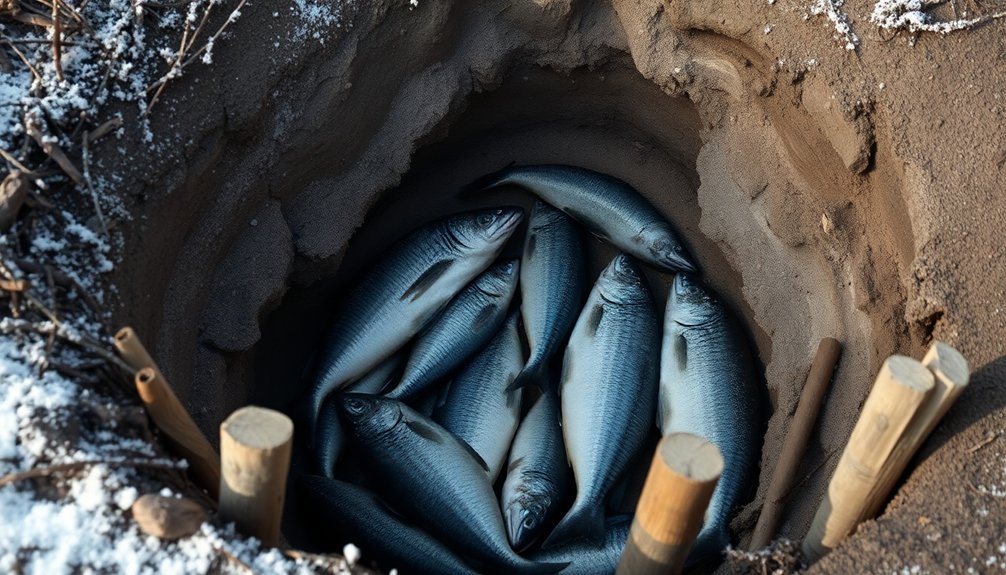
The process typically involved wrapping fish in birch bark and burying it underground in specially prepared holes or barrels, where controlled decomposition could occur in an oxygen-poor environment.
Ancient Nordic Fish Methods
Preserving fish through burial might sound strange today, but ancient Nordic peoples mastered this technique as an indispensable survival method. They'd develop sophisticated preservation methods like gravlax, which literally means "buried salmon," using the earth's natural cooling properties and fermentation processes to their advantage.
You'll find that these ancient preservationists wrapped their fish in birch bark, which served two vital purposes: lowering the pH levels and creating a protective barrier against harmful bacteria. They'd dig holes in cold, wet ground and carefully layer the fish, often adding carbohydrate-rich ingredients like malted barley or whey to encourage proper fermentation.
The process wasn't quick – it could take months for fish like rakfisk to properly ferment. You'd need to turn the fish regularly and keep it pressed down to maintain proper brine coverage.
The result? A distinctive preserved fish with a buttery, cheese-like texture that helped communities survive through scarce times.
While modern versions don't require burial, these ancient techniques proved remarkably effective. When salt was scarce in medieval times, you could rely on these fermentation methods to keep valuable protein sources available year-round.
Salt and Time Process
The salt and time process stands at the heart of Nordic fish preservation, building upon the burial techniques with precise measurements and timing.
You'll need to start by applying fine-grained salt to your fish, allowing it to penetrate the flesh and draw out moisture. For every inch of meat, you'll want to salt for 24 hours, though larger fish might need up to 10 days for proper preservation.
During the essential maturation phase, which typically runs 4-6 weeks, your fish will maintain about 17-18% salt content and 57-58% water content.
To achieve proper klippfisk status, you'll need to dry the fish until its water content drops below 48%. The drying process will increase the salt concentration to 19-20% while reducing moisture to 50-53%.
You'll find that storage conditions are vital for long-term preservation. Keep your finished product in cool, dark conditions at 2-4°C, and it'll last up to two years.
If you're using the brine-salted method, you can expect nine months of shelf life at temperatures below 70°F.
For extended storage, you can repack the fish in fresh salt, combining traditional dry salting with brine methods for best results.
Underground Storage Techniques
Burying fish beneath the earth's surface represents one of the most distinctive preservation methods in Nordic culture. You'll find variations of this technique across Scandinavia, where people have perfected the art of underground fermentation over centuries.
| Method | Duration | Result |
|---|---|---|
| Short-term burial | 2-7 days | Fresh, uncooked fish |
| Gravlaks | 2-3 months | Salt-cured salmon |
| Rakefisk | 3-6 months | Fermented trout |
| Surfisk | 3-6 months | Swedish fermented fish |
| Arctic storage | Year-round | Frozen preservation |
To preserve your fish using traditional Nordic methods, you'll need to dig a hole and line it with birch bark. For short-term preservation, you'll only need to bury the salted fish for a few days. However, if you're aiming for fermented delicacies like rakefisk, you'll want to leave it underground for several months.
In Arctic regions, you can take advantage of natural permafrost, similar to Alaska's siġluaqs (ice cellars). These underground storage spaces, traditionally framed with whalebone and driftwood, maintain freezing temperatures year-round, offering an effective way to preserve your fish without the fermentation process.
Mexican Barbacoa Underground Technique
The magic happens during the 10-16 hour cooking process, as you'll cover everything with leaves and earth, creating a sealed environment.
This slow-cooking method produces incredibly tender meat and flavorful broth.
While modern adaptations use slow cookers or pressure cookers, you can't replicate the unique earthen flavors that come from this time-honored pit cooking technique.
Samoan Food Pit Methods

Deep within Samoan culinary tradition lies the umu, an underground cooking method that transforms simple ingredients into smoky, flavorful feasts. You'll need volcanic rocks, firewood, coconut husks, and shells to create the foundation of your umu. Start by placing corrugated iron on the ground, then build your fire to heat the rocks until they're glowing red – typically 30-40 minutes.
When preparing your ingredients, you'll wrap taro, fish, octopus, and various meats in banana leaves after coating them with coconut cream. The layering process is essential: place taro first as it needs more cooking time, followed by other ingredients.
| Component | Preparation | Timing |
|---|---|---|
| Base Layer | Hot rocks & leaves | First |
| Middle Layer | Taro & root vegetables | 2 hours |
| Top Layer | Meats & fish | Last to add |
Once you've arranged your food, seal the umu with banana leaves to trap the steam. You'll want to stamp around the edges to maintain the seal. After about two hours, you'll uncover a feast that's been infused with distinctive smoky flavors – a reflection of this time-honored cooking method that continues to bring Samoan communities together.
Chinese Buried Pickle Practices
You'll find Chinese buried pickle practices follow specific seasonal patterns, with fresh vegetables selected during peak harvest times and prepared in ceramic vessels for underground storage.
Traditional preservation methods involve layering vegetables with precise amounts of salt, sugar, and baijiu in these vessels before burying them in cool, earthen pits.
The underground environment maintains consistent temperatures for fermentation, while the careful selection of non-metallic containers and proper brine ratios guarantees the pickles develop their characteristic flavors.
Earthen Pit Storage Methods
Contrary to common assumptions, traditional Chinese pickle-making rarely involves earthen pit storage methods. Instead, you'll find that Chinese fermentation practices rely heavily on specialized vessels like narrow-mouthed crocks and jars, which create the best anaerobic environment for pickling.
When you're preparing Chinese pickles, you'll want to focus on proper vessel selection rather than digging pits. You should choose containers with narrow openings that help keep vegetables submerged in the brine. For smaller vegetable pieces, you'll need to add weights like plastic container lids or large cabbage leaves to maintain submersion.
The key to successful Chinese pickling lies in maintaining a perpetual brine system. You'll find that your initial batch might take 1-2 weeks to develop flavor, but subsequent batches will ferment much faster in the established brine.
You should regularly monitor and adjust the brine's salt, sugar, and spice levels, adding ingredients like ginger, Sichuan peppercorns, and dried chilies to enhance the flavor profile.
Remember to release air from your vessel every few days during initial fermentation and keep the container in a cool, dark place for best results.
Seasonal Vegetable Selection Process
While proper vessel selection sets the foundation for Chinese pickling, successful fermentation begins long before the first vegetables touch the brine. You'll want to select firm, unblemished vegetables that are in their peak season, such as spring carrots for their natural sweetness or tender asparagus spears when available.
Choose medium-sized pieces of cabbage and radish to guarantee the brine penetrates effectively throughout the fermentation process.
You'll need to prepare your vegetables carefully before fermentation. Cut them into medium-sized chunks that are easy to retrieve from the brine later. When working with kohlrabi, peel it and set aside the leaves for other uses. Remove any damaged or wilted parts from greens like kale and collards to prevent spoilage.
It's best to avoid cucumbers in your initial fermentation attempts, as their high water content makes them challenging to pickle properly.
Pack your prepared vegetables tightly in the vessel to eliminate air pockets. You'll find that seasonal selection and proper preparation greatly impact your fermentation's success, creating the foundation for traditional Chinese buried pickles that carry deep, complex flavors.
Traditional Preservation Techniques
Three key elements define traditional Chinese buried pickle preservation: a properly balanced brine, consistent fermentation conditions, and careful monitoring.
You'll need to create a brine using water, salt, and optional sugar, along with traditional spices like ginger, Sichuan peppercorns, and dried chilies. While you can boil the water first, some practitioners prefer using spring water directly.
You'll want to use narrow-mouthed Chinese crocks or jars, which help keep your vegetables submerged beneath the brine. The jar's shoulders naturally hold down larger pieces, but you might need additional weights for smaller vegetables.
Place your jar in a dark location and remember to release built-up gases periodically.
Your initial batch will take 1-2 weeks to develop proper flavor and texture. You'll know the fermentation's complete when bubbles stop rising and the liquid becomes clear.
The brine can be reused multiple times, though you'll need to adjust its components as the flavor diminishes. With proper care, your pickles will remain crunchy and flavorful for 5-6 months, ready for use in various dishes or as side accompaniments.
African Underground Grain Storage

Traditional African underground grain storage represents one of the continent's most enduring agricultural practices, particularly prevalent in regions like Morocco, Tunisia, Egypt, and Sudan. You'll find three main types of storage pits: bell-shaped, cylindrical, and underground silos, each designed to preserve grains like millet, sorghum, and cow peas.
When you're constructing these pits, it's essential to select sites with clay or conglomerate soil that can maintain nearly vertical sides. You'll want to guarantee proper water drainage and keep pits separated to prevent moisture transfer.
| Storage Type | Key Features | Advantages | Challenges | Best Uses |
|---|---|---|---|---|
| Bell-Shaped Pits | Small entrance, large chamber | Long-term storage | Moisture buildup | Cow peas, millet |
| Cylindrical Pits | Wide opening, mat-supported walls | Easy access | Requires maintenance | Large quantities |
| Underground Silos | Rural adaptation | Cost-effective | Insect issues | Small holdings |
| Traditional Mix | Cow dung/ash coating | Natural preservation | Labor intensive | Pest control |
| Modern Alternative | Metal construction | Better protection | Higher cost | All grains |
While these storage methods can lead to losses of 15-50% due to moisture and pests, you can improve results by incorporating traditional techniques like mixing grains with ash or using raised platforms for additional protection.
Pacific Islander Breadfruit Pits
Just as African communities developed underground grain storage, Pacific Islanders mastered the art of preserving breadfruit in specialized pits.
You'll need to peel and core the breadfruit before placing it in a pit that's been carefully lined with breadfruit leaves. Once you've arranged the fruits, you'll cover them with more leaves and add a thick layer of soil or rocks on top.
Within five to seven days, you'll see the fermentation process begin, transforming the breadfruit into a sour dough-like paste that can last up to a year. You'll want to maintain temperatures around 13°C with 85-95% relative humidity for ideal results.
It's essential to minimize ethylene exposure and handle the fruit carefully to prevent bruising.
This preservation method isn't just practical – it's been important to Pacific Island cultures, enabling communities to thrive in marginal island environments by providing a reliable food source.
When you're storing fermented breadfruit, you'll need well-ventilated containers to maintain quality. The fermented product retains much of its nutritional value, making it a significant component of traditional island diets and food security strategies.
Native American Earth Pit
Ancient Native American communities mastered the art of earth pit fermentation and cooking, developing techniques that have endured for thousands of years.
These earth pits were carefully constructed by digging into soft earth or bedrock, then lined with specific materials to retain heat and moisture. You'll find that they used cooking balls made from soil and water to regulate temperature, while prickly pear pads served as natural insulators.
The process involved placing food on hot coals and cooking balls, then covering it with soil for several hours. You can imagine how the natural yeasts and microbes present in the environment would facilitate fermentation, which could last several days depending on the food type.
These methods weren't just practical – they were deeply woven into the cultural fabric of Native American communities, ensuring year-round food availability.
- Earth pits could cook various foods within two hours using retained heat
- Natural materials like banana leaves were used for lining and wrapping
- The technique allowed for both cooking and fermentation in the same pit
- Archaeological evidence shows widespread use at sites like Poverty Point
- The method preserved ancestral knowledge through generations
Maori Hangi Food Preservation
New Zealand's Maori people developed the hangi, an ingenious earth-pit cooking and preservation system that's both practical and culturally significant.
You'll find the hangi method involves digging a pit, placing hot volcanic rocks inside, and layering food in specific order: meat first, followed by vegetables, all covered with leaves or flax matting. In geothermal areas like Rotorua, you can even use natural steam for cooking.
When you're preserving food Maori-style, you'll use several complementary techniques. You can dry kūmara, shellfish, and fish using embers or hot rocks, while you'll preserve fatty birds like tītī in their own fat within gourds.
For shellfish preservation, you'll thread them onto flax and dry them in the sun and wind.
You'll store your preserved foods in pātaka (storehouses) or rua kūmara (underground storage pits) built on slopes for proper drainage.
The remarkable pōhā (bull kelp bags) you'll use can keep food safe for up to three years.
When fermenting foods like corn through the Kanga Kopiro process, you'll need to follow specific steps to eliminate toxins and guarantee food safety.
Frequently Asked Questions
How Do Underground Fermentation Techniques Affect Food Safety Across Different Climates?
You'll find underground fermentation affects food safety differently: cooler temps slow bacterial growth in tropics, while pH control and oxygen exclusion maintain safety across climates, but you must monitor conditions carefully to prevent contamination.
What Materials Are Best for Lining Fermentation Pits in Various Soil Types?
You'll want to use HDPE liners for clay soils, polyurea-coated geotextiles for sandy soils, and bentonite-HDPE combinations for rocky terrain. Each provides ideal sealing and durability for your fermentation pit's specific conditions.
Can Modern Temperature Monitoring Devices Be Integrated Into Traditional Pit Fermentation?
Yes, you can integrate modern temperature sensors into traditional pit fermentation. They'll work wirelessly, require minimal setup, and won't disrupt ancestral methods while providing precise monitoring of your fermentation conditions through remote devices.
How Do Seasonal Changes Impact the Duration of Pit Fermentation Processes?
You'll find that colder seasons greatly extend your pit fermentation time, often doubling it from 3-4 weeks to 6-8 weeks, while warmer temperatures speed up the process but require careful monitoring to prevent spoilage.
What Emergency Measures Exist if Pit Fermentation Goes Wrong During Crucial Stages?
If you notice off-odors or mold, immediately check pH levels and salt concentration. You'll need to adjust temperature, add starter cultures, or increase salt content. In severe cases, you must discard and restart completely.
In Summary
You've now explored ancient pit fermentation methods that span cultures and continents. These time-tested techniques aren't just about food preservation – they're living connections to our ancestors' ingenuity. Whether you're fascinated by Hawaiian kalua or Nordic buried fish, you'll find these methods still relevant today. Consider trying these techniques yourself to experience the unique flavors and traditions they offer.


Leave a Reply