
To preserve food using ash, you'll need nine key tools for success. Start with earthenware storage containers for durability and proper food storage. Collect wood ash using metal containers and filtering equipment like mesh screens and sifters. You'll want sharp cutting implements and food handling tools, including cloth bags and twine for wrapping meats. Don't forget airtight container seals, moisture testing equipment, and storage area supplies like dehumidifiers and sealants. Finally, keep cleaning supplies handy for sanitization. Understanding how to use each tool properly will maximize your preservation results.
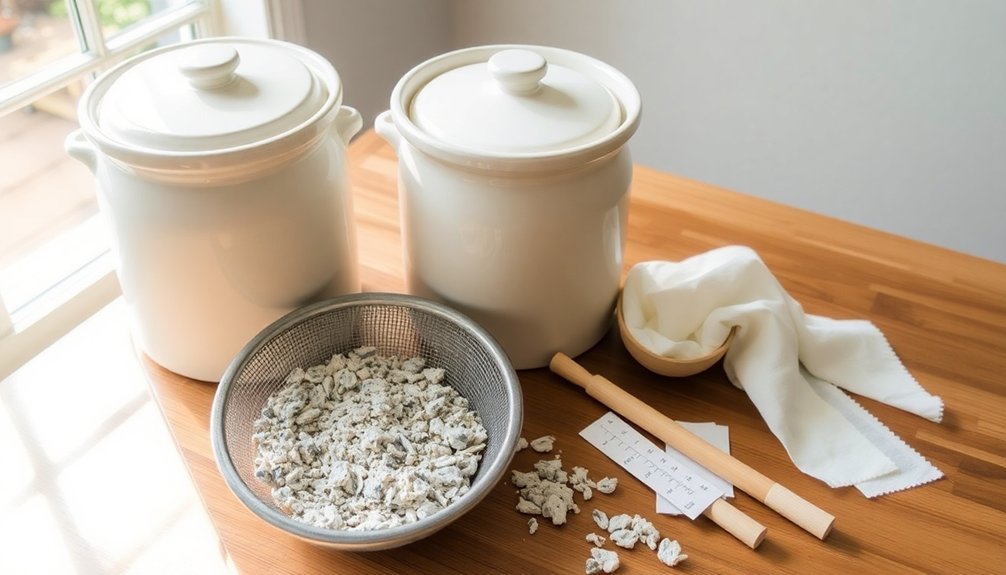
Earthenware Storage Containers

Throughout history, earthenware and stoneware containers have played an essential role in food preservation. These durable vessels, crafted by skilled potters, were specifically designed for long-term food storage and could last for many years when properly maintained. Regular cleaning and care will help prevent bacteria buildup and ensure food safety.
You'll find that traditional earthenware containers feature round shapes, alkaline glazes, and ear-shaped handles, making them ideal for preserving large quantities of food.
When you're using earthenware for preservation, you'll need to take into account their specific characteristics. While they're excellent for storing meat, animal fats, and dairy products, you'll want to layer your food with preservatives like salt, saltpeter, or molasses.
You'll notice these containers are quite heavy and large, which can make cleaning challenging but guarantees ample storage capacity. To maintain your earthenware's effectiveness, you'll need to store it in cool, dry places and regularly inspect for cracks or chips.
If you're collecting historic pieces, you might find valuable inscriptions from notable potters like Dave Drake, which provide insights into their original uses. Remember to handle these containers with care, as proper maintenance will greatly extend their useful life.
Wood Ash Collection Tools
You'll need proper filtering equipment like mesh screens and sifters to separate usable wood ash from debris and larger particles when collecting ash for food preservation.
Dedicated ash storage containers must be metal, airtight, and equipped with secure lids to prevent moisture contamination and maintain the ash's effectiveness. Place containers at least ten feet from any flammable materials for safe storage.
Your containers should be stored in a dry location away from any food items, yet remain easily accessible when you need the ash for preserving purposes.
Filtering and Sifting Equipment
When preserving food with wood ash, proper filtering and sifting equipment makes all the difference in collecting clean, usable ash. You'll need a stainless steel mesh screen as your primary filtering tool, which you can push along the bottom of your firebox like a shovel. This mesh separates fine ash from larger coal fragments, letting you collect the dry, fine ash you need for preservation.
To create an effective sifting station, attach hardware cloth to a wooden frame. This setup helps you remove any remaining charcoal pieces, ensuring you're left with only the fine gray dust that's ideal for food preservation. The ash preservation method is particularly effective for Gruyere cheese, which can be stored for three months in a cool cellar environment.
Don't forget to wear proper protective gear during the filtering process. You'll need leather gloves or welder's gloves to prevent burns, and you should always use long-handled tools to maintain a safe distance from the ashes.
Keep a metal bucket with a long handle nearby for collecting your filtered ash, and you'll be well-equipped for effective ash collection and food preservation.
Ash Storage Containers
Once you've filtered your wood ash, proper storage becomes the next key step in your preservation process.
You'll need specific containers depending on your preservation goals. For food storage using ash, you can use paper cartons, cardboard boxes, or traditional earthenware crockery with matching lids. If you're working with tomatoes, opt for a wooden or woven basket lined with paper.
When handling ash, you'll need protective equipment and proper tools. Always wear leather gloves to prevent burns, and use long-handled tools like fire pokers and shovels for safe ash removal.
Transfer the ash using a metal bucket with a long handle, being careful not to overfill it.
For general ash storage, metal containers with tight-fitting lids are your safest option. Place these containers outdoors on a cement or brick slab, keeping them at least 3 feet away from any combustible materials.
Don't store ash containers on wooden decks or porches. You'll want to make certain your storage area stays cool and dry, and regularly check for any signs of combustion.
When you're ready to use the stored ash, wait at least a month and choose a windless day for spreading.
Sifting Equipment for Ash

Food preservation's success often depends on properly sifted ash, making reliable sifting equipment vital. You'll need to choose from several effective options to guarantee your ash is free from sharp particles and debris while maintaining a consistent texture throughout your preservation process.
The most common and reliable sifting tools include:
- Manual fine-mesh sieves: Perfect for small batches and precise control
- Centrifugal sifters: Ideal for breaking down clumps efficiently
- Gyratory sifters: Best for high-quality contamination removal
- Stacked sieves: Excellent for achieving precise particle sizes
When using your sifting equipment, you'll want to start with cool ash from your cooking fire or chimney. Run it through your chosen sifter multiple times to remove all large residues and guarantee uniform particle size.
It's essential to keep your equipment clean and well-maintained to prevent contamination. Check your screens regularly for wear and tear, replacing them when necessary. Store your sifted ash in a dry, cool place until you're ready to use it for preserving foods like tomatoes or cheese.
Remember to handle the sifted ash carefully to avoid reintroducing contaminants.
Proper Cutting Implements
When you're handling food preservation tasks, you'll need a selection of sharp, well-maintained knives to guarantee clean cuts and minimize food waste.
Your cutting implements should match the size of the items you're preparing, from small paring knives for detailed work to larger chef's knives for bulk processing.
The right blade not only makes your preservation work more efficient but also helps maintain the quality of your preserved foods by creating precise, even cuts that promote uniform processing.
Sharp Blades for Success
Armed with proper cutting implements, you'll find that food preservation becomes markedly more efficient and safer. Your knife collection should include a precise paring knife, a 6-inch multipurpose blade, and an 8- or 10-inch chef's knife. Choose high-quality stainless or high carbon steel blades, and store them properly on a magnetic strip or in a knife block to maintain their edge.
Sharp blades are essential for successful food preservation. They'll help you work more efficiently while reducing the risk of accidents that often occur with dull knives. When your blades are razor-sharp, you'll preserve the integrity of your ingredients and minimize bacterial contamination that can occur from crushed or torn food surfaces.
- Keep your blades professionally sharpened or learn proper sharpening techniques
- Use appropriate cutting boards to protect your knife edges
- Clean and dry your knives immediately after use
- Store knives separately from other utensils to prevent dulling
Complement your knife collection with essential tools like kitchen scissors for herbs, a vegetable peeler for prep work, and tongs for safely handling hot items. These implements work together to guarantee your preservation process is both safe and effective.
Proper Size Selection Matters
Just as important as having sharp implements is selecting the right sizes for both your cutting tools and the ingredients you'll preserve. When you're working with tomatoes, you'll want to choose specimens that are ripe but still firm, avoiding any that are too large or show signs of bruising. The tomatoes should have intact skin to guarantee successful preservation.
For cheese preservation, you'll need to maintain proper thickness, ideally around 1.5 inches, to assure sufficient product remains after the preservation process. Hard cheeses work best, as they contain less moisture than their softer counterparts.
Your storage containers need to accommodate multiple layers while providing enough space for proper ash coverage. Whether you're using wooden boxes, baskets, or stoneware pots, verify they're large enough to hold 1.5-inch layers of ash both below and above your food items.
As you layer your ingredients, place them in single rows and maintain uniform ash coverage between each layer. Don't pack the ash too tightly, as this could damage your preserved items. Keep space between layers consistent to achieve excellent preservation results.
Food Handling Tools

Throughout history, food preservation has relied on specific tools designed for safe and effective handling of meats and other perishables.
When working with ash-based preservation methods, you'll need several essential tools to guarantee proper handling and protection of your food items.
For meat preservation specifically, you'll want to start with cloth or muslin bags to wrap your cuts, preventing direct contact between the meat and ash. You'll also need sturdy twine to secure these wrappings tightly.
When it's time to apply the ash, a fine-mesh sieve helps guarantee uniform consistency for better pest control.
Here are the primary handling tools you'll need:
- Peanut or cloth sacks for storing and protecting cured meats
- Shovels or scoops for applying and burying meats in ash
- Sturdy twine or string for securing wrapped meats
- Fine-mesh sieves for filtering and evening out ash consistency
Remember that while these traditional tools were effective historically, modern food preservation typically relies on controlled environments and regulated methods.
If you're preserving food for personal use, always guarantee your tools are clean and in good condition before starting the preservation process.
Temperature Monitoring Devices
In modern food preservation, temperature monitoring devices serve as critical tools for maintaining food safety and quality. You'll find automated systems that use wireless sensors to track temperatures in real-time, guaranteeing your preserved foods remain at safe levels throughout storage and processing.
These smart monitoring systems connect to your smartphone or tablet, letting you check temperatures anywhere, anytime. When temperatures drift outside safe ranges, you'll receive instant alerts, helping you prevent food spoilage before it occurs.
The sensors work across a wide temperature range, from -40°F to +257°F, making them suitable for both freezer storage and high-temperature processing.
You'll appreciate the automated compliance features these devices offer. They'll generate HACCP reports automatically and maintain electronic records that meet FDA requirements. The systems come with customizable checklists and menus, streamlining your documentation process.
Choose from various sensor types, including thermocouples for high-temperature applications and digital sensors for standard monitoring. You can place these sensors inside refrigerators, freezers, or use handheld wireless probes for spot-checking temperatures.
This flexibility guarantees you're always in control of your food preservation environment.
Ash Packing Equipment
Modern ash packing equipment forms an essential part of your industrial preservation toolkit, combining efficient handling with precise measurement capabilities.
You'll find these systems are designed to handle temperatures up to 650°F, with special assemblies managing even higher temperatures of 1,800°F. The equipment's automated features allow you to maintain continuous cycling while guaranteeing dust-free operations.
When selecting your ash packing equipment, you'll want to take into account these key components:
- Roto Packers for high-speed filling of pre-stitched valve bags
- Automatic Pick and Fill Sealing Machines for seamless operation
- Open mouth bag filling systems with simultaneous weighing capability
- Jumbo Bag Filling Machines for handling large-scale operations
Your packing system's efficiency depends on its ability to handle various container types while maintaining accurate measurements.
The equipment's Teflon coating addresses ash's corrosive nature, while the absence of moving parts reduces your maintenance needs. You'll benefit from low material transfer velocity, which helps preserve both the equipment and the product quality.
These ISO 9001 certified systems guarantee you're getting reliable performance while keeping operational costs low through reduced maintenance requirements and efficient material handling.
Airtight Container Seals
Reliable airtight container seals play an essential role in food preservation by creating secure barriers against air and moisture. When you're selecting containers, look for those with vacuum-sealing capabilities, such as Tightvac's push-button system or FoodSaver's handheld sealer compatibility. These mechanisms effectively displace air to create a protective environment for your stored items.
You'll find containers made from different materials, each with unique benefits. Glass options like Anchor Hocking TrueSeal offer oven-safe durability up to 425ºF, while crush-resistant plastic containers can last five years or more. Silicone seals, featured in products like Zyliss Twist & Seal, are particularly effective for storing dry goods.
To maintain your containers' effectiveness, you'll need to test them regularly for leakage and clean them properly. If your container isn't dishwasher safe, hand wash it to prevent warping.
When canning, remember to leave appropriate headspace and avoid overtightening lids to allow proper air displacement during processing. Whether you're preserving food for home use, camping, or travel, proper seal maintenance guarantees your containers will continue to protect your stored items effectively.
Moisture Testing Tools

Moisture testing tools have revolutionized food preservation by incorporating thermo-gravimetric analysis for precise moisture content measurements.
These sophisticated instruments use halogen lamps or infrared radiators to heat your food samples while measuring weight changes, giving you accurate moisture content readings that are vital for preservation success.
Modern moisture analyzers offer you various features to streamline your testing process.
You'll find options ranging from high-end METTLER TOLEDO models to budget-friendly alternatives like the HE53 and HE73 series. They're equipped with user-friendly interfaces and advanced connectivity options, allowing you to save and analyze your results efficiently.
- OneClick™ operation reduces your testing complexity while guaranteeing consistent results
- QuickPredict™ technology cuts your testing time from 15 minutes to just 2 minutes
- Multiple connectivity options let you transfer data via USB, Ethernet, or Wi-Fi
- Robust construction guarantees reliability in demanding food processing environments
Understanding moisture content isn't just about preservation – it's essential for maintaining food quality, extending shelf life, and guaranteeing safety standards.
These tools help you monitor moisture levels precisely, making them indispensable in your food preservation toolkit.
Storage Area Preparation Supplies
You'll need reliable sealants and waterproof barriers to protect your storage area from unwanted moisture infiltration and pest entry points.
Weather stripping, silicone caulk, and expandable foam can effectively seal gaps around windows, doors, and utility penetrations in your food storage space.
A quality dehumidifier, moisture-absorbing desiccant packs, and proper ventilation equipment will help maintain ideal humidity levels for long-term food preservation.
Location Sealants and Barriers
Proper sealants and barriers form the foundation of an effective food storage area. You'll need to guarantee your storage containers and location are properly sealed to maintain ideal preservation conditions.
When using wood ash for food preservation, it's vital to create multiple protective barriers that work together to keep moisture out while allowing minimal airflow.
For best storage conditions, you'll want to line your containers with paper before adding ash and food items. This creates a protective barrier between the ash and your food while still allowing the ash to do its preservation work.
Whether you're using earthenware crocks, stoneware pots, or ground storage, proper sealing is essential.
- Line storage containers with paper to create a barrier between ash and food
- Use plates or loose-fitting covers as container tops, avoiding airtight seals
- Place stones or bricks on top of covers to secure them while allowing minimal airflow
- Create layered barriers with ash between food items to prevent contact and spoilage
Remember to check your sealants and barriers regularly for any signs of moisture or damage.
Even small breaches in your storage system can compromise the preservation process and lead to food spoilage.
Moisture Control Equipment
Control over humidity levels stands as a critical factor in successful food preservation with wood ash. You'll need several key pieces of moisture control equipment to maintain the ideal storage environment for your ash-preserved tomatoes.
Start with a reliable hygrometer to monitor relative humidity in your storage area, aiming to keep it consistently dry.
Install dehumidifiers if you're storing your containers in naturally damp areas, as excess moisture can compromise the preservative properties of wood ash.
You'll want to position moisture-absorbing materials like silica gel packets or calcium chloride containers strategically around your storage space.
Don't forget to include proper ventilation equipment – small fans can help maintain air circulation without disturbing the ash layers in your containers.
For your storage containers, you'll need moisture-resistant paper liners to create a barrier between the ash and the container walls.
When you're preparing wooden or cardboard containers, apply food-grade sealants to prevent ambient moisture from seeping through.
Remember to keep a supply of clean, dry paper on hand for replacing liners that may become damp during long-term storage.
Cleaning and Sanitization Equipment

Three essential categories of cleaning and sanitization equipment are necessary for safe food preservation: cleaning agents, rinsing systems, and sanitizing solutions.
You'll need alkaline cleaners like caustic soda or trisodium phosphate for thorough cleaning, while citric acid helps neutralize residues and remove mineral deposits. For effective sanitization, you'll want to keep quaternary ammonium compounds and peroxyacetic acid solutions on hand.
Your cleaning and sanitizing toolkit should include:
- High-pressure spraying equipment that can handle both cold and warm water (100-109°F)
- Clean, sanitary brushes for manual scrubbing of equipment surfaces
- Testing equipment like swabs to verify sanitization effectiveness
- Temperature gauges to guarantee proper hot water sanitizing at 180°F
Don't forget to maintain proper storage for your cleaning equipment – everything should be kept clean and dry to prevent bacterial growth.
You'll need to keep detailed records of your cleaning procedures and regularly calibrate your pressure gauges. When using steam or hot water sanitization, confirm you're reaching the required 180°F for at least 20 minutes to effectively eliminate harmful microorganisms.
Frequently Asked Questions
Can Different Types of Wood Ash Affect the Preservation Process Differently?
Yes, you'll find that different wood types create ash with varying chemical compositions. Hardwoods typically produce more calcium-rich ash, while softwoods have different mineral content, affecting how well they'll preserve your food.
How Do You Know When Preserved Cheese Has Gone Bad?
You'll know your preserved cheese has spoiled if you notice a strong ammonia smell, unusual mold growth, slimy texture, or discoloration. Don't consume it if it tastes sour or has an off-putting flavor.
Is It Safe to Eat the Outer Layer That Contacts Ash?
While it's safe to consume the ash-contacted outer layer since wood ash is non-toxic, you'll want to remove it for better taste. You can simply scrape off the ash-covered rind before eating.
Can Preserved Cheese Be Returned to Normal Refrigeration After Ash Storage?
Yes, you can return ash-preserved cheese to refrigeration. Just clean off the ash and any affected rind thoroughly before storing. While the texture may differ slightly, your cheese will remain safe and usable under refrigeration.
What Happens if Moisture Accidentally Gets Into the Ash During Storage?
If moisture gets into your ash, you'll need to replace it immediately. It'll lose its preservative properties, promote bacterial growth, and can create harmful lye. Don't use contaminated ash for food preservation.
In Summary
You'll find these essential tools make preserving food with ash both safer and more efficient. By having proper containers, ash collection equipment, cutting tools, and sanitization supplies ready, you're setting yourself up for successful food preservation. Remember to regularly check your moisture levels and maintain clean storage areas. With the right tools and careful attention to detail, you'll extend your food's shelf life naturally.

Leave a Reply