
You'll master food storage in snow pits with these three proven tricks. First, construct your pit 100-110cm wide at waist height with smooth, stable walls and proper drainage to prevent collapse. Second, create strategic temperature zones by packing different densities of snow – use firm snow for root vegetables (32-40°F) and lighter layers for winter squash (40-60°F). Third, install a simple retrieval system using ropes and sacks attached to wooden racks for easy access without disturbing the temperature layers. These fundamental techniques will set you up for success, but there's much more to discover about maximizing your snow pit's potential.
Snow Pit Construction Basics

Building a proper snow pit requires careful site selection and precise digging techniques. You'll want to choose a spot that represents average snow depth in your area, avoiding unusually deep pockets that won't give you a realistic assessment. Consider the wind direction, elevation, and slope gradient when selecting your location. Extended Column Testing should be performed to verify snow stability before starting your dig.
Once you've picked your spot, dig a hole that's about 100-110cm wide. You'll need enough space to work comfortably while storing and accessing your food. Dig until you reach waist level, making sure to create smooth walls that'll help prevent collapse and make it easier to organize your storage space.
If you encounter hard layers while digging, use downward pressure with a probe to break through them.
As you dig, pay attention to the snow layers and their stability. You'll want to test the strength of your pit walls by performing simple compression tests. Look for any weak layers, crusts, or unusual formations that could compromise your storage space.
If you notice thin grey lines in the snow or particularly unstable layers, you may need to choose a different location or reinforce your pit walls.
Temperature Control With Snow Layers
Once your snow pit is properly constructed, maintaining the right temperature becomes your next challenge. You'll need to layer snow strategically to maintain temperatures between 32°F and 40°F, which is ideal for most root crops, onions, and garlic. Consider separating onions and potatoes since they should never be stored together.
Pack snow firmly around your storage containers, creating insulating layers that protect against temperature fluctuations. Monitor your snow pit's temperature using a thermometer placed at different depths. If temperatures rise above 40°F, add more snow layers or pack existing layers more densely.
For storing winter squashes, which need slightly warmer conditions, create a less densely packed snow layer that allows temperatures to stay between 40°F and 60°F. Don't forget to include ventilation channels between snow layers to prevent condensation buildup.
You can create these by inserting small PVC pipes or bamboo poles vertically through the snow layers. This airflow is essential for maintaining proper humidity levels – especially important for onions and garlic, which need drier conditions around 70-75% relative humidity.
Check your snow layers weekly and replace any that have melted or compressed too much, as this can affect the pit's insulating properties.
Efficient Food Retrieval Methods
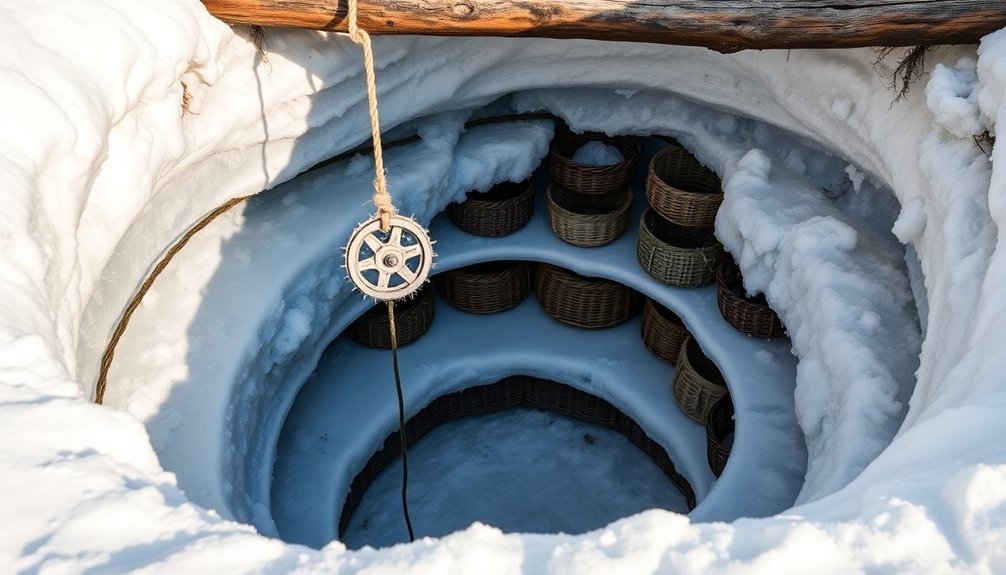
Successful food retrieval from your snow pit depends on smart organization and proper access mechanisms.
You'll want to install vertical wooden ducts and access hatches positioned several feet above ground level to prevent snow and ice blockage. Secure your food items in sacks attached to ropes, and use wooden cleats to anchor the rope ends for easy lifting.
To make retrieval more efficient, organize your food in distinct layers using wooden lath racks that keep produce elevated and well-ventilated. Using a canoe paddle helps maneuver sacks into position without damaging the contents.
You'll need to rotate your stock regularly, ensuring older items are used first. Label everything clearly and maintain a tracking system for quick identification of stored items.
Your access points should include a sturdy well box supporting the hatch, which you'll cover with earth and mulch for insulation.
Keep the pit's entrance above the snow line but below the frost line for year-round accessibility. Install proper drainage to prevent water accumulation, and use aluminum foil pie tins filled with sand to control moisture levels.
Monitor the environment regularly with thermometers and hygrometers, adjusting conditions as needed to maintain ideal storage conditions.
Frequently Asked Questions
How Long Can Different Meats Safely Stay Preserved in a Snow Pit?
You can safely store beef and game meats for 2-4 weeks, while pork and lamb will last 1-3 weeks. Sausages have the shortest life at 1-2 weeks, assuming you maintain proper cold temperatures.
Can Snow Pits Be Used Effectively in Areas With Frequent Temperature Fluctuations?
You shouldn't rely on snow pits in areas with frequent temperature changes. They can't maintain consistent temperatures, which puts your food at risk of dangerous thawing and refreezing cycles. Consider alternative storage methods instead.
What Natural Alternatives Can Replace Straw for Insulation in Snow Pits?
You can effectively replace straw with sheep's wool, which offers superior insulation and moisture control. Hemp, cork, and recycled denim cotton are also excellent natural alternatives that'll protect against temperature variations.
Are Certain Food Containers Better Than Others for Snow Pit Storage?
You'll want to use stainless steel or silicone containers for their durability and insulation properties. They're waterproof, won't absorb odors, and resist cracking in cold temperatures, unlike plastic or glass options.
How Do Wildlife Patterns Affect the Optimal Location for Snow Pit Placement?
You'll want to avoid areas with heavy animal traffic, including their resting spots and feeding grounds. Look for locations away from tracks, especially those near wooded areas and water sources.
In Summary
You'll find storing food in snow pits becomes second nature once you've mastered these three key techniques. By carefully constructing your pit, managing temperature with strategic snow layering, and developing smart retrieval methods, you're ensuring your food stays fresh and accessible in winter conditions. Remember to check your pit regularly and maintain the snow layers – your outdoor food storage success depends on consistent maintenance.


Leave a Reply