
To build a winter snow pit for food preservation, you'll need to select a gently sloping location with well-draining soil, away from direct sunlight and flooding risks. Dig a 4-foot square pit about 4 feet deep, then construct a well box using dimension lumber with wooden cleats and lath racks for air circulation. Install proper insulation with rigid foam and closed-cell spray foam to achieve R-49 values, and create a vented roof assembly for snow load. You'll want to use durable, cold-resistant containers and maintain temperatures between 32-40°F for ideal food storage. These fundamental steps will set you on the path to successful winter food preservation.
Site Selection and Planning
A snow pit's success hinges entirely on proper site selection and thoughtful planning.
You'll want to scout your property for a location that experiences moderate winter temperatures without extreme fluctuations. For optimal food preservation, aim to maintain 32 to 40 degrees Fahrenheit in your pit. Look for ground that slopes gently, as this natural gradient will help channel excess water away from your storage area.
Choose a spot that's easily accessible during winter months but isn't exposed to direct sunlight or excessive heat. You'll need to stay clear of areas where water tends to pool or flood during rain or snow melt. It's essential to position your pit away from potential contamination sources and areas where pests commonly gather.
When evaluating potential sites, test the soil's drainage capabilities. You'll want well-draining soil that won't hold water around your pit's perimeter. If you're unsure about drainage, dig a test hole and observe how quickly water dissipates.
Consider marking your chosen location with sturdy stakes that'll remain visible even under snow. Remember to maintain a reasonable distance from heat sources like your home's foundation, furnace vents, or underground utility lines that could affect the pit's temperature stability.
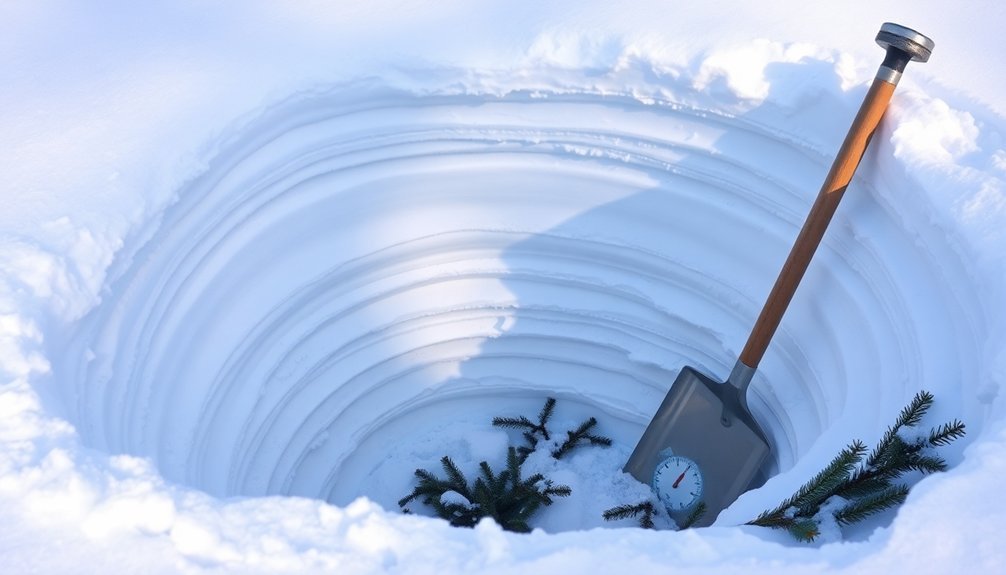
Snow Pit Depth Requirements
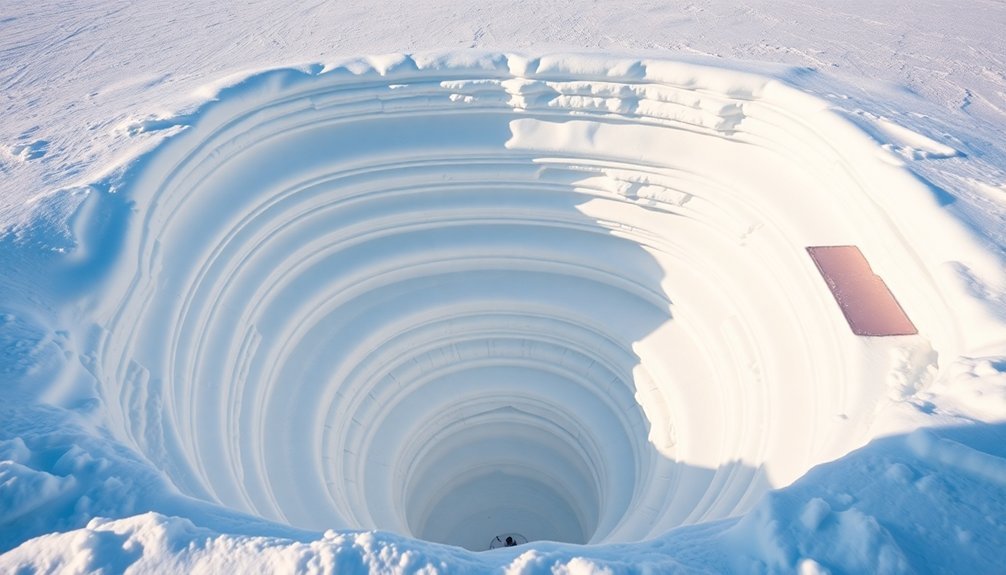
You'll need to dig your snow pit to a minimum depth of one meter to conduct effective measurements, though reaching two meters may be necessary to capture the full annual layer.
When planning your pit depth, consider the local frost line and guarantee you're digging deep enough to reach undisturbed layers beneath any surface activity.
Your measurements should extend from the ground up to the snow surface, with consistent depth intervals maintained across multiple pits if you're conducting comparative studies.
The entire process of analyzing your snow pit's layers will take approximately 1-2 hours to complete, depending on the depth and hardness of the snow.
Frost Line Considerations
For reliable snow pit construction, determining the proper depth based on your local frost line is essential. You'll need to dig your pit below the frost line to maintain consistent cold temperatures throughout the winter months.
Before you begin, consult your area's climate data to identify the average frost line depth, as this varies greatly by region and soil conditions. Measuring the snow density profile will help determine the insulating properties of your snowpack.
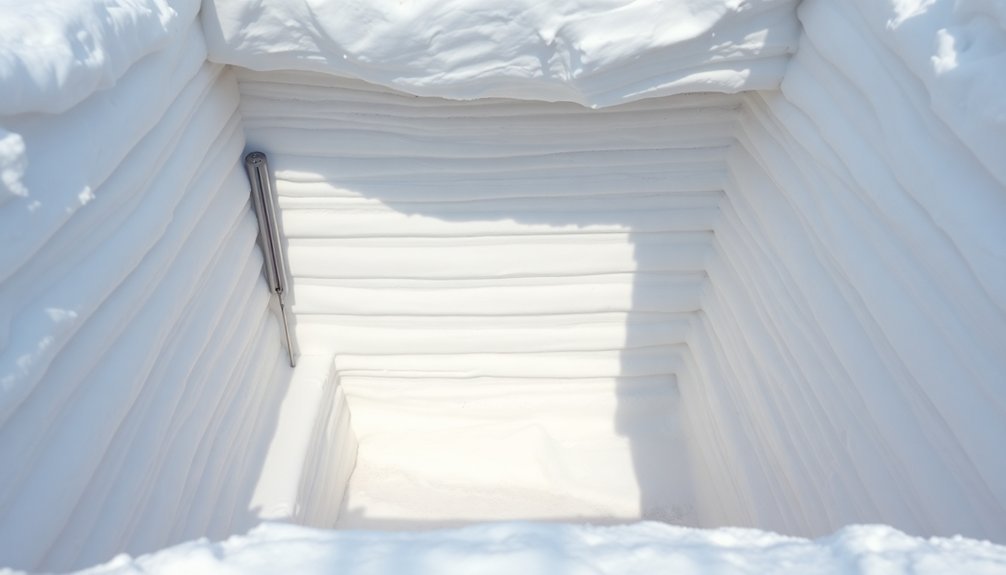
When you're excavating your snow pit, pay close attention to the different snow layers you encounter. Each layer will have unique characteristics regarding grain size, shape, and hardness.
Take temperature measurements every 10 cm from the surface down to ground level, using a properly calibrated thermometer. This will help you identify thermal gradients and areas of potential heat loss.
Select your pit location carefully, choosing a spot that's protected from direct sunlight and prevailing winds. You'll want to avoid areas with heavy vegetation or obstacles that could compromise the pit's structural integrity.
The site's slope and aspect will affect your snow accumulation and retention, so consider these factors when determining your final location. Document any unusual features in the snowpack, as they may affect your pit's performance.
Optimal Digging Measurements
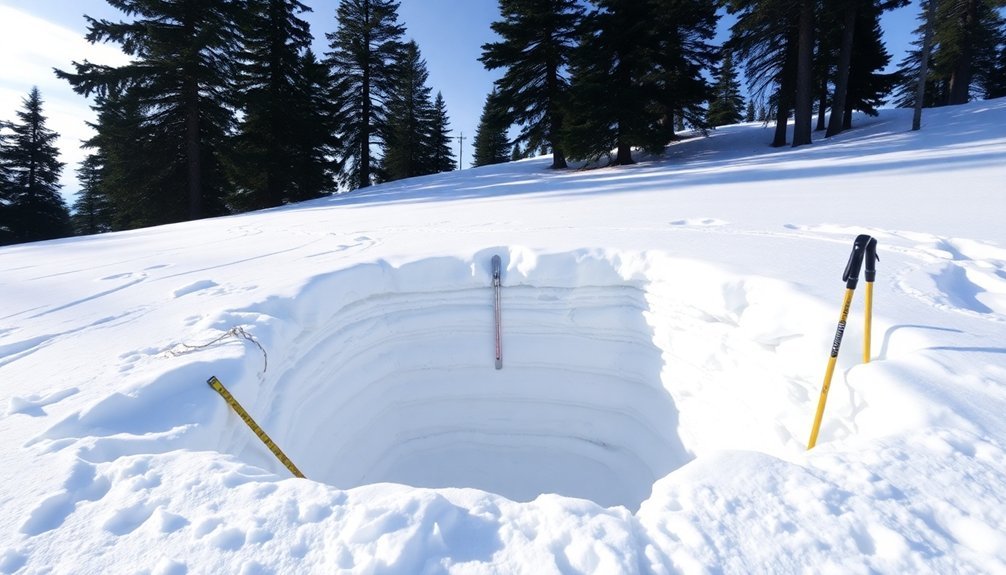
Proper snow pit dimensions are critical for accurate snowpack analysis and safe operation. You'll need to dig your pit between 1.5 and 2 meters deep (5 to 6.5 feet) to guarantee you're capturing all significant snow layers. If you're short on time, dig at least one meter deep to observe the most important layers in the snowpack.
Make your pit wide enough to match the length of a ski, which will give you adequate space to work. You'll want to create a vertical, smooth wall on the side facing away from the sun – this is where you'll conduct your measurements.
Don't forget to cut steps into one side of the pit for easy access and movement.
When measuring, anchor your metric tape to the pit wall, starting at ground level. You should mark every 10 centimeters for consistent density and temperature readings. Use golf tees or popsicle sticks to identify different snow layers and changeover zones.
If you're digging multiple pits, maintain consistent depths across all locations to guarantee your comparative analysis remains valid. Remember to avoid digging where rocks or other obstacles might interfere with your measurements.
Essential Tools and Materials
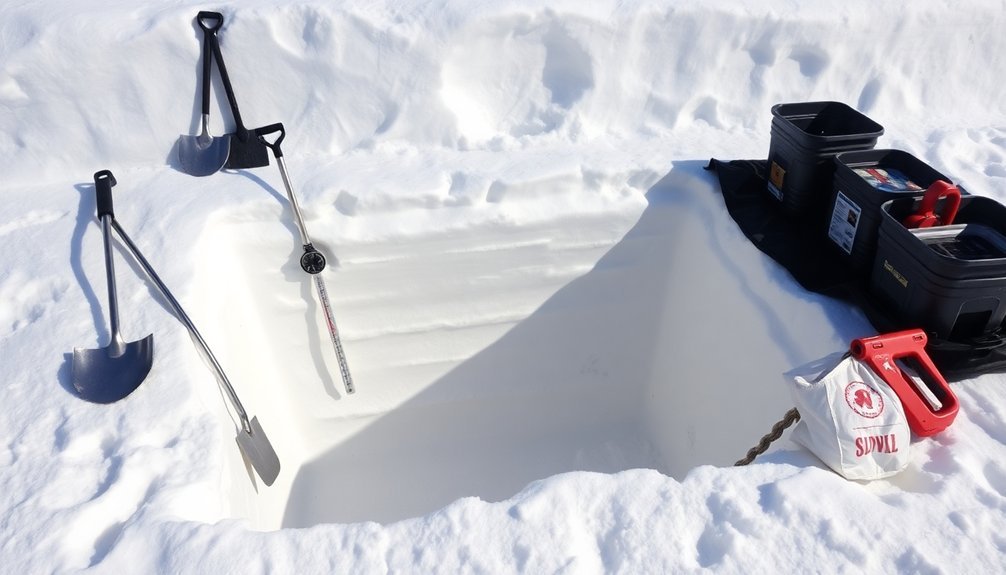
You'll need basic construction tools like shovels, pickaxes, and measuring tapes to properly excavate and shape your snow pit.
To safely store your food items, gather wooden crates, breathable baskets, and insulating materials like straw or hay for separating produce layers.
Don't forget essential safety gear including gloves, a first aid kit, and monitoring equipment such as thermometers and moisture meters to maintain ideal storage conditions.
Basic Construction Equipment Needed
Successful snow pit construction requires specific heavy equipment designed to handle intense winter conditions and move substantial amounts of snow efficiently.
You'll need a combination of machines to create a properly structured snow pit for food preservation.
A backhoe loader serves as your primary excavation tool, offering the torque needed to dig through heavy, wet snow while providing precise control for detailed work.
You'll benefit from its ability to lift snow into stockpiles and create well-defined pit walls.
For larger pit projects, you'll want to incorporate a wheel loader, which excels at moving substantial snow volumes and can be equipped with various attachments for different construction phases.
In tight spaces or for smaller pits, you'll find a skid steer invaluable.
Its compact design allows for nimble maneuvering while still maintaining enough power for effective snow removal.
If you're working on an extensive commercial-scale pit, consider using a crawler dozer for its superior stability on icy surfaces and consistent ground pressure distribution.
These tracked machines are particularly useful when you need to create stable, compacted snow walls and guarantee even snow distribution throughout the construction process.
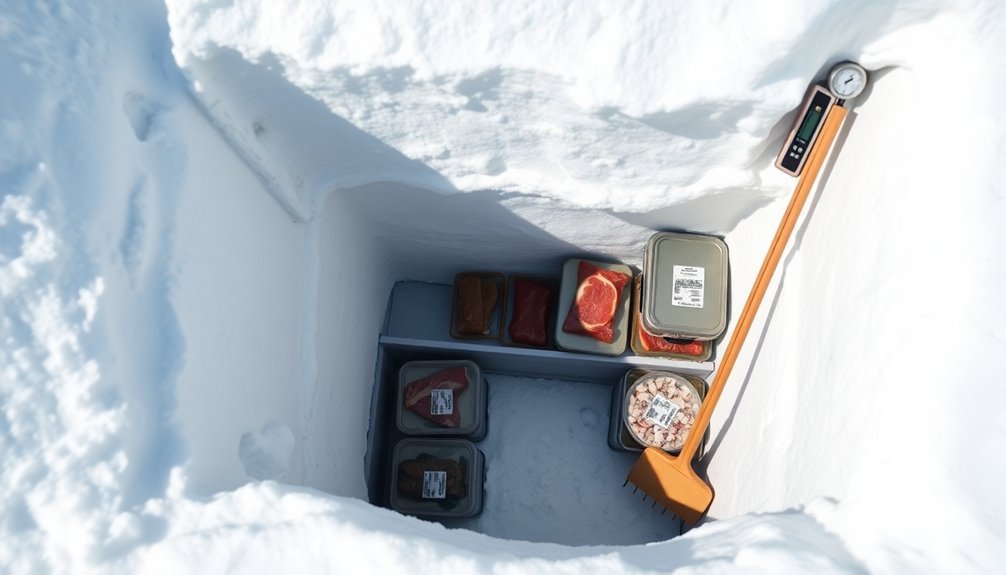
Storage Containers and Packaging
When equipping your snow pit for food storage, selecting the right containers and packaging materials becomes essential for maintaining ideal preservation conditions.
You'll need durable, leakproof containers that can withstand cold temperatures without becoming brittle. Make certain they're moisture vapor resistant and can be properly labeled for easy identification.
For humidity control, you'll want to include muslin bags to hold desiccants and cloth sacks for moisture-absorbing materials. Aluminum foil pie tins filled with sand help manage humidity levels through evaporation.
Don't forget to include rope and sacks to keep produce elevated off the pit floor for better air circulation.
For long-term storage, consider using Mylar bags or self-sealing freezer bags, especially for freeze-dried foods. You can also opt for sealable containers with Snap-On lids or #10 food grade metal cans for larger quantities.
Include oxygen absorber packets to remove residual air in sealed packages. You'll want either an impulse sealer or vacuum sealer to guarantee your packages are properly sealed.
Remember to monitor conditions regularly using a thermometer and hygrometer, adjusting humidity levels through the central duct as needed.
Safety and Monitoring Gear
Maintaining a safe and functional snow pit requires essential monitoring tools and protective equipment. You'll need reliable thermometers to guarantee temperatures stay between 50-70°F, preventing food spoilage and freezing damage. Place multiple thermometers at different heights to monitor temperature variations throughout your storage space.
Keep digital hygrometers on hand to track humidity levels, making sure they remain below 15% to prevent condensation and moisture buildup. You'll also want to include manual backup tools, like traditional thermometers and basic can openers, in case your electronic devices fail during emergencies.
For your electronic monitoring equipment, store spare batteries in warmer areas of your home, as cold temperatures can greatly reduce their lifespan. Include power banks and backup charging devices, but protect them from extreme cold that could damage their screens or internal components.
Don't forget safety gear for pest monitoring. Install battery-operated motion sensors and inspection lights to detect unwanted visitors.
Keep a logbook to track temperature readings, humidity levels, and any signs of pest activity. This documentation will help you maintain ideal storage conditions and identify potential problems before they compromise your food supplies.
Ground Preparation
Proper ground preparation lays the foundation for an effective snow pit study. You'll need to carefully select your location, ensuring it's representative of the larger area and hasn't been disturbed by foot traffic. Look for a spot that's easily accessible but away from areas where people might walk or alter the snow conditions.
Once you've chosen your site, you'll need to dig a pit at least one meter deep, though you might need to go as deep as two meters depending on your study needs. Create a smooth, vertical wall on the shaded side of the pit to prevent direct sunlight from affecting your temperature readings.
Don't forget to dig steps into the pit's side – you'll need these for easy movement during your observations.
Before you begin your measurements, secure a metric tape measure to the pit wall, starting at ground level. Mark the total snow depth and identify distinct layers using visual inspection and the naked finger test.
You'll want to document the slope aspect and percentage using a compass and clinometer, and map any surface features like crusts or drifts that could affect your findings.
Building the Storage Chamber
You'll need to construct the storage chamber using a 4-foot square well box built from dimension lumber, ensuring it extends 4 feet deep to reach below the frost line.
To provide essential structural support, install wooden cleats along the interior walls and add wooden lath racks that will keep your produce sacks elevated for proper air circulation.
The chamber's dimensions aren't arbitrary – they're specifically designed to maintain ideal temperature control while providing enough space to store and access your winter provisions.
Structural Support Techniques
The foundation of a secure snow pit storage chamber relies on precise structural support techniques.
You'll need to start by compacting a 6-foot by 6-foot area using snowshoes or skis to create a solid base that won't collapse under pressure. Make sure you're working with at least 3 feet of compacted snow for ideal stability.
For the chamber's framework, cut snow blocks roughly 2 feet by 1.5 feet and 6-8 inches thick using a snow saw or standard saw. Position these blocks in an A-frame configuration along the sides of your storage chamber, ensuring they fit tightly together to minimize gaps.
You'll want to leave some snow on the floor to create stable platforms for food storage.
To reinforce the structure, let the packed snow settle for at least an hour – this process, called sintering, greatly strengthens the snow pit. Use ski poles to gauge wall thickness as you work, and fill any tool marks with fresh snow to maintain structural integrity.
For dome-style chambers, incorporate logs, rocks, or ice blocks to keep the structure stable and secure. Don't forget to position the entrance away from prevailing winds to protect your stored items from cold drafts.
Chamber Size Requirements
With your structural foundation in place, determining the right chamber dimensions becomes your next key task. You'll want to dig your entrance tunnel low, roughly 1.5 to 2 meters from the opening, then angle it upward to create a higher storage chamber. This design guarantees cold air settles in the entrance while preserving warmer temperatures in the main chamber.
Shape your chamber in a teardrop design for ideal structural integrity and space efficiency. Make sure you've got enough headroom to comfortably move around while working with your stored items. If you're building a larger chamber that exceeds six feet in width, include snow columns for additional support.
Don't forget to create a small entry area or "mud room" for temporary storage and food preparation. For maximum temperature control, build your sleeping platform above the entrance level.
You can enhance the chamber's functionality by cutting small holes in the walls to store tools and supplies. Remember to smooth the ceiling to prevent water from dripping onto your stored items. These carefully planned dimensions will guarantee your snow pit remains structurally sound while maintaining ideal preservation conditions.
Insulation Layer Installation
Proper insulation layer installation stands as the cornerstone of an effective winter snow pit, requiring careful attention to both materials and methods. You'll need to create a multi-layered system that prevents thermal bridging while maintaining the ideal temperature of around 55°F for food preservation.
Start by installing rigid foam insulation continuously across the rafters to establish your primary thermal barrier.
- Combine closed-cell spray foam with rigid foam panels to achieve R-49 to R-50 values
- Install 2×4 purlins above rafters before adding your final sheathing layer
- Create an over-roof venting system using two decks with furring spaces
- Seal all gaps meticulously with foam insulation around exterior access points
For the roof assembly, you'll want to incorporate a vented design, especially vital in high snow load areas.
Layer your insulation by starting with pressure-treated plywood as your base, then add your rigid foam panels, followed by spray foam in any remaining gaps.
Don't forget to install custom sheet metal drip edges to maintain a watertight seal while allowing proper ventilation.
This thorough approach guarantees your snow pit maintains consistent temperatures while preventing destructive ice dams.
Drainage System Setup
Beyond insulation, effective drainage forms the backbone of your winter snow pit's longevity. You'll need to install a perforated drainage pipe system around the pit's foundation, ensuring it slopes away from the structure. Connect this system to a sump pump that'll channel water at least 20 feet from your pit to prevent moisture accumulation.
| Drainage Component | Primary Function | Winter Maintenance |
|---|---|---|
| Perforated Pipes | Water Collection | Clear ice buildup regularly |
| Sump Pump | Water Displacement | Install freeze protection |
| Discharge Line | Directional Flow | Disconnect before winter |
For winter-specific protection, you'll want to use 3" PVC piping over the standard discharge lines to prevent freezing. Install a diverter valve to redirect water flow during the coldest months. Don't forget to maintain proper slope throughout the system – even a slight incline helps prevent water from pooling and freezing. When temperatures drop, you'll need to be vigilant about removing snow accumulation around drain areas and clearing any ice formations that could block water flow. Remember to never use sharp tools to remove ice, as this could damage your drainage components.
Temperature Control Methods
Temperature management stands at the heart of a successful snow pit operation. You'll need to monitor and control temperatures regularly to maintain ideal food preservation conditions. Using thermal imaging technology alongside traditional thermometers gives you precise measurements across the entire pit surface, helping you identify any hot spots or temperature variations that could compromise storage.
- Install heating coils at the pit's bottom with vertical risers above the surface
- Position temperature sensors at key heights: soil surface, above litter layer, and every 25cm upward
- Take measurements immediately after digging to get accurate baseline readings
- Monitor temperatures at 10cm intervals for pits less than 60cm deep
When installing your heating system, place the coils strategically to guarantee uniform heat distribution. You'll want to protect them with diagonal plates or fins to prevent damage from ice and slush.
Choose your heat source based on what's readily available – options include glycol solutions, electricity, or natural gas. Install a reliable control system with temperature sensors to automatically adjust heat output and prevent overheating.
For enhanced performance, consider using a mod con boiler to boost water temperatures from 35°F to 140°F when needed.
Food Storage Organization
With your temperature control system in place, organizing your food storage becomes the next key focus.
You'll want to install a vertical wooden duct that serves as your main organizational structure, allowing you to arrange produce-filled sacks in an easily accessible manner. Attach these sacks to a main rope line using knots that you can quickly tie and release, spacing them apart to enable individual retrieval without disturbing neighboring items.
Set up a well box with an access hatch positioned above ground level, making sure it's high enough to remain accessible even during heavy snowfall.
You'll need to arrange the sacks on wooden lath racks to maintain proper air circulation throughout your storage space. When securing your produce, use small wooden cleats to fasten rope ends effectively.
Implement an efficient system for regular inspections by ensuring you can easily add or remove items as needed. The smooth-surfaced duct prevents damage to your storage sacks during movement.
Remember to position everything so you can conduct bi-weekly inspections to remove any spoiled items without disrupting your entire storage system.
Snow Compaction Techniques
Proper snow compaction forms the foundation of a successful winter pit storage system. You'll need to carefully select a well-drained site on flat terrain, away from water bodies and flood-prone areas. Start by clearing all debris from the area and guarantee you're working with a pervious surface that allows proper filtration of snowmelt.
- Choose heavy machinery or manual compaction tools based on your pit size
- Work in layers to achieve uniform density and prevent ice formation
- Install barriers like silt fences to control meltwater flow
- Maintain vegetative buffers around the site for natural filtration
When compacting snow for your storage pit, you'll want to pack each layer thoroughly before adding the next. This systematic approach prevents air pockets that could compromise your food storage temperatures.
Don't forget to map out the surface drainage patterns to guarantee meltwater won't pool around your storage area. You should also regularly inspect the site for signs of erosion or contamination, especially during warmer periods.
Year-Round Maintenance Schedule
A well-organized maintenance schedule assures your snow pit remains functional throughout the year. You'll need to start your preparations in spring by conducting preventive maintenance on equipment and securing necessary supplies. As summer approaches, make sure you've checked all mechanical components, including motor oil levels and hydraulic fluid.
| Season | Primary Tasks | Equipment Needs |
|---|---|---|
| Spring | Equipment maintenance, supply procurement | Basic tools, maintenance supplies |
| Summer | Storage preparation, workforce training | Storage materials, training equipment |
| Winter | 24/7 operations, regular inspections | Snow removal tools, generators |
During winter months, you'll want to maintain 24/7 staffing rotations with at least three operators per shift. Don't forget to establish clear communication protocols and set up a command center for coordinating snow operations. Keep floor runners in place at entrance points to prevent ice damage, and regularly inspect exterior elements like gutters for potential issues.
As winter winds down in March, begin scaling back operations while maintaining critical systems until the season fully ends. Use this time to review your winter performance and plan improvements for next year. Remember to properly store all equipment and complete any necessary maintenance before the next winter season begins.
Frequently Asked Questions
Can Multiple Families Share One Snow Pit Storage System Effectively?
You can effectively share a snow pit with multiple families if you'll establish clear organization systems, divide maintenance duties, and create usage guidelines. It's practical when everyone cooperates and follows agreed-upon protocols.
How Do Wild Animals React to Food Scents From Snow Pits?
You'll notice wild animals are strongly attracted to food scents from snow pits. They'll actively investigate the area, and their natural caution may decrease as hunger drives them to seek out these food sources.
What Happens if the Snow Pit Freezes Completely During Extreme Cold?
If your pit freezes completely, you'll lose temperature regulation and risk freezer burn on stored foods. You'll need to add insulation and possibly use hot objects through the wooden duct to restore proper conditions.
Are Traditional Snow Pits More Energy-Efficient Than Modern Refrigeration Methods?
While traditional snow pits don't use any electricity, making them technically more energy-efficient, they can't match modern refrigeration's reliability, temperature control, and scalability that you'd need for practical food preservation today.
Can Snow Pits Be Modified for Summer Storage Without Major Reconstruction?
You can adapt snow pits for summer use by adding 30-40 cm of sawdust or woodchips as cover, shaping the pit for ideal volume-to-surface ratio, and ensuring proper drainage to minimize groundwater heat transfer.
In Summary
You'll find a snow pit offers reliable, eco-friendly food storage when built and maintained properly. Watch your temperature levels closely and check for any signs of melting or structural issues throughout the seasons. Remember to rotate your stored items regularly and repack the snow as needed. With consistent care and monitoring, you've got a sustainable solution that'll serve your food preservation needs year after year.


Leave a Reply