To master air-dried salted cod, you'll need to focus on five key steps. Start by selecting fresh cod with firm flesh, clear eyes, and a mild sea scent. Next, prepare a salt curing mixture and coat the fish thoroughly, using a non-reactive container kept at 3-5°C. Position your cod in direct sunlight at a height of 6-7 feet, covered with cheesecloth for protection. Monitor environmental conditions carefully, maintaining consistent airflow and temperature while preventing excess humidity. Finally, test for proper dehydration by checking moisture content and texture. Following these steps will reveal the secrets to creating perfectly preserved bacalhau.
Select and Clean Fresh Cod
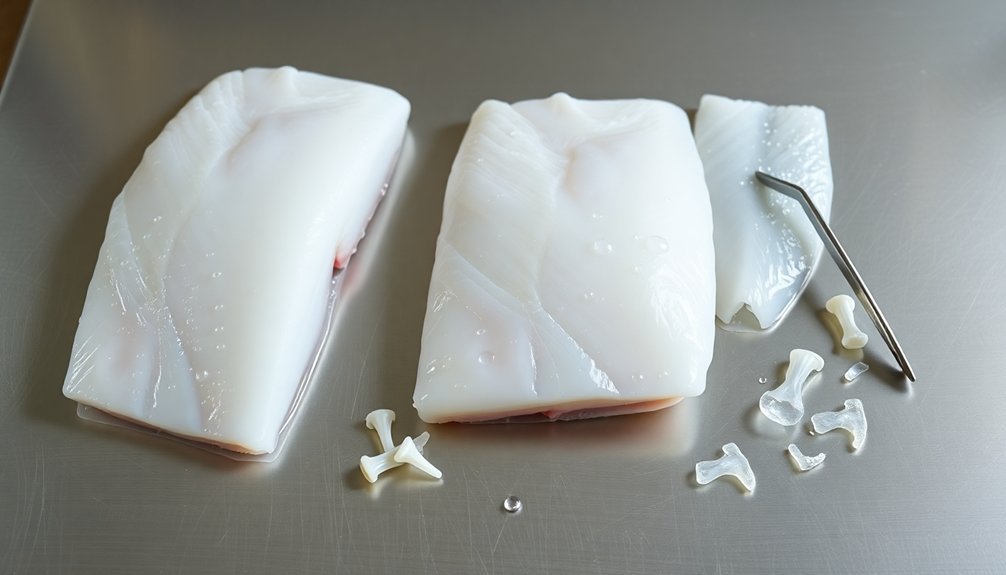
For successful air-dried salted cod, selecting the right fish is essential. You'll need to rely on your senses to identify the freshest cod available.
First, trust your nose – fresh cod should have a mild, pleasant sea scent. If you detect any strong fishy, sour, or ammonia-like odors, don't purchase the fish. Fresh cod must be used within two days of purchase for optimal results.
Visually inspect the cod's appearance carefully. Look for clear, bright eyes if you're buying whole fish, as cloudy or sunken eyes indicate aging. The flesh should appear firm and glistening, with a distinctive silvery layer beneath the skin for Atlantic cod. When you press the flesh with your finger, it should spring back immediately – avoid any fish that feels mushy or leaves an indentation.
Make certain the cod you're buying has been properly stored. It should be displayed on a thick bed of fresh ice or kept refrigerated.
Don't purchase fish that's been sitting at room temperature for more than two hours. Check any packaging for time and temperature indicators, and verify the storage area appears clean and well-maintained.
Proper selection at this stage will notably impact your final product's quality.
Apply Salt and Curing Mixture
After selecting and cleaning your fresh cod, proper salting and curing will determine the success of your final product.
You'll need to prepare a curing mixture using salt as the primary ingredient, with optional additions of sugar, black pepper, garlic, or herbs for enhanced flavor. For dry curing, generously coat your cod fillets with the mixture, while for brine curing, use a ratio of 1 cup of salt per quart of water. This preservation method creates a long shelf life for your fish.
Place your coated fillets in a non-reactive container and guarantee complete coverage. If you're using the brine method, fully submerge the fish and use weights if necessary to keep it below the surface.
The curing process requires careful monitoring, with timing varying based on your desired outcome.
For best results, follow these critical steps:
- Maintain a consistent temperature between 3°C and 5°C throughout the curing process.
- Check the fish regularly for signs of proper curing or potential spoilage.
- Allow proper drainage if dry curing, or change the brine solution periodically if wet curing.
Keep your curing fish in a cool, dark place with good ventilation, as these conditions will greatly impact the final quality of your salted cod.
Position for Air Drying
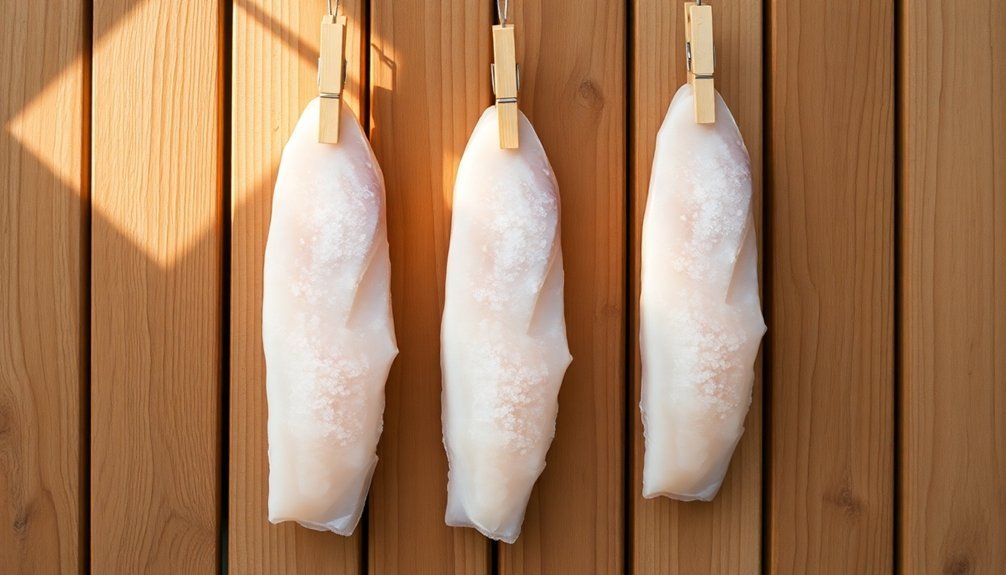
Proper positioning of your salted cod directly impacts its drying success. You'll need to hang your fish in a location with direct sunlight using a sturdy apparatus like a broomstick or specialized drying rack. Skewer the fish to maximize surface exposure, and if you're drying whole cod, pull the sides apart to guarantee the gut area dries thoroughly.
| Setup Element | Purpose | Key Consideration |
|---|---|---|
| Cheesecloth Cover | Pest Prevention | Must allow airflow |
| Hanging Height | Air Circulation | 6-7 feet from ground |
| Location | Even Drying | Away from humidity |
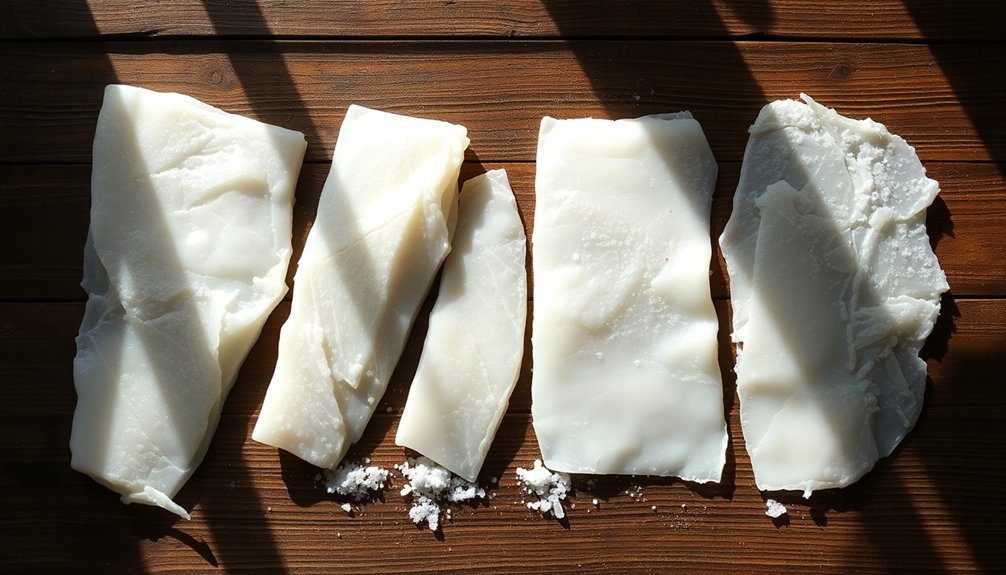
Choose a spot with consistent air movement and protect your cod by covering it with cheesecloth to prevent insect contamination. You'll want to keep the fish pieces separated to guarantee even air circulation around each piece. Monitor the drying area's temperature and humidity levels, as these factors greatly affect the drying process. Don't forget to adjust the fish's position throughout the day for even sun exposure. Select a clean area away from strong odors and potential contaminants, and guarantee your hanging method is secure to prevent the fish from falling during the drying period. The entire process typically takes up to two days for complete drying when done properly.
Monitor Environmental Conditions
Environmental precision stands at the heart of successful cod drying. You'll need to carefully balance temperature, humidity, and wind conditions to achieve ideal results. Keep temperatures low but above freezing, particularly during the prime drying months of January through April. Monitor closely to prevent the development of 'pink fish' or 'dun' mold that can occur with excessive heat.
Wind and humidity management are equally important. You'll want consistent air circulation to remove 70-85% of the fish's water content while maintaining appropriate moisture levels to prevent over-drying. Watch for crust formation on the fish surface, as this indicates improper humidity levels.
To maintain product quality, you must:
- Monitor temperature constantly to prevent lipid oxidation and protein denaturation
- Control humidity levels to guarantee even drying while avoiding moisture accumulation
- Maintain proper air circulation to prevent mold growth and bacterial development
Don't overlook contamination risks during the drying process. Use only clean fishery salt, maintain a sanitized drying area, and handle the fish with care. If you spot any signs of spoilage, remove affected pieces immediately to protect the remaining batch.
Test for Proper Dehydration

Having established ideal environmental controls, you'll need precise testing methods to confirm proper dehydration of your salted cod. Begin by randomly selecting samples from your batch, ensuring you brush away surface salt particles before analysis. You'll need to weigh and photograph each cod specimen before proceeding with the tests.
| Test Type | Method | Target Result |
|---|---|---|
| Water Content | Oven dry at 103-105°C | ≤ 47% moisture |
| Sample Collection | Cross-section cuts | Even distribution |
| Visual Check | Surface inspection | No moisture pockets |
| Texture Analysis | Manual assessment | Tough but not brittle |
| Weight Analysis | Compare pre/post drying | Consistent loss |
To determine water content precisely, cut your samples into smaller pieces and use the formula: Water content (g/100g) = 100*(W1-W2)/(W1-Ws). You'll want to dry these in an oven until you reach a constant weight. For best results, maintain a drying time of approximately 95 hours. Document your findings, including the length and weight of each fish tested. If your tests reveal water content above 47%, you'll need to continue the drying process to meet legal standards.
Frequently Asked Questions
How Long Can Properly Air-Dried Salted Cod Be Stored?
You'll find that properly stored air-dried salted cod can last 8 months in your cupboard, but when you maintain ideal cool, dry conditions and airtight packaging, it's possible to preserve it for several years.
Why Does My Salted Cod Have Yellow Spots After Drying?
Your salted cod's yellow spots likely come from inadequate salting, poor moisture control, or improper storage. You'll want to guarantee proper salt coverage, complete drying, and storage in cool, dark conditions next time.
Can I Use Iodized Table Salt Instead of Sea Salt?
Yes, you can use iodized table salt for salting cod. While sea salt's often preferred, table salt will preserve your fish just as effectively. The iodine content won't affect the final product's quality or taste.
What Alternatives Can I Use if Outdoor Drying Isn't Possible?
You can use a dehydrator for the fastest results, or try oven drying with the door cracked open. If you're not in a hurry, refrigerator curing's also effective, though it takes longer.
Should I Remove Dark Belly Meat Before Starting the Process?
Yes, you'll want to remove the dark belly meat before starting. It's tougher and has a stronger flavor that can affect your final result, though it's ultimately your choice based on personal preference.
In Summary
You've now learned the essential steps to master air-dried salted cod at home. While it requires patience and attention to detail, you'll find the process rewarding once you taste the final product. Just remember to maintain proper humidity levels and air circulation throughout the drying period. If you've followed these steps carefully, you'll have perfectly preserved cod ready for your favorite traditional recipes.


Leave a Reply