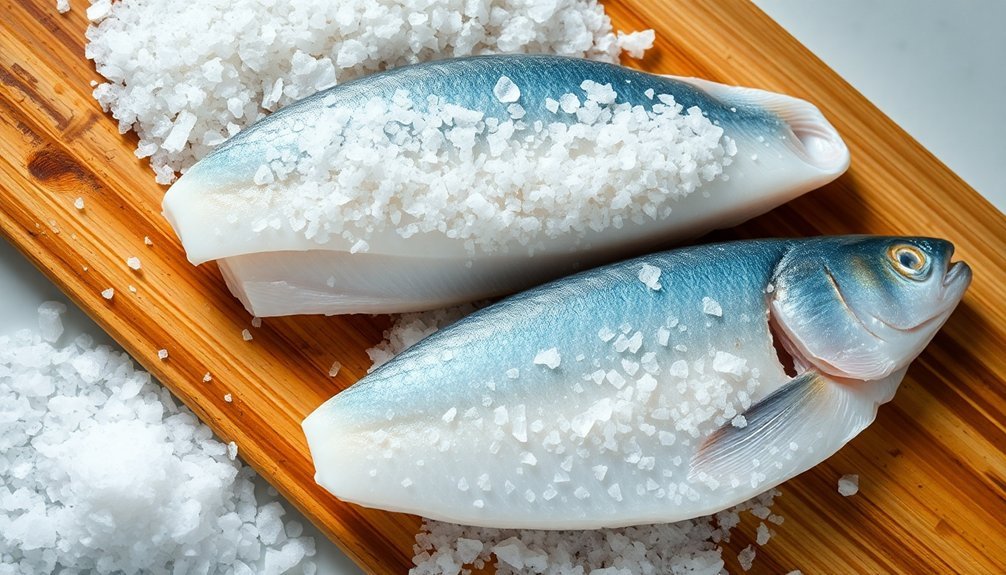
Before air-drying your fish, you'll need to follow critical preparation steps for safe curing. Start by selecting fresh fish with clear eyes, firm flesh, and bright scales. Clean and scale the fish thoroughly, removing all organs and blood by soaking in saltwater (300g salt per liter). Pat the fish dry and guarantee uniform fillet thickness for even curing. Apply either a dry salt coating or submerge in brine (1 cup salt per quart water), keeping temperature between 34-35°F. Monitor the process until the flesh feels firm with a slightly tacky surface. The success of your cured fish depends on mastering these foundational steps.
Essential Fish Selection Guidelines

Selecting the right fish is vital for successful salt-curing. When choosing your fish, you'll need to take into account both the species and its fat content, as these factors directly impact the curing process and final results.
You can work with fatty fish like salmon and mackerel, which offer rich flavor and texture, but keep in mind they're more challenging to cure and won't keep as long. If you're new to curing, you might want to start with lean fish like cod, haddock, or pollock, as they're more forgiving and require shorter curing times. Using coarse sea salt will give you better control over the curing process.
Before beginning the curing process, verify your fish fillets are uniform in thickness. This consistency is essential for even salt penetration and moisture extraction.
You'll also need to thoroughly clean the fish, removing all bones, blood, and membranes. Start by carefully taking out all pin bones, as these can become potential spoilage points.
Then, remove the backbone and any remaining bones without damaging the flesh. Don't forget to clean the fish thoroughly inside and out, removing all blood and offal to prevent bacterial growth during the curing process.
Inspecting Fish Quality and Freshness
When selecting fish for salt-curing, you'll need to check for clear, bulging eyes and bright, intact scales that indicate peak freshness.
Next, you should smell the fish, ensuring it has a light, ocean-fresh scent rather than a strong, fishy odor that would signal spoilage. Regular sensory evaluation techniques help ensure consistent quality assessment of the fish.
Press your finger gently against the flesh to verify it's firm and springs back quickly, avoiding any fish that feels mushy or leaves an indentation.
Visual and Aroma Checks
The success of salt-curing fish heavily depends on starting with fresh, high-quality fish. You'll need to carefully examine the fish's appearance and smell before beginning the curing process. This initial inspection is crucial since proper salt curing will significantly extend the shelf life of your catch.
Look for shiny, firm skin with tightly attached scales, and check that the eyes are clear and bulging, not sunken or cloudy. The gills should be bright red and free of slime, while the overall appearance should show no signs of mold, rust, or discoloration.
Trust your nose when evaluating freshness. Fresh fish should have a mild, ocean-like aroma without any strong fishy smell. If you detect ammonia, sourness, or chemical odors, particularly from the gills or flesh, don't use the fish for curing.
- Slime or mucus on the skin and gills indicates spoilage and makes the fish unsuitable for curing
- Soft, mushy texture around the gills and eyes means bacterial growth has begun
- A strong fishy or ammonia smell suggests the fish has started decomposing
- Loose or flaking scales combined with discoloration point to poor handling or age
If you notice any of these warning signs, it's best to reject the fish and select a fresher specimen for your curing project.
Testing Fish Flesh Firmness
Beyond visual and aroma checks, proper assessment of fish flesh firmness helps determine if your fish is suitable for curing. When testing firmness, you'll want to look for flesh that's resilient and firm, as soft flesh can lead to quality issues during the curing process.
You can test firmness through several reliable methods. The Warner-Bratzler shear blade, used with a TA.XT Plus Texture Analyzer, offers the most effective measurement for fish fillets. It measures the cutting force needed to penetrate the flesh, providing consistent and accurate results that help predict how well the fish will handle during curing.
The tensile strength test is another valuable method you'll find useful, especially for predicting post-mortem gaping – a common issue that affects about 40% of Atlantic salmon. This test involves pulling the flesh apart to measure its resistance, helping you assess its durability for the curing process.
For a simpler approach, you can use the compression and rebound method. Press the flesh with consistent pressure and observe how it rebounds. Good quality fish flesh should spring back quickly and maintain its structure, indicating it's suitable for curing.
Proper Fish Cleaning Methods
Before diving into salt-curing fish, proper cleaning methods lay the foundation for a successful preservation process.
You'll need to start by thoroughly rinsing the fish under cold water, removing any loose debris that could compromise the final product. Using a fish scaler or the back of a knife, work from tail to head to remove all scales, ensuring you don't damage the flesh underneath.
Make a clean incision along the belly and carefully remove all innards, then rinse the cavity thoroughly to eliminate any remaining blood. After removing the head and fins, you're ready to begin filleting.
Position the fish on its side, make your initial cut behind the gills, and carefully separate the fillets from the backbone. Don't forget to remove any remaining bones with tweezers.
Essential tips for clean, safe fish preparation:
- Use high-quality filleting knives with non-slip handles to maintain control during wet conditions
- Keep your workspace clean and organized to prevent cross-contamination
- Always use cold water for rinsing to maintain flesh integrity
- Pat the fish completely dry with paper towels before moving on to the curing process
Salt Types and Their Uses
With your fish properly cleaned and prepared, selecting the right salt becomes your next key step in successful curing.
You'll want to choose either coarse sea salt or kosher salt, as they're free from additives and dissolve at a slower rate, giving you better control over the curing process. Avoid table salt, as its anti-caking agents and iodine can leave unwanted flavors in your fish.
The size of your salt grains matters greatly. Larger grains draw moisture out more slowly, which can be beneficial for certain fish types. You might find that combining coarse and fine salt gives you ideal results, especially when working with different thicknesses of fish fillets.
When measuring your salt quantities, you'll need approximately 30-40% of the fish's weight in salt for dry curing.
If you're working with fatty fish, you'll want to take into account using a brine solution containing about 36% salt instead of dry salting. The brine method guarantees more even distribution of salt throughout the flesh and produces a more delicate finish compared to dry curing's firmer texture.
Tools and Equipment Needed
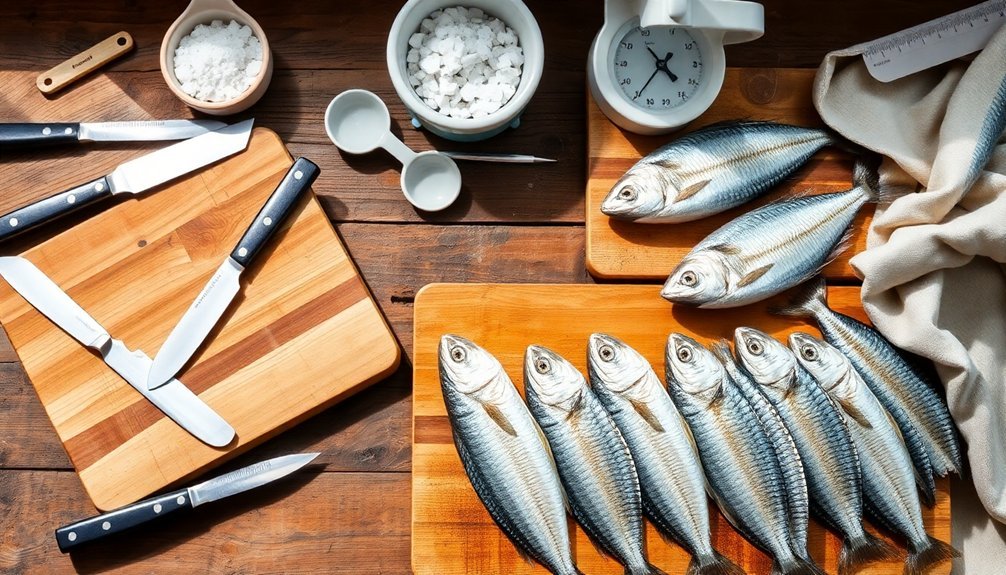
Getting started with salt-curing fish requires a specific set of tools and equipment to guarantee success.
You'll need containers for both the salting process and storage, including watertight coolers, stoneware crocks, or oil drums depending on your batch size. For the actual salting work, gather a flat-bottomed bowl or baking sheet to coat the fish, plus a wooden salting vat and shovel for mixing.
The pressing and drying phase demands clean wooden planks, non-metal weights, and proper drying racks that minimize wood contact with the fish.
Essential tools include sharp knives for preparation, a salinometer to measure brine concentration, and a proper drainage system to remove excess liquid.
- Choose containers that won't react with salt – avoid metal containers that could corrode and taint your fish
- Set up your drying racks in a well-ventilated area to prevent moisture buildup
- Keep separate tools for different stages to avoid cross-contamination
- Maintain clean, dedicated weights for pressing – they'll be in constant contact with your fish during curing
Fish Preparation Fundamentals
You'll want to start by selecting fresh fish that's firm to the touch and has clear eyes, bright red gills, and no off-putting odors.
Before beginning the curing process, properly clean your fish by scaling, gutting, and thoroughly rinsing it under cold water, then pat it dry with paper towels.
Keep your fish properly chilled at 40°F (4°C) or below until you're ready to begin the curing process, ensuring ideal food safety and quality results.
Quality Fish Selection Standards
Selecting quality fish is the cornerstone of successful salt-curing. You'll need to guarantee your fish is fresh, properly chilled, and free from any signs of spoilage. Remember that salting won't improve poor-quality fish, so starting with top-grade fish is essential for achieving the best results.
When choosing your fish, you can opt for either fatty varieties like salmon and mackerel or leaner white-meated fish. Fatty fish will develop a silky texture and require longer curing times, while leaner fish become denser after curing. Your local favorites, such as red snapper, flounder, or speckled trout, can work well too.
- Fresh fish should feel firm to the touch and have bright, clear eyes
- There shouldn't be any strong fishy odors – fresh fish smells mild and clean
- The gills should be bright red, not brown or gray
- The flesh should spring back when pressed and shouldn't feel slimy
You'll need to handle and store your fish properly from the moment it's caught or purchased. Use clean containers, maintain proper temperatures, and guarantee all working areas remain uncontaminated.
Immediate chilling after catching helps prevent bacterial growth and maintains the fish's quality throughout the curing process.
Safe Cleaning Procedures First
Proper cleaning procedures form the foundation of safe salt-curing.
You'll need to start by rinsing your fish under cold water to remove debris, then use a fish scaler or the back of a knife to remove scales, working from tail to head. Cut off the head and fins to make the cleaning process more manageable.
Make a careful incision along the belly and remove all internal organs, including the kidney (the dark streak along the backbone). It's essential to thoroughly wash the cavity to remove any blood.
When filleting, place the fish on its side, cut behind the gills down to the backbone, and slice toward the tail to separate the meat from bones. Don't forget to remove any remaining bones with tweezers.
Next, you'll need to address blood removal through a saltwater soak. Create a brine solution using 300 grams of salt per liter of water, or 1 cup of salt per gallon of cold water.
Soak the fish for about 30 minutes, then rinse in clean water. Finally, pat the fillets completely dry with paper towels before moving on to the curing process.
Proper Storage Before Curing
A fish's journey to successful salt-curing begins long before the actual preservation process. You'll need to maintain proper storage conditions immediately after catching or purchasing your fish to guarantee the best possible results. Keep your fish consistently chilled, either through ice or refrigeration, to prevent any potential spoilage and maintain its original quality.
The environment where you store your fish must be clean and sanitary to avoid contamination. Whether you're working with fatty fish like salmon or leaner varieties, proper storage temperature is essential for preserving the flesh's integrity until you're ready to begin the curing process.
- Store fish at temperatures between 32-38°F (0-3°C) to maintain ideal freshness
- Keep fish wrapped in moisture-proof packaging to prevent cross-contamination
- Place fish in the coldest part of your refrigerator, typically the bottom shelf
- Use within 1-2 days of purchase for best results
You'll know your fish has been stored properly when it maintains its firm texture, natural color, and fresh ocean smell.
Poor storage can lead to bacterial growth and compromised flavor, which will affect the entire curing process regardless of your technique or recipe.
Basic Curing Methods

Fish preservation through curing relies on three fundamental methods: dry curing, wet curing, and acid curing. Each method offers distinct advantages and results in different textures and flavors.
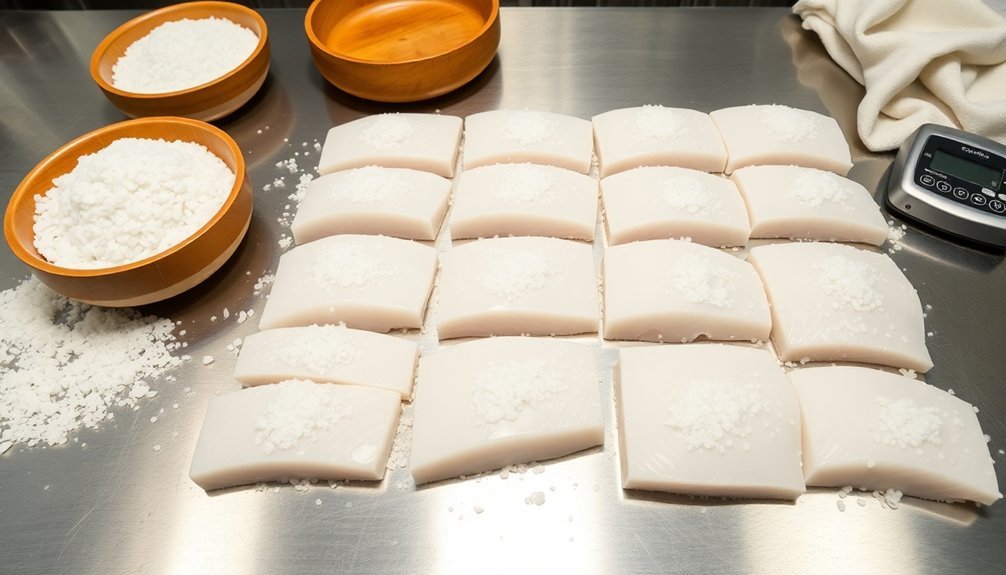
In dry curing, you'll coat your fish fillets directly with salt, guaranteeing even coverage across the surface. Place the salted fish in a non-reactive container and refrigerate it. The salt draws moisture from the fish, creating a natural brine while producing a firmer final texture.
Wet curing requires you to prepare a saltwater solution using one cup of salt per quart of water. You'll completely submerge your fish fillets in this brine, which allows for more uniform salt distribution throughout the flesh. This method typically yields a more delicate texture than dry curing.
If you're looking for a quick preservation method, acid curing using citrus juices offers an alternative to salt-based methods. While it won't preserve fish long-term, it's perfect for small quantities and dishes like ceviche.
Before applying any curing method, you'll need to properly clean your fish by scaling, gutting, and filleting it, then pat it dry to guarantee effective preservation.
The Salt Application Process
Now that you understand the basic methods, mastering the salt application process will determine your success in fish preservation.
You'll need to start with properly cleaned fish fillets of uniform thickness, guaranteeing you've removed all scales, innards, and blood. When applying salt, you can choose between dry curing or brine curing methods, but both require careful attention to coverage and contact.
For dry curing, coat your fillets generously with coarse sea salt or kosher salt, avoiding table salt with additives. If you're using brine, mix one cup of salt per quart of water and guarantee your fish stays fully submerged. You can add sugar to your salt mixture at a ratio of 1.4% salt to 0.6% sugar to balance the flavor.
Key considerations for successful salt application:
- Layer your fish with alternating directions to guarantee even distribution of salt
- Use weights to keep fish submerged if you're using brine
- Maintain consistent salt contact throughout the curing process
- Keep the temperature cool to prevent bacterial growth and spoilage
Remember to pack multiple layers with salt between each layer, starting with a thin salt base in your non-reactive container.
Monitoring Curing Progress

During the curing process, careful monitoring becomes essential to achieve the perfect balance of salt penetration and moisture reduction.
You'll need to adjust your curing time based on the type and size of fish you're working with, as times can range from 2-4 hours for a light cure to 24-48 hours for a more intense flavor.
Watch for changes in the fish's texture and water content as the salt penetrates the muscle. The water content should decrease from its initial 75-80% to around 50% or less, while salt content increases to approximately 25-30%.
You'll notice the flesh becoming firmer and more concentrated in flavor as proteins restructure and enzymes deactivate.
Keep a close eye on temperature and humidity levels, as these factors can affect curing times.
You'll want to avoid over-curing, which results in an overly salty or dry product. For fattier fish, you'll need longer curing periods, but the salt helps prevent rancidity in the oils.
Throughout the process, guarantee proper cleaning and removal of blood to prevent spoilage.
Once curing is complete, store your fish in a cool, dark place to maintain quality.
Temperature and Environment Control
Your salt-cured fish needs a consistent temperature between 1-2°C (34-35°F) and proper air circulation to guarantee ideal results.
Keep the humidity under control by using raised racks covered with nylon mesh and maintain adequate spacing between fish pieces to allow proper airflow.
You'll want to protect your curing fish from direct sunlight while guaranteeing good ventilation, which you can achieve by using burlap or green leaf covers that don't directly touch the fish.
Ideal Storage Temperature Range
For ideal preservation of salt-cured fish, maintaining proper storage temperatures is critical across different environments.
You'll need to closely monitor temperatures whether you're storing your fish in the refrigerator, freezer, or at room temperature. Your refrigerator should stay between 32°F to 39°F (0°C to 4°C), while your freezer must maintain temperatures at or below 0°F (-18°C).
During transportation and handling, don't let temperatures exceed 50°F (10°C), and avoid exposing the fish to temperatures above 70°F (21.1°C) for more than four hours.
If you're storing at room temperature, which isn't recommended, verify your fish is thoroughly cured and kept in a cool, dark place with proper moisture control.
- Refrigerated storage at 32-39°F extends shelf life to several weeks when fish is tightly wrapped
- Freezer storage at 0°F or below preserves quality for up to a year with vacuum sealing
- Room temperature storage requires thorough curing and airtight containers with desiccants
- Transportation temperatures must stay at or below 50°F using sufficient cooling media
Remember to thaw frozen fish in the refrigerator for 24 hours before use, never at room temperature, to prevent bacterial growth.
Humidity Control Measures
Through careful monitoring of both temperature and humidity, successful salt-curing depends on maintaining precise environmental controls.
You'll need to keep temperatures below 3°C for dry salting and under 10°C for brine salting to prevent bacterial growth and surface damage. Higher temperatures can compromise both the curing process and the fish's quality.
You'll want to focus on maintaining low humidity levels during the air-drying phase. While sunlight might seem ideal, it can actually discolor your fish, especially in the early stages. Instead, choose a shaded area with good air circulation. If you're in a warm, dry climate like Texas, you'll find the conditions particularly suitable for the drying process.
To protect your fish during drying, cover it with cheesecloth to keep insects away. You can also create a smoke smudge using wood fire and green branches as an additional barrier against flies.
Don't use resinous woods like pine or fir, as they'll affect the taste. Remember to check your fish regularly for any signs of mold or deterioration, which can occur if humidity levels rise too high. Proper ventilation and consistent environmental monitoring are essential for achieving the best results.
Airflow and Ventilation Setup
In order to maintain proper temperature and airflow control, setting up an effective ventilation system is essential for salt-curing fish. You'll need to guarantee temperatures don't exceed 3°C during dry salting and 10°C for brine baths.
Position fans or ventilation systems strategically to create slow, consistent air movement that prevents rapid drying and case hardening.
Set up your drying area with proper racks or hanging systems that allow fish to be suspended with enough space between pieces. You'll want to cover the fish with cheesecloth or similar protective netting to keep insects away while maintaining adequate airflow.
Remember that good air circulation helps form a protective "skin" on the fish that retains juices and enhances smoke absorption if you're planning to smoke the fish later.
- Install thermometers at different points in your drying area to monitor temperature distribution
- Position fans to create gentle, uniform airflow rather than direct, strong air currents
- Mount racks or hanging systems at least 12 inches apart to guarantee proper air circulation
- Place drip containers beneath hanging fish to collect brine and maintain cleanliness
Signs of Successful Curing
Successful salt-curing relies on several clear indicators that tell you when the process is complete.
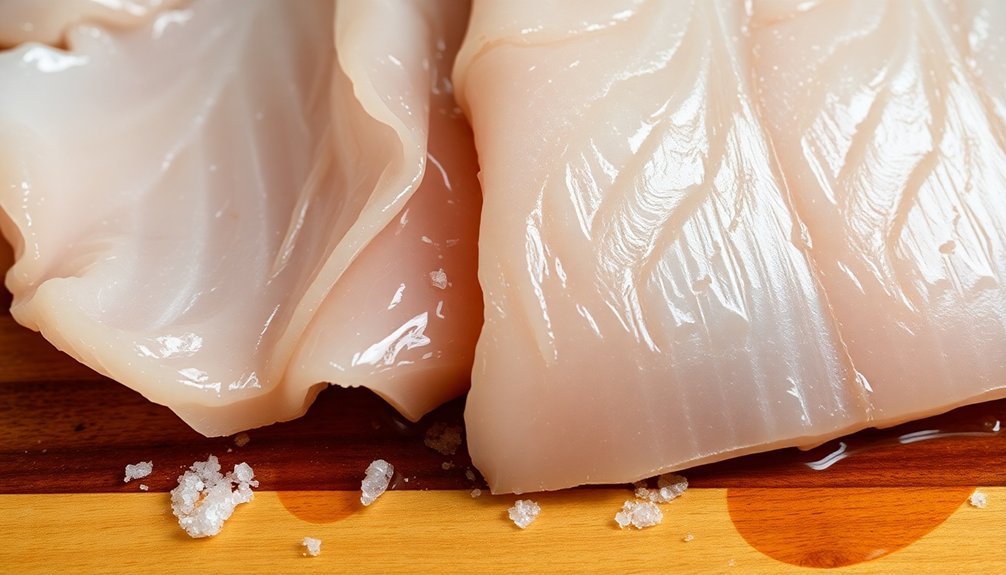
You'll notice the water content has dropped from around 75-80% to approximately 50%, while the salt content should reach about 25% in the fish flesh. When you touch the fish, it should feel firm, with a dry, slightly tacky surface, indicating proper moisture extraction.
You'll know you've achieved proper curing when the fish develops a more intense flavor and uniform texture throughout. There shouldn't be any soft spots or sogginess, and you shouldn't see any discoloration or signs of bacterial growth. A thin brine solution covering the fish surface is normal and expected.
Before moving to the air-drying phase, you'll need to verify that the fish is thoroughly cleaned of excess salt, blood, and waste.
The flesh should be firm enough to withstand gentle pressure when weighted down. You'll want to rinse the fish carefully and pat it dry, then position it to minimize surface contact during the drying process.
If you've followed these steps correctly, you won't see any signs of fermentation or detect any spoilage odors.
Frequently Asked Questions
Can I Reuse Leftover Curing Salt for Future Batches of Fish?
You shouldn't reuse leftover curing salt as it's unsafe and can cause food poisoning. The salt's already absorbed proteins and bacteria from previous fish. Always use fresh curing salt for each new batch.
How Do Allergies Affect the Consumption of Salt-Cured Fish Products?
If you're allergic to fish, you shouldn't consume salt-cured fish products as they can trigger severe reactions including hives, breathing difficulties, and even anaphylaxis. The curing process doesn't eliminate these allergens.
What Causes Some Fish to Turn Slightly Pink During Curing?
You'll notice pink coloring in cured fish due to two main factors: nitrites added for preservation and food safety, and halophilic bacteria that thrive in salty conditions. Both causes aren't harmful to eat.
Does Altitude Affect the Salt-Curing Process and Timing?
Yes, altitude can affect your curing process since it impacts temperature and humidity levels. You'll need to adjust curing times as higher altitudes typically have lower temperatures and humidity, which influence salt penetration rates.
Can Traditionally Salt-Cured Fish Be Safely Consumed During Pregnancy?
You shouldn't eat traditionally salt-cured fish during pregnancy due to listeria risks. If you're craving fish, choose fully cooked options or hot-smoked varieties heated to 165℉ (74℃) for safety.
In Summary
You'll need patience and attention to detail for successful salt-curing fish. If you've followed the proper steps – selecting fresh fish, cleaning thoroughly, using the right salt, and maintaining ideal conditions – you're well on your way. Watch for the telltale signs of proper curing before moving to the air-drying phase. With practice, you'll master this time-tested preservation method.


Leave a Reply