
You'll find wild fermentation surprisingly accessible with just a few key steps. Start by collecting pesticide-free plants during late spring or summer when sugar content peaks. Clean your glass jars or ceramic crocks thoroughly with boiling water, then maintain a 2-3% salt ratio for ideal fermentation. Keep your setup at room temperature (68-72°F), away from direct sunlight, and use airlocks or weights to create an anaerobic environment. Monitor daily for bubbles, clear brine, and characteristic aromas. While these basics will get you started, there's a whole world of fermentation techniques waiting to enhance your preservation skills.
Getting Started With Wild Plants

When foraging, you'll need to follow some essential guidelines.
Always verify that you're collecting from areas free of pesticides and other chemicals. It's vital to properly identify plants to avoid toxic species.
Collect during late spring and summer when sugar content is highest. If you're using imported materials, check that they haven't been irradiated, as this kills beneficial yeasts. Wild yeast spores exist naturally in the air, soil, and on plants.
Remember to harvest responsibly and sustainably to protect wild plant populations.
Preparing Your Fermentation Setup
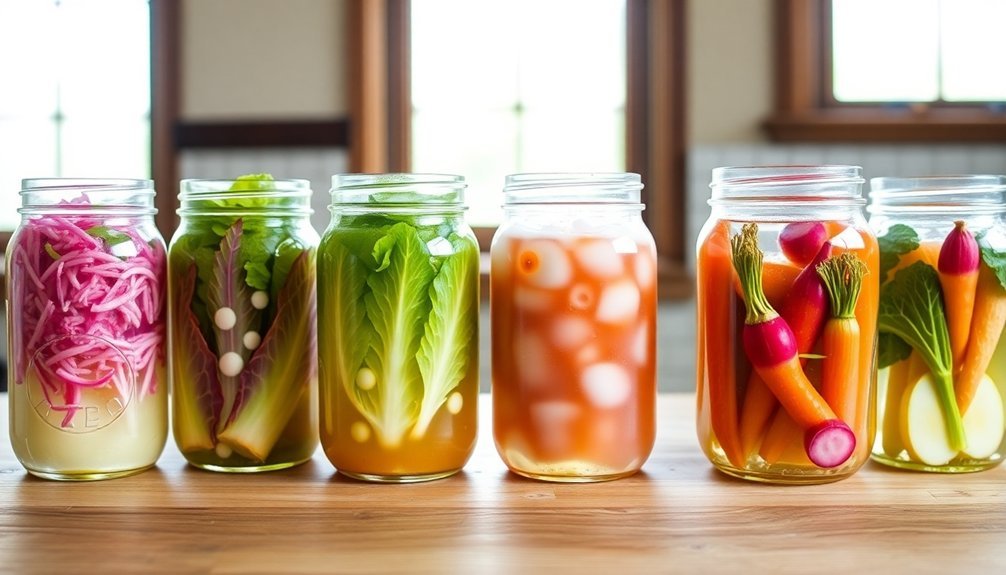
Before diving into wild fermentation, you'll need to set up a proper workspace with the right equipment and conditions. Start by choosing an appropriate vessel for your ferment – glass jars offer excellent visibility, while ceramic crocks provide superior temperature stability. Make certain your container is thoroughly cleaned and sanitized with boiling water to prevent contamination.
Creating an anaerobic environment is essential for successful fermentation. You'll need airlocks and weights to keep your fermenting materials submerged beneath the brine. Pack ingredients densely to eliminate air pockets, and use water-filled jars as weights if you don't have specialized equipment. A proper natural sea salt ratio of 2-3% should be used when preparing your wild greens for fermentation.
| Vessel Type | Best Features |
|---|---|
| Glass Jars | Visual monitoring, affordable |
| Ceramic Crocks | Temperature stability, light protection |
| Stainless Steel | Durable, non-reactive |
Temperature control plays a significant role in your setup. Keep your ferments away from direct sunlight and heat sources, and use a digital thermometer to monitor conditions. Most lacto-fermentation works best at cooler temperatures. Remember to use chlorine-free water and maintain a clean workspace throughout the process. Regular monitoring for signs of contamination will help guarantee your wild ferments develop safely and successfully.
Salt and Vegetable Ratios

Salt concentration serves as the cornerstone of successful wild fermentation. You'll want to aim for a 2.5% salt concentration for most vegetable ferments, though you can adjust between 2-5% depending on your specific needs.
For crunchier vegetables or longer preservation, consider using up to 3-4% salt. Non-iodized salts are essential for proper fermentation results.
To calculate the right amount of salt, weigh both your vegetables and water together, then multiply that total by 2.5% (or your chosen percentage) to determine how many grams of salt you'll need.
For example, if your total weight is 1000g, you'll need 25g of salt for a 2.5% concentration.
You can add salt using two main methods: dry salting or brining.
For water-rich vegetables like cabbage, dry salting works best – simply knead the salt directly into the vegetables to draw out their natural juices.
For drier vegetables like carrots, create a brine by dissolving the salt in water before adding your vegetables.
Remember to use a kitchen scale for accurate measurements, as precision is essential for creating an environment where beneficial bacteria can thrive while preventing harmful organisms from taking hold.
Managing the Fermentation Process
Every successful fermentation project requires careful monitoring and management of key variables. You'll need to maintain temperatures between 68-72°F during the initial fermentation phase, as this range keeps your beneficial microbes working efficiently. If you're fermenting in a cool space, wrap your vessel with insulating materials or place it in a cardboard box to retain heat.
| Factor | What to Monitor | How to Control |
|---|---|---|
| Temperature | 68-72°F range | Insulation, water baths |
| Nutrients | Salt levels, brine clarity | Add minerals if needed |
| Microbial Activity | Bubbling, smell, color | Check daily, remove mold |
When managing your ferment, you'll want to check it daily for signs of activity. Look for gentle bubbling, a clean sour smell, and clear brine. If you notice any off-odors or surface mold, remove it immediately. Remember that proper nutrient balance is essential – while most vegetables contain enough natural nutrients, you might need to supplement in some cases. Keep your fermentation vessel in a stable environment away from direct sunlight, and maintain clean conditions around your workspace. Once fermentation is complete, move your product to cold storage (32-38°F) to slow down the process.
Checking for Success Signs
Successful fermentation leaves clear telltale signs that you'll want to recognize. When checking your ferments, look for bubbles rising to the surface – this indicates active CO2 production and healthy microbial activity. You'll also notice the color of your ingredients changing gradually as fermentation progresses, along with the development of characteristic aromas.
To guarantee your fermentation is on track, monitor these key indicators:
- Watch for a clear or mostly clear liquid, which signals completion of the fermentation process
- Check that the temperature stays between 50°F to 86°F (10°C to 30°C) for best results
- Look for the absence of mold or any unusual discoloration
- Notice if there's a pleasant, tangy aroma rather than off-putting smells
Regular taste testing is essential to track the developing flavor profile. If you're fermenting fruits or vegetables, you'll want to measure Brix levels to monitor sugar content.
When fermentation's complete, you should detect a stable pH and consistent flavor. If you notice any off-odors, visible mold, or unusually slow fermentation, address these issues immediately to prevent spoilage and guarantee success.
Frequently Asked Questions
Can Wild-Fermented Foods Cause Food Poisoning if Prepared Incorrectly?
Yes, you can get food poisoning from improperly prepared wild ferments. If you don't maintain proper hygiene, temperature control, and pH levels, harmful bacteria can grow instead of beneficial ones, causing serious illness.
How Long Can Fermented Foods Last in the Refrigerator?
Your properly stored fermented foods can last 3-6 months for best quality and up to a year in the refrigerator. You'll get the best flavor and health benefits if you consume them within this timeframe.
Why Did My Fermentation Develop a White Film on Top?
Your fermentation's white film is likely kahm yeast due to insufficient acidity, low salt levels, high temperatures, or too much oxygen exposure. Don't worry – it's common and you can prevent it with proper conditions.
Can I Mix Different Wild Plants in the Same Fermentation Batch?
Yes, you can mix different wild plants in the same fermentation batch. Just guarantee they're compatible in flavor and texture, using reliable fermenters like wild garlic and nettle to create complex, nutritious combinations.
What Temperature Is Too Hot or Cold for Wild Fermentation?
You'll want to keep your wild fermentation between 8-10°C (46-50°F). Avoid temperatures above 32°C (90°F) as they'll stress your cultures, and stay above freezing to prevent dormancy or death.
In Summary
Now you've learned the basics of wild fermentation – from selecting fresh plants to setting up your fermentation station and monitoring the process. Don't worry if your first batch isn't perfect. Keep experimenting with different vegetables and salt ratios until you find what works best. Remember to trust your senses when checking for success signs, and you'll soon be creating delicious, probiotic-rich ferments at home.

Leave a Reply