You can safely store roasted peppers in oil by following proper sterilization and preparation techniques. Start with high-quality peppers, roast them until the skin blisters, and peel off the charred skin once cooled. Use clean, sterilized glass jars and cover the peppers completely with extra virgin olive oil, leaving no air pockets. Store them in the refrigerator for up to 3-4 weeks, or freeze them for longer preservation. Always check for signs of spoilage like mold, off-odors, or slimy texture before consuming. Understanding the complete preservation process will help you enjoy these versatile ingredients in your favorite dishes year-round.
Benefits of Oil Storage Method
The oil storage method for roasted peppers offers significant advantages for both home cooks and food enthusiasts. When you store your roasted peppers in oil, you'll extend their shelf life up to 2-3 weeks in the refrigerator, and you can even preserve them longer in the freezer for year-round enjoyment. The oil acts as a natural sealant, protecting your peppers from bacterial growth while maintaining their soft, pleasant texture. For optimal safety, store for two days maximum in the refrigerator before transferring to the freezer.
You'll appreciate how the oil enhances the peppers' flavor profile, especially when you add traditional herbs and spices. This preservation method isn't just practical – it's deeply rooted in Mediterranean culinary traditions that have been perfected over centuries.
The convenience is remarkable: your peppers will be ready to use immediately in various dishes, from antipasti to pasta and sandwiches. It's also an economical choice that lets you take advantage of seasonal produce.
When you properly sterilize your jars and keep the peppers fully submerged in oil, you're not just preserving food – you're maintaining a time-honored tradition that's perfect for sharing with family and friends. Plus, these preserved peppers make thoughtful, homemade gifts for fellow food lovers.
Selecting Quality Roasted Peppers
When selecting peppers for roasting, you'll want to choose ones with a vibrant red color, glossy skin, and firm texture that feels heavy for their size.
The best roasting candidates should be free from blemishes, have fresh green stems, and maintain a symmetrical, blocky shape without any green patches that could indicate under-ripeness.
You can guarantee ideal roasting results by picking thick-walled peppers that don't show any signs of softness, wrinkles, or strong odors. Thick-walled varieties perform particularly well for grilling and roasting applications, offering superior meatiness and texture.
Fresh Appearance Indicators
Selecting quality bell peppers for roasting starts with recognizing key visual indicators of freshness. You'll want to focus on peppers that display vibrant, deep red colors with uniform distribution throughout the skin.
When you're examining potential candidates, look for specimens with well-defined, blocky shapes that feel heavy for their size. The texture of your chosen peppers should be firm but with a slight give when gently pressed. Using a mix of red, yellow, and green peppers will create an attractive variety of colors in your preserved collection.
You'll know you've found good ones when the skin appears smooth and glossy, without any blemishes or soft spots. The stem should be fresh and green, as this indicates recent harvest and proper storage.
- Check for deep, uniform coloring without green patches or fading – this guarantees full ripeness and maximum flavor
- Examine the shape for symmetry and firmness, avoiding any with wrinkles or deformities
- Test the texture by gently pressing – it should be firm but not hard, with consistent feel throughout
- Inspect the stem and skin condition – look for fresh, green stems and smooth, unblemished surfaces without cracks or bruises
Proper Roasting Characteristics
Successful roasting of bell peppers requires careful attention to specific visual and textural characteristics. When you're roasting peppers, you'll want to achieve a consistent char across the surface, with the skin becoming wrinkled and showing blackened spots. The peppers should deflate slightly and become tender to the touch, indicating they're properly cooked through.
You'll know your peppers are perfectly roasted when they exhibit several key traits. The skin should blister and separate from the flesh, making it easy to peel off later. The flesh underneath should be soft but not mushy, maintaining enough structure to hold together when handled.
Whether you're using an oven, stovetop, grill, or broiler, these indicators remain consistent across all roasting methods.
The roasting time varies depending on your chosen method. You'll need 20-40 minutes in a 400-450°F oven, 2-3 minutes per side on a stovetop or grill, or 5-10 minutes under the broiler.
Don't rush the process – proper charring guarantees the skins will separate easily and the peppers will have that desirable smoky flavor you're looking for.
Optimal Ripeness Check
The right bell peppers make all the difference in achieving perfectly roasted results. When you're selecting peppers for roasting, look for ones with vibrant, deep colors that feel heavy for their size. Red peppers should be completely ripe without any green patches to avoid bitterness, while green peppers naturally have a slightly sharper taste. Choose peppers with well-defined, blocky shapes and symmetrical forms, as these will roast more evenly.
For the best roasting results, guarantee your peppers meet these essential criteria:
- Firm texture when gently pressed – avoid any that feel soft, mushy, or show signs of wrinkling
- Smooth, glossy skin without blemishes, cracks, or bruises
- Fresh, sturdy stems without any dry or withered appearance
- Mild, sweet aroma near the stem end, with no strong or off-putting smells
The pepper's weight is particularly important for roasting – heavier ones typically have thicker walls and more flesh, making them ideal for this cooking method.
The skin should maintain its shine, indicating freshness, and the overall shape should be uniform to guarantee even cooking during the roasting process.
Essential Tools and Equipment
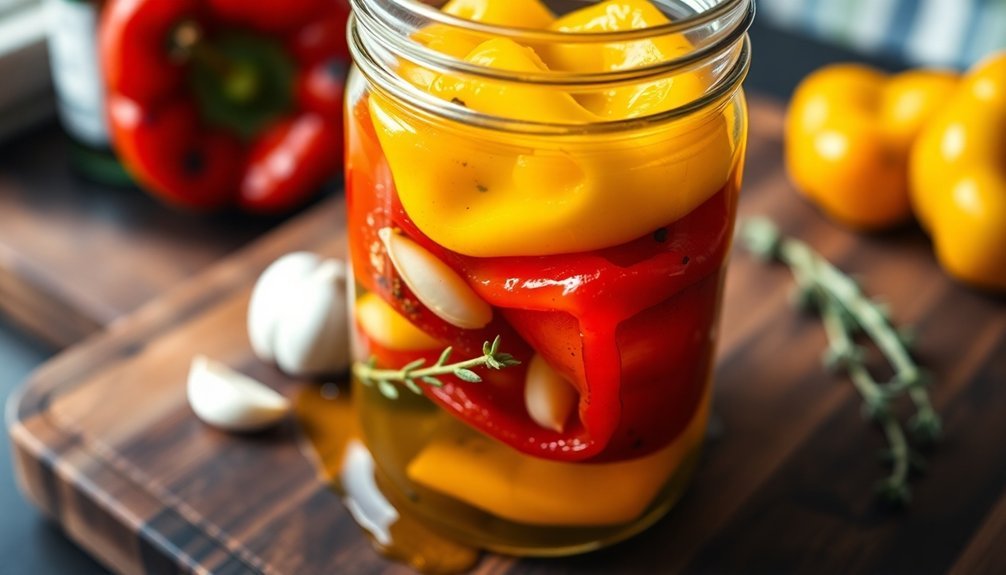
You'll need clean, sterilized glass jars with airtight lids to properly store your roasted peppers in oil.
Essential kitchen tools for preparation include a sharp knife, cutting board, baking sheet, and protective gloves to handle the peppers safely.
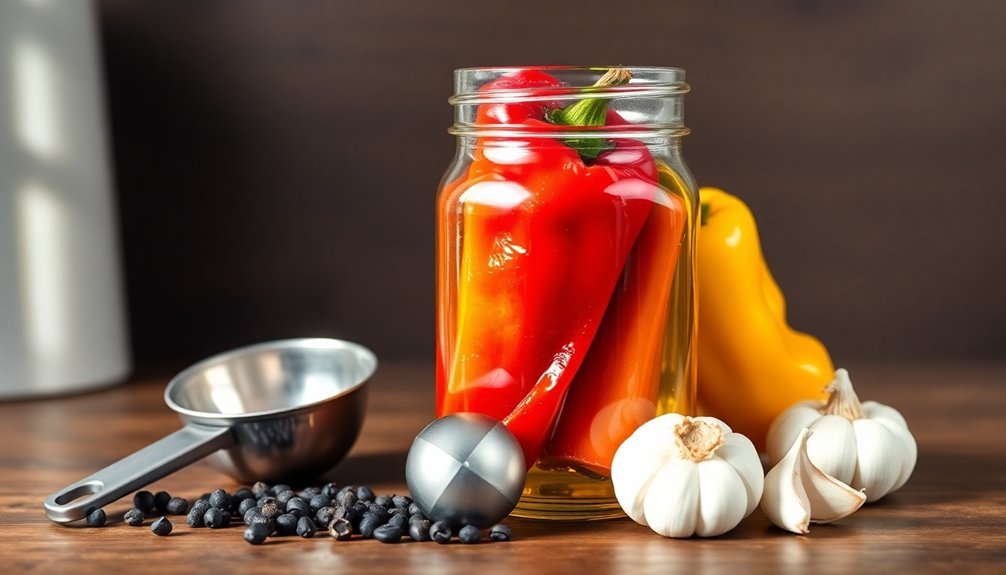
Choose high-quality olive oil or your preferred oil, along with measuring cups, a wide-mouth funnel, and canning tongs to make the storage process efficient and mess-free.
[DIRECTIONS]:
Storage Containers and Jars
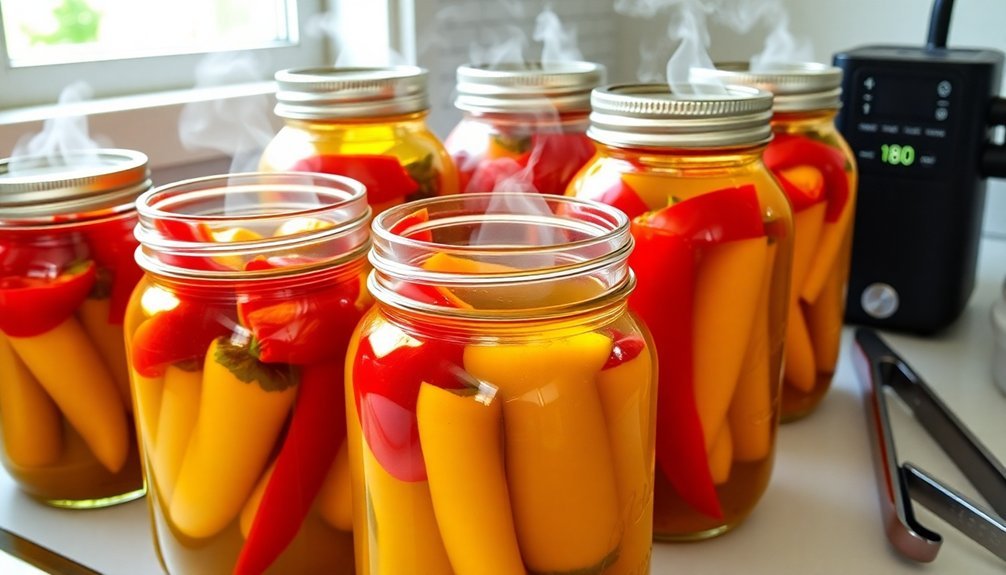
Selecting proper storage containers is essential for preserving roasted peppers in oil. You'll need containers that provide an airtight seal and enough space to fully submerge the peppers in olive oil. Glass jars with secure lids are ideal for refrigerator storage, while zipper-top freezer bags work best for long-term freezer storage of up to one year.
When choosing your containers, verify they're clean, completely dry, and appropriately sized for your batch of roasted peppers. Wide-mouth jars make it easier to add and remove peppers, and using a canning funnel helps prevent mess during filling. Remember to coat the bottom of each container with olive oil and garlic before adding your peppers.
- Use glass jars for refrigerated storage (3-5 days)
- Choose freezer-safe zipper bags for long-term storage
- Select containers large enough to allow oil circulation
- Opt for wide-mouth containers for easy filling and removal
Always check for air bubbles after filling your containers, and verify the peppers are fully submerged in oil.
Don't store oil-packed peppers at room temperature, as their low acid content can make them unsafe for extended periods.
Kitchen Tools for Preparation
Before beginning the storage process, gathering the right kitchen tools guarantees smooth and efficient pepper preparation.
You'll need various equipment for roasting, including an oven that can reach 450 degrees, a parchment-lined baking sheet, or a grill pan for stovetop roasting. If you prefer, you can use a gas flame for direct roasting.
For peeling and preparation, make sure you have a paring knife or melon baller to remove seeds and membranes. You'll also need plastic wrap or a kitchen towel to cover the peppers while they steam in a bowl after roasting.
A sharp knife and cutting board are essential for slicing the peppers into your desired shapes.
Don't forget specific tools for roasting garlic, such as aluminum foil for wrapping, and a garlic press for extracting the softened cloves.
When you're ready to store your peppers, you'll need measuring cups and spoons for precise oil and seasoning measurements.
If you're planning to preserve the peppers long-term, gather sterilization equipment for your jars and a plastic skewer to remove air bubbles before sealing.
Oil Selection Essentials
The success of properly stored roasted peppers hinges on choosing the right oil. Extra virgin olive oil (EVOO) stands out as your best choice, offering superior flavor and health benefits. If EVOO isn't available, regular olive oil or grapeseed oil can serve as suitable alternatives, but avoid oils with overpowering flavors that might compete with your peppers.
When combining oil with your roasted peppers, remember these essential points:
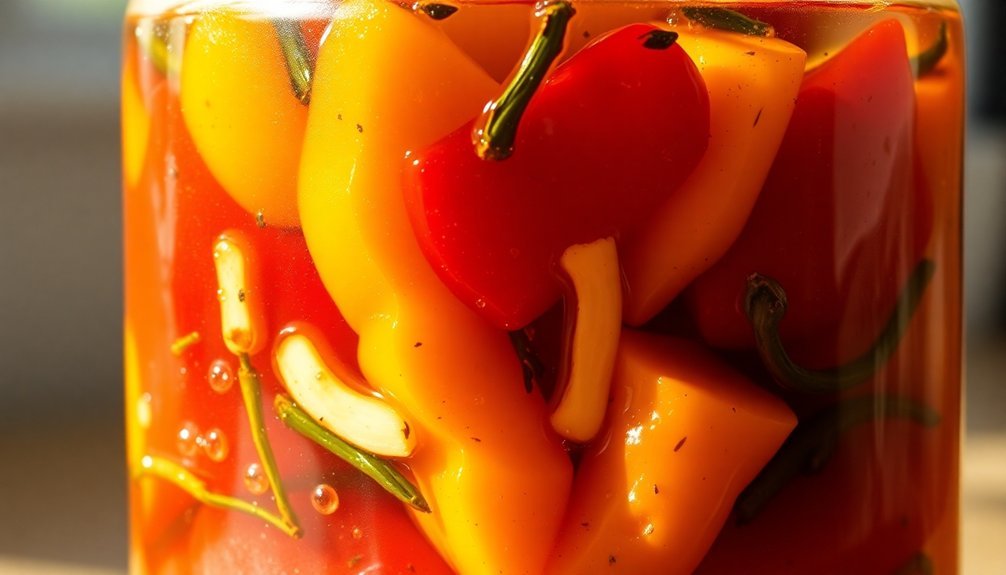
- Use just enough oil to fully cover the peppers, preventing exposure to air while avoiding unnecessary waste – adjust the quantity based on your container size and pepper amount.
- If you're adding garlic for extra flavor, stick to roasted or minced garlic mixed thoroughly into the oil for even distribution.
- Only use dried herbs and spices to minimize moisture content, which helps prevent bacterial growth.
- Store your oil-covered peppers in the refrigerator and consume them within 5-7 days for peak safety.
For longer storage needs, it's better to freeze your roasted peppers without oil and add fresh oil after thawing.
Keep an eye on your stored peppers and discard them if you notice any signs of spoilage.
Oil Selection and Preparation
Proper oil selection forms the foundation of successfully preserving roasted peppers. You'll want to choose high-quality olive oil, which offers superior flavor and preservation properties compared to other oils. Olive oil's stability and health benefits make it the ideal choice for storing your peppers, while its protective qualities prevent air from reaching the vegetables.
Once you've selected your oil, you'll need to prepare it properly. Heat the olive oil in a heavy-bottomed saucepan over medium heat until it reaches 200°F, using an instant-read thermometer for accuracy. This heating process is essential for guaranteeing proper preservation and helping release air bubbles when filling your jars.
When filling the jars, use a wide-mouthed canning funnel to carefully ladle the hot oil over your peppers. You'll need to make certain the peppers are completely submerged to prevent spoilage. Use a chopstick or skewer to remove any trapped air bubbles, and add more oil if needed.
Remember to leave adequate headspace at the top of the jar to prevent overflow during sealing. This careful attention to oil selection and preparation will help confirm your peppers remain fresh and flavorful.
Safety and Sterilization Steps
Safe preservation starts with meticulous sterilization of your equipment and jars.
You'll need to sterilize your jars either in a 140°C oven for 20 minutes (using normal mode, not fan) or by using the boiling water method. While sterilizing jars, remember to submerge only the lid part of your two-piece lid system in boiling water, not the ring.
To prevent bacterial growth and guarantee safety, you must keep your roasted peppers completely dry before storing them in oil.
Don't use fresh or moist herbs, as they can lead to bacterial contamination. While oil acts as a preservative, you'll need to monitor the oil level to keep peppers fully submerged.
- Always check your jars for signs of spoilage, including unusual odors or mold
- Store jars at room temperature for only two days during the initial curing period
- Transfer jars to the refrigerator after curing, where they'll last up to three months
- Keep peppers completely covered with oil, checking levels after 24 hours
For long-term storage beyond three months, it's safer to freeze your roasted peppers in freezer bags and add oil upon thawing.
This method considerably reduces the risk of bacterial growth and food-borne illness.
Proper Storage Techniques
Following sterilization, successful preservation hinges on correct storage methods. For short-term storage, place your jars of roasted peppers in the refrigerator, where they'll stay fresh for 3-4 weeks. Make certain the peppers remain completely submerged in olive oil to prevent spoilage, and keep the jars away from direct sunlight and heat sources.
If you're planning for long-term storage, transfer your jars to the freezer once the oil has solidified. Freezing effectively prevents bacterial growth and maintains both flavor and texture for several months. When you're ready to use frozen peppers, thaw them completely before adding any additional ingredients.
It's essential to understand that roasted peppers in oil aren't shelf-stable and require refrigeration or freezing. Unlike commercial products with preservatives, homemade versions are vulnerable to bacterial growth. Always check for signs of spoilage before consuming.
To maximize storage success, confirm your jars are properly filled, leaving adequate headspace for oil circulation. Remove any air bubbles trapped between peppers, and don't forget to label and date your jars for proper rotation.
Store them in a cool, dry place until you're ready to refrigerate or freeze.
Signs of Spoilage

Through careful observation, you can identify spoiled roasted peppers before they pose any health risks. Visual indicators include mold growth appearing as fuzzy spots or discoloration, and any fading from the peppers' vibrant red color to brown suggests deterioration.
When checking jarred peppers, inspect the liquid for excessive cloudiness or floating particles, and watch for bulging lids that signal contamination.
Your nose is another reliable tool for detecting spoilage. If you notice sour, fermented, or unusual odors different from the peppers' natural sweet aroma, it's time to discard them. Don't ignore these warning signs, as consuming spoiled peppers can lead to food poisoning.
- Check for texture changes – slimy or mushy peppers indicate spoilage
- Look for white spots in oil-preserved peppers, which could be dangerous anaerobic bacteria
- Monitor the clarity of the preservation liquid – it should be clear or only slightly cloudy
- Watch for color changes, as they indicate both spoilage and loss of nutritional value
Remember that proper storage won't matter if you're keeping already spoiled peppers, so always check for these signs before consuming.
Extending Shelf Life Tips
Once you've learned to spot spoiled peppers, you can focus on keeping them fresh longer. To maximize storage life, start by properly preparing your peppers – peel off the blistered skins, remove seeds, and slice them before storage.
When storing in oil, heat your olive oil to 200°F and verify the peppers are completely submerged.
For refrigerator storage, use airtight glass jars or plastic containers with tight-fitting lids. You'll want to layer the peppers with garlic slices to enhance flavor and remove any trapped air bubbles using a skewer.
When stored this way, your peppers will last up to 3 months in the refrigerator, though you'll get the best flavor if you consume them within the first week.
For even longer storage, freeze your peppers in their oil using zipper-top bags or airtight containers – they'll keep for up to a year this way. Remember to squeeze out as much air as possible before sealing the bags to prevent oxidation.
Always label your containers with the storage date so you can track freshness.
Don't attempt to preserve these peppers through pressure canning in oil; if you want shelf stability, consider pickling them in vinegar instead.
Using Preserved Roasted Peppers

Preserved roasted peppers' versatility makes them a kitchen powerhouse ingredient. You'll find countless ways to incorporate these flavorful gems into your meals, from simple appetizers to complex main dishes.
They're perfect for adding a smoky, sweet depth to sandwiches, salads, and sauces, while their tender texture makes them ideal for blending into dips or spreading onto crusty bread.
Whether you're hosting a dinner party or preparing a quick weeknight meal, preserved roasted peppers can elevate your dishes with minimal effort. Add them to antipasti platters, blend them into creamy soups, or use them as a vibrant pizza topping.
- Transform ordinary sandwiches by layering roasted peppers with fresh mozzarella and basil on crusty Italian bread
- Blend them into hummus or other dips for an instant Mediterranean twist
- Dice and toss into grain salads like quinoa or farro for added color and flavor
- Puree into marinades or sauces for grilled meats and vegetables
You can also incorporate them into breakfast dishes by adding them to omelets or frittatas, proving their remarkable adaptability from morning to night.
Frequently Asked Questions
Can I Reuse the Oil After the Peppers Are Finished?
You can reuse the oil, but make sure it's free from pepper residue and properly stored in the refrigerator. Check for spoilage signs before using, and know that it'll have absorbed some pepper flavors.
What's the Best Way to Thaw Frozen Roasted Peppers?
You've got two great options: add frozen peppers directly to hot dishes while cooking, or thaw them in a microwave-safe dish on low power. For cold dishes, you can also submerge them in cold water.
Do Different Colored Peppers Require Different Storage Methods?
No, you don't need different storage methods for different colored peppers. You can store all colors together in the refrigerator, freezer, or through canning methods, as long as you maintain proper temperature and conditions.
Can I Mix Different Types of Peppers in the Same Storage Container?
Yes, you can mix different pepper types in the same container. Just make sure they're all roasted and prepared similarly. The variety of colors and flavors can complement each other when preserved together.
Should Roasted Peppers Be Peeled Before or After Freezing?
You can peel roasted peppers either before or after freezing – both methods work well. If you're short on time, freeze them with skins on and peel after thawing. Either way preserves quality effectively.
In Summary
You've now mastered the art of storing roasted peppers in oil. With proper sterilization, quality ingredients, and careful storage techniques, you'll enjoy these flavorful gems for months to come. Remember to check for signs of spoilage before use, keep your jars refrigerated, and always use clean utensils. When done correctly, you'll have delicious roasted peppers ready to enhance your favorite dishes year-round.

Leave a Reply