
Transform your summer herb harvest into lasting flavors with these seven creative DIY drying rack options. You'll love the versatility of a tiered picture frame station, perfect for drying delicate herbs like dill and parsley. Consider mounting a vintage window display, installing a mesh basket wall system, or hanging a rustic ladder rack for larger harvests. A pegboard design offers sleek organization, while a repurposed screen door creates farmhouse charm. Don't forget the simple effectiveness of a clothesline bundle station. Each design combines functionality with style, and you'll discover how easy it is to preserve your garden's bounty with these handcrafted solutions.
Picture Frame Tiered Drying Station
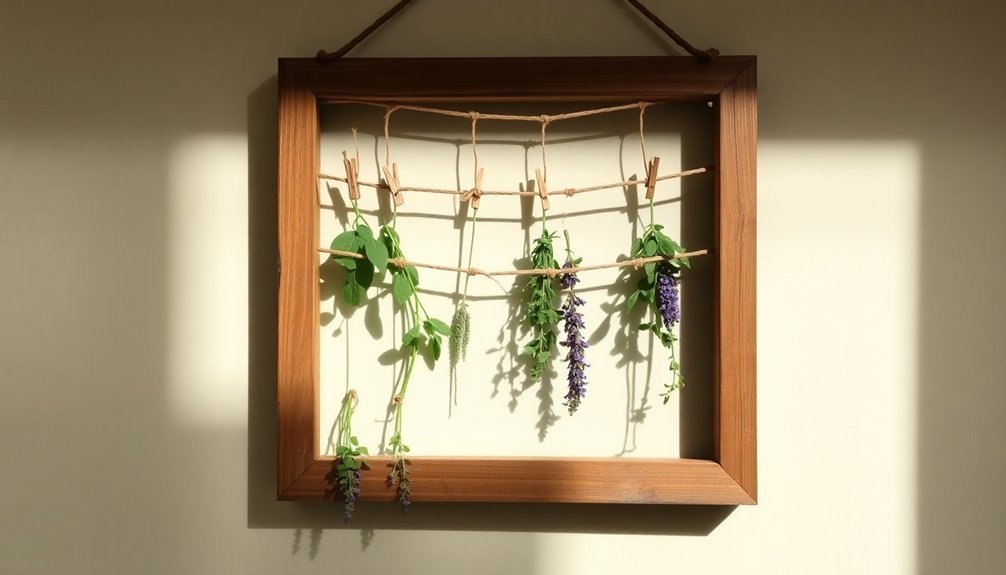
Transform old picture frames into a space-saving herb drying station that's both functional and attractive. You'll need wooden picture frames, window screen material, a staple gun, and hanging hardware like eye screws and chains to create multiple tiers.
Start by stripping your frames of glass and backing materials. If you'd like to update their appearance, apply spray paint and let them dry completely. Regular herbs like dill and parsley will be ready to store in just a few days on your rack.
Cut window screen to fit each frame, then carefully fold and staple it around the edges, making sure it's pulled tight to prevent sagging when loaded with herbs.
To assemble your tiered system, drill holes in the frame corners and install eye screws. Connect the frames vertically using S-hooks and chains, leaving enough space between levels for proper air circulation.
If you're using a single frame, you can simply attach twine across the screen for hanging herb bundles.
When you're ready to dry herbs, harvest them in the morning after the dew has evaporated. Tie small bundles with string and hang them upside down from your rack.
Place your drying station in a cool, dry area away from direct sunlight. Once your herbs are completely dry, store them in airtight containers.
Vintage Window Herb Display
With an old wooden window as your foundation, you can craft a charming herb display that doubles as vintage wall art.
Start by preparing your tin can planters: spray paint them in creamy off-white, drill drainage holes, and add decorative insects cut from wrapping paper. Seal the cans with outdoor Mod Podge or acrylic varnish for durability. The rustic finish achieved through hot air gun treatment adds character to your window frame.
Create a stable ledge by attaching pallet wood to the window frame's underside. You'll need to replace the existing sash cord to guarantee secure hanging on your wall.
Position the prepared tin cans on the wooden ledge, using magnets for additional security if needed. Don't forget to add a layer of gravel in each can before planting your herbs.
For a cohesive look, you can paint designs directly on the glass using specialty glass paints. Label your herbs clearly – either with chalkboard paint on the cans or by creating hand-painted signs.
When selecting herbs, consider your available sunlight and growing conditions. Remember to maintain proper drainage and avoid overwatering to keep your herbs thriving in this functional piece of vintage-inspired decor.
Mesh Basket Wall System
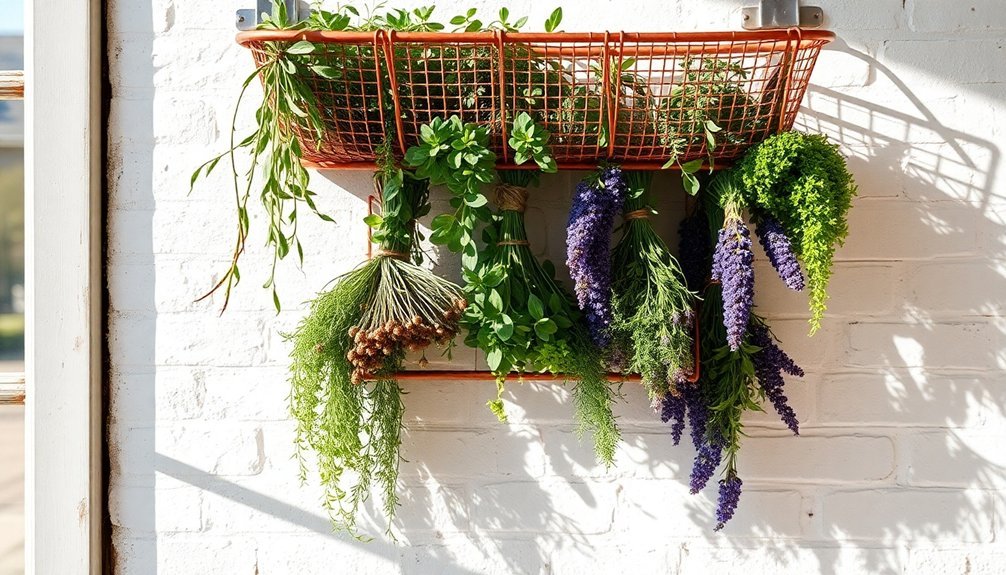
Create a versatile herb drying station using a system of metal mesh baskets mounted on your wall. You'll need peg racks or wall hooks, metal baskets in various sizes, curtain ring clips, and cheesecloth for lining the baskets. This system allows for excellent air circulation while keeping your herbs organized and accessible.
To assemble your mesh basket wall system, hang the curtain ring clips on the pegs, then attach your metal baskets. You can remove rings from the clips to create a cascading effect, arranging the baskets in columns or any pattern that suits your space. Line each basket with cheesecloth to catch any debris and help wick moisture from damp herbs. Proper humidity control during the drying process is essential for preserving the quality of your herbs.
You'll love how easy it's to customize this system. Add or remove baskets as needed, mix different sizes and shapes to accommodate various herbs, and intersperse decorative elements like framed herbal artwork between the baskets.
The system's versatility means you can expand it to cover larger wall spaces or adapt it for drying other botanicals like flowers. As your herb collection grows, simply add more baskets to meet your drying needs.
Rustic Ladder Drying Rack
Salvaged from flea markets or old barns, vintage wooden ladders offer a charming solution for drying herbs in your home.
You'll find that these reclaimed pieces can be customized to fit your space perfectly, whether you need a small 3-rung design or a larger 6-rung version for extensive herb drying.
To create your ladder drying rack, you'll need to secure it from the ceiling using sturdy chains and hangers.
Make sure to pre-drill holes to prevent the wood from splitting during installation, and verify that the ladder hangs level.
Choose a location with good air circulation but away from direct sunlight to protect your herbs.
You can enhance your rack's functionality by adding rubber bands and paper clips for securing herb bundles to the rungs.
Regular maintenance is essential – inspect the structure periodically for wear and clean both the ladder and chains to maintain their appearance.
When you're not using it for herb drying, the ladder can double as a decorative element by adding greenery or lighting.
For additional utility, consider converting it into a pot rack or chandelier with some simple modifications.
Peg Board Hanging Design
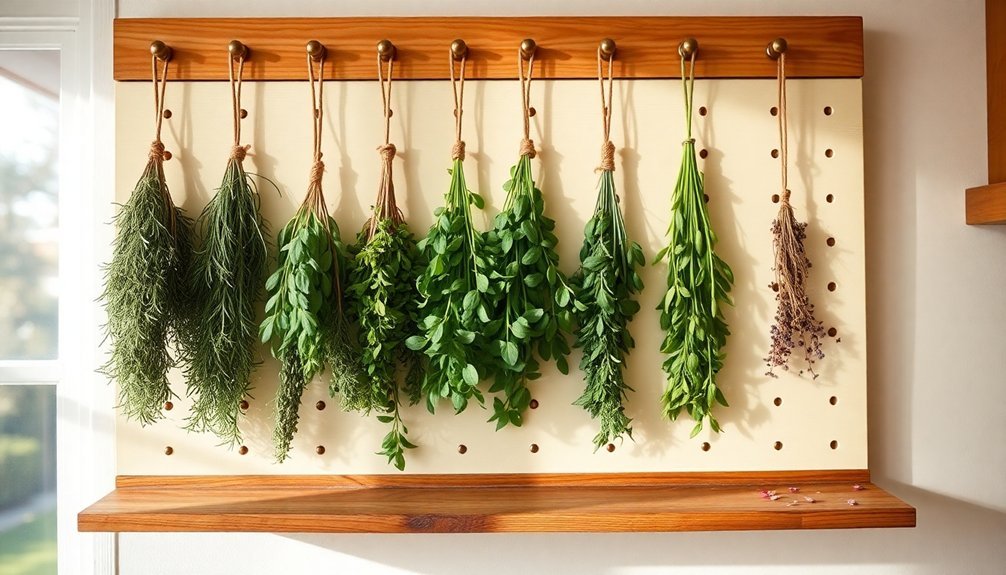
A peg board hanging rack offers a sleek and versatile solution for drying your favorite herbs. You'll need a flat board about 6 inches wide, along with your choice of clothespins, cup hooks, or shaker pegs. For a lasting hold, E6000 glue will secure your attachments firmly to the board, while D-ring picture hangers guarantee stable wall mounting.
To create your custom drying rack:
- Measure and mark equal spacing for your pins or hooks across the board, leaving room in the center if you'd like to add a stenciled design.
- Apply E6000 glue to each attachment point and press firmly into place.
- Install D-ring hangers on the back for mounting.
- Consider adding personalized touches like stenciled lettering or vintage clothespins.
You can customize the look by using reclaimed wood for rustic charm or painting new wood to match your décor.
When hanging your herbs, verify they're in a cool, dry space away from direct sunlight. The beauty of this design lies in its mobility – you can easily relocate it from kitchen to pantry as needed, keeping your drying herbs in ideal conditions.
Repurposed Screen Door Setup
If you've got an old screen door lying around, you'll find it's perfect for transforming into a large-scale herb drying rack.
You'll need to remove any unnecessary hardware from the door frame while keeping the screen material intact and taut.
Once you've prepped the frame, install eye screws at each corner and attach S-hooks with chains to create a sturdy hanging system that distributes weight evenly.
Screen Door Frame Basics
Success in repurposing a screen door for herb drying starts with proper frame evaluation and preparation.
You'll need to carefully inspect the door frame for any structural issues, including cracks, warping, or weather damage. Before moving forward, repair any compromised areas and verify the frame is square and stable – this is vital for supporting the weight of your drying herbs.
Clean the frame thoroughly by removing dirt, rust, and old hardware. You'll want to sand the surface to create a smooth, splinter-free finish that won't snag your herbs. Don't forget to wear protective gear during this process, including gloves and a dust mask.
- Check the frame's corners for squareness using clamps, and reinforce weak spots with additional support brackets.
- Measure your door opening carefully, confirming at least 2 inches of clearance for proper air circulation.
- Sand all surfaces that will come in contact with herbs to prevent contamination.
- Apply a food-safe sealant to protect the wood and make it easier to clean.
Once your frame is properly prepared, you can customize it with paint or stain, making sure to choose non-toxic finishes that won't affect your herbs.
Hanging Hardware Installation
With your screen door frame properly prepared, the next step focuses on installing the right hanging hardware for your herb drying system.
Begin by installing eye screws at each corner of your frame. Space them evenly and make sure they're firmly secured, as they'll bear the weight of your herbs and the frame itself.
Attach S-hooks to the eye screws, making certain they're strong enough to support your chosen hanging method.
You'll need three sturdy chains from hanging baskets to create a stable suspension system. Connect these chains to the S-hooks in a crosswise pattern, then gather them at the center using a larger S-hook for balanced weight distribution.
If you're planning to hang the rack from the ceiling, install a robust plant hook at your chosen location.
Adjust the chain lengths until your rack hangs level and at a comfortable working height. You'll want to test the stability by gently pushing the frame – it shouldn't sway excessively.
For additional support, consider adding metal brackets at the corners, especially if you're planning to dry larger quantities of herbs.
Clothesline Bundle Drying Station
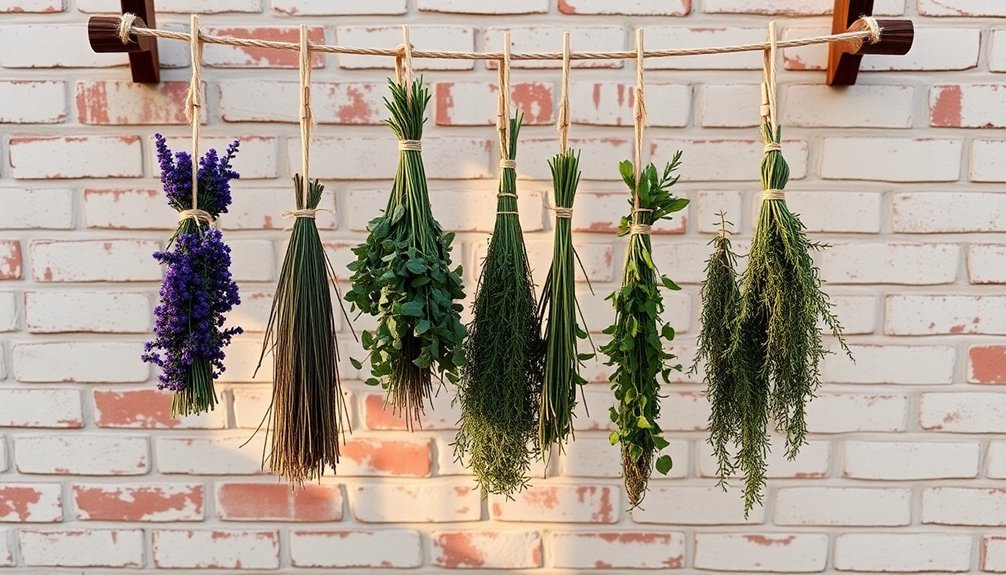
Creating a clothesline bundle drying station offers a practical and space-efficient way to preserve your herbs throughout the season. You'll need basic materials like S-hooks, chains, and eyehooks, along with repurposed items such as old picture frames or wire wreath bases.
The setup process is straightforward – simply attach your screen or cheesecloth to frames, install the hanging hardware, and position your station in a well-ventilated area away from direct sunlight.
To maximize your drying station's effectiveness, follow these essential steps:
- Group similar herbs together using rubber bands, ensuring proper air circulation between bundles.
- Space your clotheslines at least 6 inches apart to prevent herbs from touching while drying.
- Install multiple tiers using chains and S-hooks to increase your drying capacity.
- Add curtain clips or paper clips for easy bundle attachment and removal.
You can customize your station by incorporating decorative elements like painted frames or gold paper clips.
The versatile design allows you to dry not just herbs but also flowers, beans, and other garden produce. When you're not using it for herbs, repurpose the station for hanging lightweight items or creating an attractive herbal display wall.
Frequently Asked Questions
How Do You Prevent Herbs From Losing Color While Drying?
To prevent color loss in your herbs, you'll need to harvest at peak times, dry them in a dark place, maintain good air circulation, and store them in airtight containers away from light and moisture.
Can You Dry Different Herb Varieties Together on the Same Rack?
You can dry herbs together if they have similar drying times and compatible flavors. Don't mix strong-scented herbs with mild ones, and group herbs with similar moisture content to guarantee even drying and preserve flavors.
What's the Ideal Room Temperature and Humidity for Indoor Herb Drying?
You'll want to maintain your room at around 70°F (21°C) with low humidity for ideal herb drying. Avoid temperature fluctuations and use a dehumidifier if needed to prevent mold growth on your herbs.
How Long Should Herbs Typically Be Left to Dry Completely?
You'll notice drying times vary considerably: tender herbs like dill dry in 2-4 days, while dense herbs like sage take 1-2 weeks. Check for crispness and brittleness to know they're completely dried.
Should Herb Bundles Be Covered With Paper Bags While Drying?
You don't need to cover herb bundles with paper bags while drying. Leaving them uncovered promotes better airflow, prevents moisture buildup, and allows you to easily monitor the drying process. It's actually more effective.
In Summary
Now you've got plenty of creative DIY herb drying rack options to preserve your summer harvest. Whether you're drawn to the vintage charm of an old window display or prefer the practical simplicity of a clothesline bundle system, you'll find a perfect match for your space and style. Don't let those fresh herbs go to waste – pick your favorite design and start drying today.


Leave a Reply