
Modern folding herb dryers can transform your herb preservation with these clever hacks. You'll save space by utilizing vertical storage and quick-release mechanisms for easy setup and breakdown. Stack your dryer tiers strategically – leafy herbs on top, mixed herbs in the middle, and delicate herbs at the bottom. Secure the structure with double-knotted strings and binder clips for added stability. Keep your dryer clean between seasons using mild soap and thorough drying. For transport, collapse tiers with the quick-fold method and secure with straps. Position your dryer efficiently with waterproof barriers to protect against weather. These smart techniques are just the beginning of maximizing your herb drying potential.
Mastering Quick Release Mechanisms
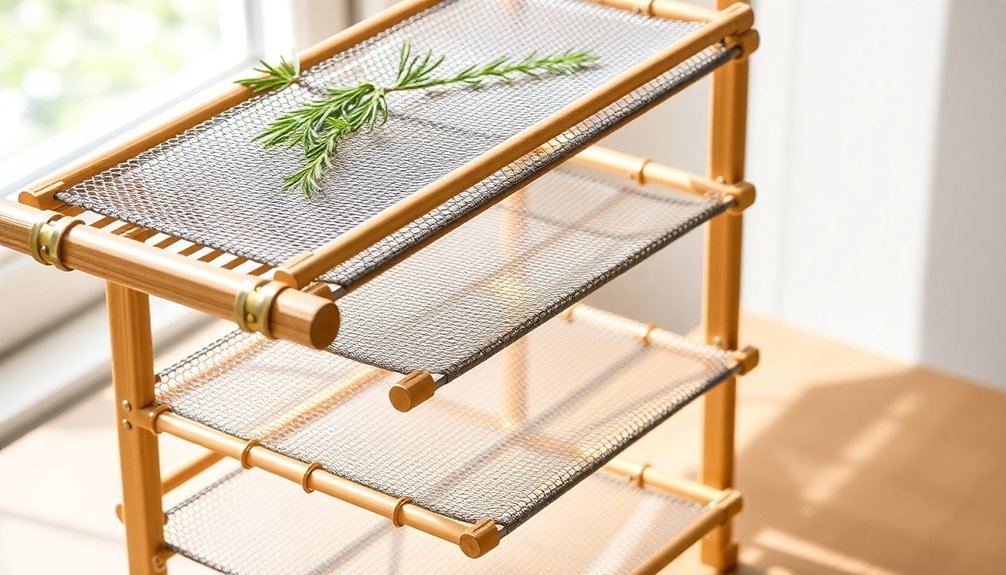
In line with professional herb drying practices, quick release mechanisms serve as essential components of modern folding herb dryers. These mechanisms combine high-tensile steel frames with secure internal latching systems to provide both durability and ease of use. You'll find that the stainless steel components guarantee long-lasting performance while preventing rust and deterioration.
To master your dryer's quick release system, start by familiarizing yourself with the illustrated instruction booklet. You won't need special tools, as these units are designed for tool-free assembly and disassembly. Pay attention to the built-in loops and hooks, which offer versatile mounting options and enhance the dryer's functionality. The collapsible design makes storage effortless when not in use.
When using the quick release features, you'll notice how they complement the rugged zippers and breathable mesh netting. These elements work together to maintain organized chambers while allowing proper air circulation. You can easily customize the layer arrangement to suit different herb types and quantities.
For added protection, utilize the waterproof fabric tops and consider adding cheesecloth barriers to prevent herb loss. The system's design guarantees you can quickly access your herbs during the drying process while keeping them safe from contaminants.
Space-Saving Storage Solutions
You'll save significant cabinet space by folding your herb drying rack according to manufacturer specifications and storing it vertically against a wall or in a narrow gap.
Breathable materials ensure proper airflow even when the rack is folded, preventing moisture buildup during storage.
Make the most of vertical storage by choosing a spot near your other kitchen tools, using dedicated hooks or organizers to keep the rack secure and accessible.
Stack your folded herb dryer with similar-sized items in modular containers to create an efficient storage system that maximizes every inch of available space.
Minimize Cabinet Space Usage
Maximizing cabinet space requires smart storage solutions when working with folding herb dryers. You'll find that utilizing hidden spaces, like the back of cabinet doors, creates valuable storage areas for your herb drying equipment.
Install organizers or hooks on door backs to hang your folding herb dryer when it's not in use, keeping it easily accessible yet out of the way. Just like how Home Depot Pro Referral can help with installation services, proper mounting ensures your storage solutions stay secure.
Make the most of your cabinet interiors by implementing adjustable shelving systems. You can customize the height between shelves to accommodate your herb dryer's compact case alongside other kitchen items.
Consider using stackable shelf organizers to create additional layers within cabinets, effectively doubling your storage capacity without sacrificing accessibility.
Transform your storage approach by incorporating multi-functional solutions. Use plastic baskets to store your herb dryer's components separately when dismantled, and add command hooks in strategic locations for hanging the dryer's compact case.
Don't overlook the potential of under-shelf baskets, which can hold smaller items while leaving room for your folding herb dryer above. These adjustable and modular solutions let you reconfigure your space as your storage needs change.
Vertical Storage Techniques
Clever vertical storage solutions transform the way you organize folding herb dryers and maximize available space. You'll find that utilizing wall-mounted screens and multi-tiered racks creates an efficient drying system while keeping your floor space clear. Install sturdy wall shelves specifically designed for herb storage, and don't forget to label everything for easy identification.
| Storage Area | Best Uses | Key Tips |
|---|---|---|
| Upper Tiers | Leafy Herbs | Guarantee good airflow |
| Middle Tiers | Mixed Herbs | Space items evenly |
| Lower Tiers | Delicate Herbs | Easy access point |
| Corners | Small Items | Use magnetic labels |
| Edges | Flower Petals | Monitor drying progress |
Make the most of your vertical space by combining drying racks with complementary storage solutions. You can integrate under-shelf spice racks and extendable organizers to create an all-encompassing system. Position your collapsible racks in areas with good cross-ventilation, and use corner spaces for smaller items like flower petals or herbs with tiny leaves. When your herbs are fully dried, transfer them to airtight containers and store them on nearby shelves for a complete preservation system.
Modular Stacking Methods
Modern modular stacking methods revolutionize herb drying by combining stackable shelves with sliding trays for maximum effectiveness. You'll find that these systems let you customize your drying setup while maintaining a surprisingly compact footprint in your workspace.
To make the most of your modular system, start by configuring the stackable shelves based on your herb varieties. You can adjust the spacing between trays to accommodate different plant sizes, and the vented shelves guarantee proper air circulation throughout all levels.
When you're working with multiple herbs, use the sliding trays for easy access without disturbing other layers. For best organization, take advantage of the independent components. You'll want to group similar herbs on the same level and use chalkboard labels to track what's drying where.
The modular design makes it simple to add or remove sections as your needs change. When you're not using the full system, these units break down easily for storage. Remember to clean each component thoroughly between uses – the modular design makes this task straightforward.
If you're dealing with different drying temperatures, use the adjustable settings to create suitable conditions for each herb type.
Vertical Stacking Methods

Effective vertical stacking revolutionizes herb drying by making the most of limited space while ensuring proper airflow.
You'll find two main pre-made options: collapsible racks and stackable screens. The collapsible design features six 6-inch diameter levels that compress to just 3 inches for storage, while stackable screens offer flexible placement on any flat surface.
If you're feeling crafty, try DIY solutions like the embroidery hoop technique. Simply secure cheesecloth between the inner and outer hoops, then tie strings for hanging your herbs.
For a more robust option, construct wooden racks using furring strips and hardware mesh, creating multiple layers for maximum drying capacity.
You can optimize vertical space by hanging herb bundles in small groups of 3-5 stems. Secure them with twine or rubber bands, spacing them appropriately for good air circulation.
Don't forget to make use of existing structures – clotheslines, beams, or even homemade branch ladders can serve as effective drying stations.
For protection against dust and pests, cover your herbs with mesh or paper bags while maintaining adequate ventilation.
Securing Multiple Tiers Together
Once your vertical drying system is in place, securing multiple tiers together will determine its stability and success. You'll find several effective methods to guarantee your tiers remain stable throughout the drying process.
Using strings offers a reliable approach – start with four 4-foot strands knotted at the top. You'll want to focus carefully on balancing the first level, as it sets the foundation for the others. Double-knot the strings at middle and bottom tiers, and secure them to the frame using wire connections as guides.
For a more flexible solution, you can opt for binder clips to attach materials to the metal frame. Clip around the outside ring, leaving the interior space free for tools or support. If you're using fabric, choose tutu netting or similar materials with small holes for maximum airflow. Simply fold and zigzag the fabric around the wires, securing it with clips.
If you've invested in a commercial rack, you'll benefit from built-in features like Velcro loops and zippered chambers. These systems often include adjustable tiers and specialized mechanisms that make securing your herbs straightforward and efficient.
Portable Transportation Techniques
When you're ready to transport your folding herb dryer, collapse each tier using the quick-fold method by pressing the side latches and gently pushing inward.
You'll want to secure the folded tiers with adjustable straps, preventing any accidental unfolding during movement.
For safe transport, position the straps at both ends of the bundled unit and carry it horizontally to maintain stability and protect your dried herbs.
Quick Fold Travel Method
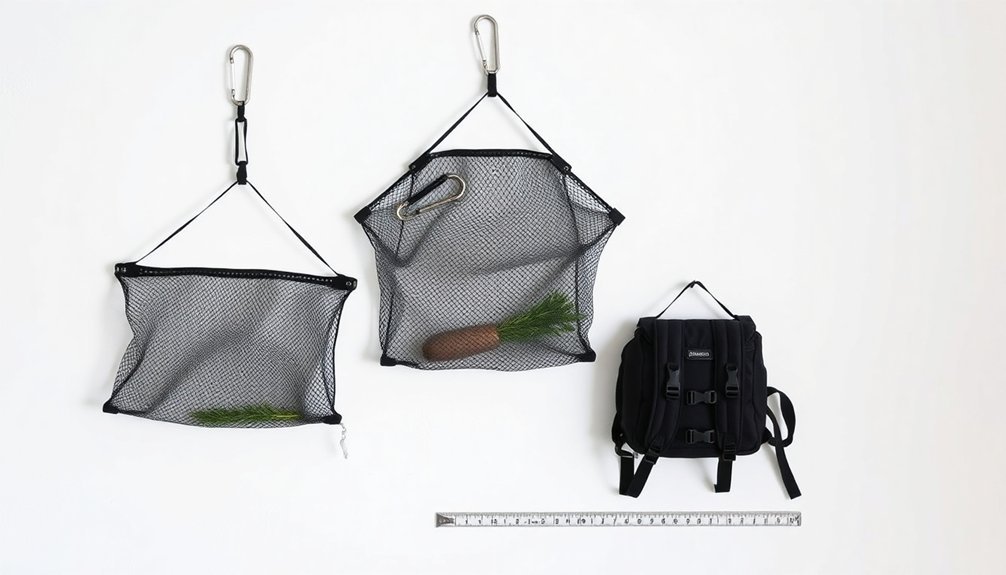
Several portable herb dryers can be quickly folded for travel using the "Christmas tree" stacking method and color-coded zippers. You'll find that this efficient packing technique maximizes space while protecting your materials during transport.
Start by stacking your buds upright in the mesh nets, following the Christmas tree pattern to prevent flat spots and maintain product quality.
When you're ready to fold your dryer, locate the color-coded zippers that make organization straightforward. Collapse the steel ring wires systematically, working from top to bottom. The layered construction will allow you to fold the mesh nets flat, making them compact enough to fit into their storage case.
If you're using adjustable cantilever attachments, detach them and store them separately in your carrying case.
Don't forget to utilize the heavy-duty handles for secure transportation. You can nest multiple drying racks together if you're moving several units at once.
The non-toxic polyester mesh fabric will maintain its integrity even when folded repeatedly, and the durable construction guarantees your dryer won't lose its shape during transit.
Keep the storage case handy for quick setup at your destination.
Secure Straps While Moving
Through proper strap management, you'll prevent your herb dryer from shifting during transport. Before moving your dryer, verify all color-coded zippers are completely closed to maintain separation between herb batches and prevent any cross-contamination.
Double-check that the rugged zippers are securely fastened to keep your drying material protected from dust and moisture during transit.
When you're ready to move, collapse the structure following its designated folding points. You'll want to secure any loose straps by wrapping them around the folded unit, preventing them from catching on surrounding objects.
Place the folded dryer in its carrying case, which keeps all components organized and protected. If your case has additional securing mechanisms like Velcro or buckles, use them to minimize movement inside.
For longer distances, take advantage of the built-in Velcro loops to secure the packed unit to a stable surface in your vehicle. Remember that the hooks and loops can support up to 1kg per chamber, so distribute weight evenly when packing.
Keep the waterproof top facing outward to maintain protection against unexpected moisture during transport.
Clean Between-Season Maintenance
Properly maintaining your herb drying rack between seasons guarantees its longevity and ideal performance for your next harvest.
Start by disassembling your rack and washing all components with mild soap and water, ensuring you remove any leftover plant residue or debris.
Don't forget to thoroughly dry each part to prevent mold and rust formation.
Inspect your drying chambers carefully, paying special attention to the mesh material for tears or holes.
You'll want to repair these immediately to maintain the rack's effectiveness.
Clean the zippers and moving parts to keep them operating smoothly, and vacuum out any fine particles that might've accumulated in the chambers.
When you're ready to store your rack, fold it into its compact 12-inch-diameter form and place it in a labeled fabric bag or container.
Make sure you're storing it in a dry, well-ventilated area.
Check that the waterproof fabric top is intact and all mesh sections are secure to prevent dust and pest infiltration during storage.
Keep your cleaning supplies and maintenance tools in an easily accessible, designated area so you'll be ready for quick cleanups when the next drying season arrives.
Weather-Resistant Setup Strategies

Successful outdoor herb drying starts with strategic weather-resistant setup that protects your harvest from the elements. To maximize protection, position your Mars Hydro drying rack where you'll have ideal control over environmental factors. You'll want to take advantage of the waterproof top and dust-proof fabric features while guaranteeing proper ventilation.
Set up your drying rack using the hook and loop combination with the "S" hook for versatile placement options. You can hang it from sturdy tree branches, poles, or ceiling fixtures, but always make sure it's securely fastened.
Make use of the built-in Velcro loops for additional stability, especially in windy conditions. Don't forget to zip up all chambers completely to create a protective barrier against insects and unwanted debris.
The polyester mesh and steel wireframe construction will maintain structural integrity even in challenging weather. If you're drying outdoors, you'll need to monitor weather conditions closely and be ready to move your setup inside if necessary.
Consider using additional climate control equipment like fans or dehumidifiers to maintain ideal drying conditions, particularly in humid environments where moisture can compromise your harvest.
Frequently Asked Questions
How Long Should Herbs Dry Before Checking Their Crispiness Level?
You'll want to check your herbs' crispiness after 2-4 hours in a dehydrator, 1-3 weeks for air drying, or 60-120 seconds in a microwave. Always verify they're brittle and break easily.
Can Multiple Types of Herbs Be Dried Together Without Mixing Flavors?
Yes, you can dry different herbs together without flavor transfer. Your herbs will maintain their distinct tastes while drying, whether you're using air drying, dehydrators, or other methods. Just guarantee good ventilation.
What Temperature and Humidity Levels Are Ideal for Indoor Herb Drying?
You'll want to maintain temperatures between 95-115°F for ideal herb drying. In humid conditions, increase temps up to 125°F. Keep your space well-ventilated and monitor herbs until they're crisp and crumbly.
How Do You Prevent Mold Growth During the Drying Process?
You'll prevent mold by maintaining humidity below 60%, ensuring proper airflow, keeping herbs separated, monitoring regularly for musty odors, and removing affected herbs immediately. Don't forget to use fans for circulation.
Should Herbs Be Washed Before Placing Them in Drying Racks?
It's best to avoid washing herbs before drying unless they're visibly dirty. If you must wash them, use a salad spinner and let them air dry completely before placing them in drying racks to prevent mold.
In Summary
Maximizing your herb drying setup doesn't have to be complicated. You'll find these seven folding techniques transform your drying process into a more efficient, space-conscious operation. Whether you're storing your dryer during off-seasons or quickly deploying it for unexpected harvests, these smart solutions help you maintain your equipment and protect your herbs. Put these methods into practice, and you'll soon wonder how you managed without them.


Leave a Reply