
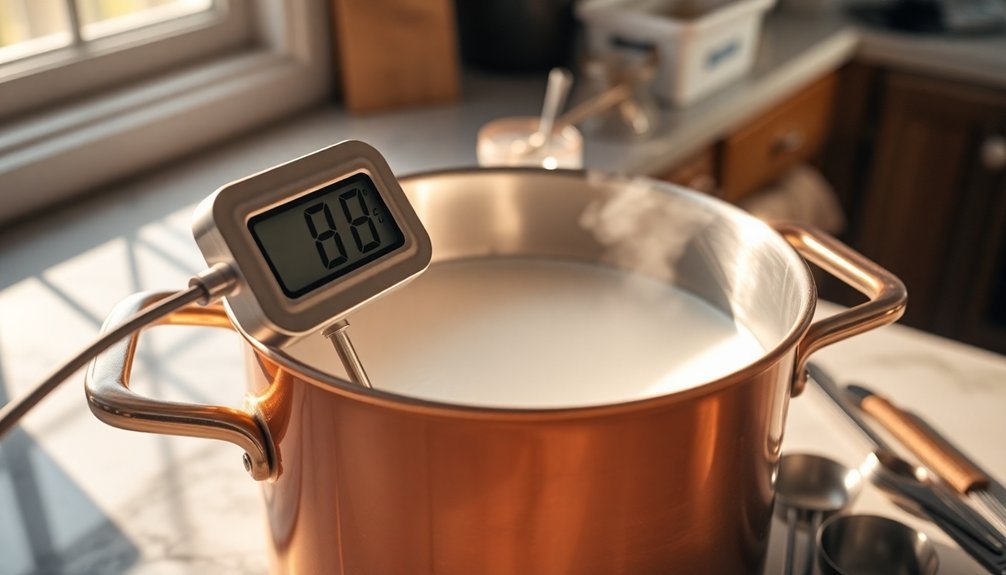
To achieve perfect temperature control in cheesemaking, start by investing in a reliable digital thermometer that's accurate within ±1°C. You'll want to set up a proper heating station using a PID controller and double-walled vat for consistent heat distribution. Master the double boiler method by maintaining 2 inches of water and monitoring gradual temperature increases of 2°F per minute. Keep your aging environment stable with regular checks using a digital hygrometer thermometer. Don't forget to track and document temperatures during critical stages like pasteurization, culture addition, and curd cooking. These fundamentals will help you reveal the secrets to consistently excellent cheese.
Choose The Right Thermometer

For successful cheese making, choosing the right thermometer is vital to maintaining precise temperature control throughout the process. You'll need to decide between three main types: digital, dial, or infrared thermometers.
Digital thermometers offer quick, accurate readings with clear displays, while dial thermometers provide reliability without batteries and can be easily recalibrated. Though infrared thermometers are convenient, they're less ideal for cheese making as they only measure surface temperatures. Recommended models like ThermoPop by ThermoWorks offer exceptional versatility for cheese makers.
When selecting your thermometer, focus on four key features. First, ascertain accuracy within ±1°C or ±2°F, as even small temperature variations can affect your cheese's texture and taste.
Second, verify the temperature range covers 0°C to 100°C (32°F to 212°F) to accommodate all cheese-making stages. Third, choose a durable model that can withstand frequent liquid exposure and temperature changes.
Finally, opt for an easy-to-clean design to maintain proper hygiene.
Don't forget about maintenance. You'll need to calibrate your thermometer regularly using ice water or boiling water methods.
Store it carefully to prevent damage, and if you're using a digital model, keep fresh batteries on hand.
Set Up Your Heating Station
A well-organized heating station serves as the cornerstone of successful cheese making.
You'll want to start by connecting your heating equipment to a PID controller, which will automate and maintain precise temperature control throughout the process. For best results, select a double-walled vat or restaurant food warmer that can distribute heat evenly. Many cheesemakers have found success with a Costco food warmer setup.
Install a dual probe system and calibrate your PID controller before you begin. This setup will help you maintain temperatures within a narrow range of +/- 1 degree.
Add a small pump to circulate water and a stirring mechanism to guarantee uniform heat distribution throughout your milk.
Program your controller to handle specific temperature profiles for different cheese varieties. You'll need to set it up so it can quickly reach the required temperature and hold it steady. For cooking curds, configure gradual increases of about 2 degrees every 5 minutes.
Make sure your system includes high and low temperature alarms for added safety.
Don't forget to position your sensors strategically – you'll need them to be accurate within +/- 0.1 degrees.
Use long sensor cables to give yourself flexibility in arranging your workspace, and adjust your thermostat's differential settings to enhance energy usage.
Master The Double Boiler Method

Throughout the cheese-making process, a double boiler setup provides essential temperature control for achieving consistent, high-quality results.
Begin by selecting two compatible pans that fit together with enough space between them, and elevate the inner pan using wooden utensils or a specialized jam-making saucepan. The larger water capacity of this setup ensures better temperature stability. Fill the bottom pan with about 2 inches of water to create the steam needed for gentle heating.
Monitor the temperature carefully as you heat the milk, aiming for a gradual increase of 2°F per minute. Once you've reached your target temperature, make minimal adjustments to maintain stability. If temperatures rise too quickly, temporarily remove the inner pan from the heat source. The water's thermal mass in the bottom pan helps maintain consistent temperatures throughout the process.
- Use a reliable thermometer to track temperature changes accurately
- Keep the setup properly insulated to maintain stable temperatures
- Allow steam to escape gently to prevent pressure buildup
- Avoid direct heat on the inner pan to prevent hot spots and overheating
This method guarantees even heat distribution and prevents localized overheating, which can compromise your cheese's quality and structure.
Monitor Aging Environment Carefully
Don't forget to equip yourself with proper monitoring tools.
You'll need a digital hygrometer thermometer for accurate readings, and it's worth investing in a temperature-controlled cheese cave or modified refrigerator.
Check your temperatures twice daily and use a hygrometer to track humidity levels, making adjustments as needed.
Track Temperature During Critical Stages
Successful cheesemaking depends on maintaining precise temperatures during each critical phase of production. You'll need to closely monitor and adjust temperatures from initial milk preparation through final curd cooking to achieve the desired results.
During pasteurization, heat your milk to 72°C for 15 seconds, or use gentler thermisation between 57-68°C if you're aiming to preserve natural enzymes.
When adding starter cultures, you must maintain specific temperature ranges – 20-40°C for mesophilic cultures and 40-55°C for thermophilic varieties. The coagulation phase requires temperatures between 30-40°C for proper curd formation, while cooking temperatures vary by cheese type, from 38°C for cheddar to 50°C for parmesan.
- Keep a digital thermometer handy and check temperatures frequently throughout the process
- Heat milk gradually to avoid shocking the cultures or creating uneven curd formation
- Document temperature readings at each stage to help troubleshoot if issues arise
- Use a water bath or double boiler setup for more precise temperature control
Remember that even small temperature variations can greatly impact your cheese's final texture and quality.
Too high or too low temperatures during any stage can result in failed batches or undesirable characteristics.
Frequently Asked Questions
How Long Should Milk Cool Down After Pasteurization Before Adding Cultures?
You'll need to let your milk cool for 30-60 minutes after pasteurization, until it reaches 86-90°F for mesophilic cultures. Use a thermometer to confirm the temperature's stable before adding your cultures.
Can I Reuse the Same Thermometer for Both Milk and Aging Processes?
Yes, you can reuse the same thermometer for both milk and aging processes. Just make certain you properly calibrate it before each use and keep it clean. Regular accuracy checks will guarantee reliable temperature readings.
What's the Maximum Temperature Fluctuation Allowed During Overnight Cheesemaking Processes?
You shouldn't allow temperature fluctuations greater than ±2°C during overnight cheesemaking. If you're working with mesophilic cultures, maintain temperatures between 20-40°C, while thermophilic cultures need 40-55°C consistently.
Does Altitude Affect the Target Temperatures for Cheese Making?
Yes, you'll need to adjust your target temperatures at higher altitudes. While pasteurization stays constant at 140-145°F, you should lower other cheesemaking temperatures to prevent overheating and maintain proper texture and flavor.
Should Temperature Adjustments Differ When Using Goat's Versus Cow's Milk?
Yes, you'll need to adjust your heating approach with goat's milk since it heats faster than cow's milk. Use lower heat settings and monitor temperatures more closely to prevent overheating when working with goat's milk.
In Summary
You'll find that proper temperature control makes or breaks your cheese-making success. By following these guidelines for choosing accurate thermometers, setting up an efficient heating station, mastering the double boiler technique, monitoring your aging space, and tracking temps during key stages, you're well-equipped to create consistent, high-quality cheese. Don't let temperature mishaps derail your cheese-making journey – stay vigilant and precise.


Leave a Reply