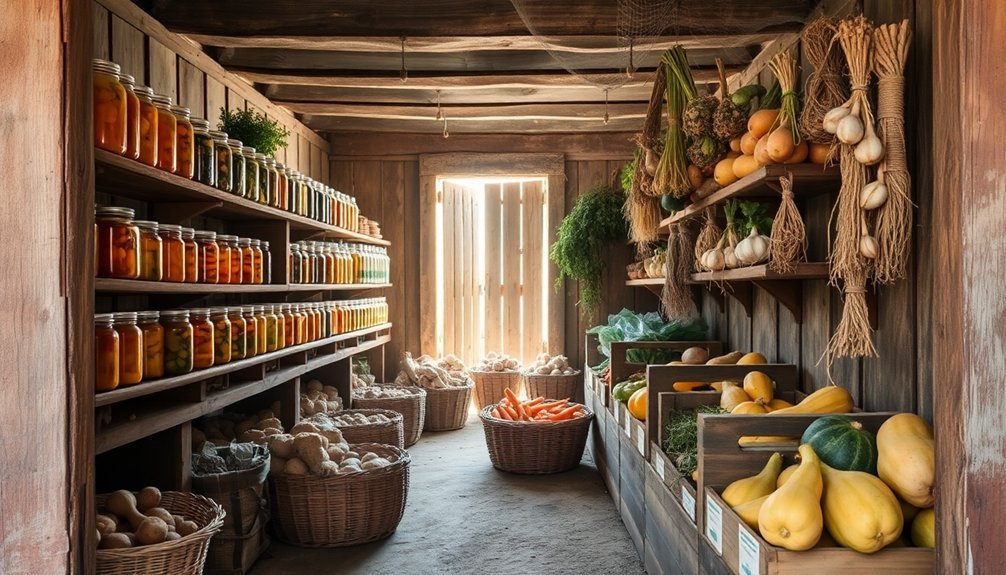
A root cellar food cache contains a strategic mix of vegetables, fruits, and preserved goods stored in carefully arranged layers. You'll find root vegetables like potatoes, carrots, and beets packed in damp sawdust or sand, while apples are kept separate to prevent their ethylene gas from spoiling other produce. Your cellar should maintain temperatures between 32-40°F with 85-95% humidity using natural cooling and moisture control methods. Custom wooden boxes, ventilated bins, and moisture-proof containers protect your food supply, while herbs like mint and lavender help deter pests. Understanding proper storage techniques can transform your cellar into a year-round food preservation system.
Root Cellar Location Selection

Selecting the right location for your root cellar is essential for maintaining ideal food storage conditions year-round.
You'll want to choose a cool, shaded spot away from direct sunlight, ideally on a north-facing slope or partially underground to take advantage of the earth's natural insulation. Building into hillsides provides excellent natural temperature regulation for long-term food preservation.
Position your root cellar close to both your house and garden for convenient access during harvest and throughout the winter months. If you've got an unheated basement room, that's often a suitable solution.
When selecting the site, verify it has good drainage and isn't in a low-lying area prone to flooding, as excess moisture can compromise your stored produce.
Consider your local climate and frost line when determining the cellar's depth. You'll need to maintain temperatures between 32 and 40°F and humidity levels of 85-95% for prime storage conditions.
If you're building a new structure, think about placing it under a shed or covered area to help manage snow accumulation and make winter access easier.
Remember to include proper ventilation in your design to control ethylene gas and prevent mold growth while maintaining consistent temperature and humidity levels.
Essential Construction Materials
You'll need to start with a solid foundation made of concrete footers and walls, which provide essential structural support and moisture control for your root cellar.
Your drainage system must include gravel fill, polyethylene sheeting, and proper slope to prevent water accumulation that could damage stored food. Barbed wire layers between construction materials enhance structural integrity and stability.
For effective temperature regulation, you'll want to incorporate multiple insulation layers using materials like Styrofoam sheets, 6-mil polyethylene, and a soil-grass covering for the roof.
Concrete Walls and Foundation
For a durable root cellar, concrete walls and foundations form the structural backbone of your underground food storage. You'll need approximately 350 cinder blocks for an 8 x 8 foot cellar, and you must lay them on properly constructed concrete footers to prevent shifting over time.
Your footers should extend below the frost line and measure 16 inches wide for block walls or 8 inches for poured concrete walls. Install reinforcing rods in the footer and let it cure for 3-7 days before starting the walls.
When building the walls, you'll want to incorporate both horizontal and vertical rebar for structural integrity. Use #3 or #4 rebar, placing horizontal pieces every foot and vertical pieces every two feet. The extra-thick block walls provide superior protection against water infiltration when properly sealed.
Don't forget to seal your concrete blocks with a water barrier to prevent moisture seepage. You can use the slipform technique to combine concrete with stones for added strength and faster construction.
Your forms must be level before pouring concrete, and you'll need to guarantee the entire structure can withstand moisture and cold temperatures. These careful construction methods will create a lasting foundation for your food storage system.
Drainage System Components
Proper drainage forms the cornerstone of a successful root cellar design. You'll need a 4-inch diameter perforated drainpipe, which you'll place along the upper side of your cellar, buried 12 inches deep.
Install the pipe with a slope of 1 inch across 8 feet to guarantee water flows away effectively, and make sure it daylights on both ends beyond the cellar.
For maximum drainage, lay a 3-inch gravel bed beneath the drainpipe and protect it with heavy roofing paper or 6-mil plastic sheeting to prevent silt clogging.
You'll want to surround the cellar with a 6-inch layer of gravel, including over the arch. As you backfill, tamp the soil firmly but gently, maintaining at least 4 inches of gravel at ground level.
Your cellar floor should slope 4-6 inches from back to front, with the interior floor level higher than the outside soil.
Cover both the floor and entrance walkway with gravel to prevent mud issues. If you're concerned about water accumulation, install a vertical pipe for an optional sump pump.
Remember to bend the drainpipe around both corners, ensuring proper daylight drainage on both ends.
Insulation and Sealing Materials
Sealing off your root cellar starts with choosing the right insulation materials.
You'll need to insulate all sides of the structure, including the ceiling, to maintain consistent temperatures and humidity levels. Foam plastic sheets at 20mm thickness serve as your primary barrier, while rigid foam sheets offer superior moisture resistance compared to fiberglass alternatives.
For ideal insulation and sealing, consider these essential components:
- Extruded polystyrene foam sheets for walls and ceiling, offering excellent thermal protection and moisture resistance
- 6-mm plastic sheeting to line excavation edges before constructing earthbag walls
- Composite deck material for bottom wall plates to prevent moisture seepage
- Fire-resistant covering sheets to meet building codes when using foam insulation
You'll want to seal any gaps with cement stucco or earthen plaster, reinforcing the structure with chicken wire mesh where needed.
When installing vent pipes, create insulated panels using plywood and foam, laminated with polyurethane construction adhesive.
Don't forget to leverage natural earth insulation by building into a hillside when possible, as this provides additional temperature regulation benefits.
Maintaining Proper Temperature Control

Temperature control serves as the backbone of successful root cellar storage, with the ideal range falling between 32-40°F (0-4°C). You'll need to maintain this range consistently to slow down vegetable decay and prevent issues like potato sprouting. Proper temperature management helps preserve the quality of your root crops throughout the storage period.
To achieve peak cooling, you can create your own ice supply during winter months. You'll want to fill about one-third of your cellar's volume with ice, which acts as a cold battery through summer. Remember that ice-making requires temperatures at least 5°F below freezing.
You'll need to monitor temperature levels regularly using environmental sensors. It's vital to check your ventilation system frequently, as it helps remove ethylene gas and prevents mold growth. You should adjust your ventilation settings seasonally and confirm your insulation materials, whether straw bales, foam board, or earth insulation, are functioning effectively.
Don't forget to maintain humidity levels between 85-95% to prevent your vegetables from drying out. You'll also want to minimize light exposure, as it can cause nutrient bleaching and unwanted sprouting.
Best Storage Container Options
Choosing the right storage containers for your root cellar can greatly impact the longevity of your stored foods. You'll need a mix of containers to accommodate different types of produce and dry goods while maintaining ideal preservation conditions.
- Food-grade plastic buckets and barrels are your first line of defense, with 5-gallon containers being perfect for versatile storage needs, while 55-gallon drums can handle bulk storage. You'll often find these at local restaurants or bakeries.
- Custom wooden boxes built from 3/4-inch plywood offer flexible storage solutions, especially when sized at 3-ft long by 1-ft wide by 1-ft deep. They're ideal for root vegetables and can include dividers for organization.
- Moisture-proof containers with gamma seal lids protect dry goods like spices and grains, while heavy-duty plastic totes safely transport glass jars and delicate items.
- Peat moss layering systems work alongside these containers, requiring a 3-inch base layer in storage boxes. You'll want to add layers between vegetables and on top to maintain proper moisture levels and prevent rotting.
Choose containers based on your specific storage needs, ensuring they provide appropriate moisture control, ventilation, and protection from pests.
Common Food Storage Methods

You'll find several proven methods for storing food in your root cellar, from traditional sand and straw layering to modern container systems with ventilated bins.
When using natural materials, you can create protective barriers with sawdust, clean sand, or dried leaves to cushion and isolate your vegetables while maintaining proper airflow.
Your storage success depends on choosing the right combination of these methods based on what you're storing, as root vegetables work well with sand layering while fruits and tender vegetables need more structured container systems.
Traditional Layering Techniques
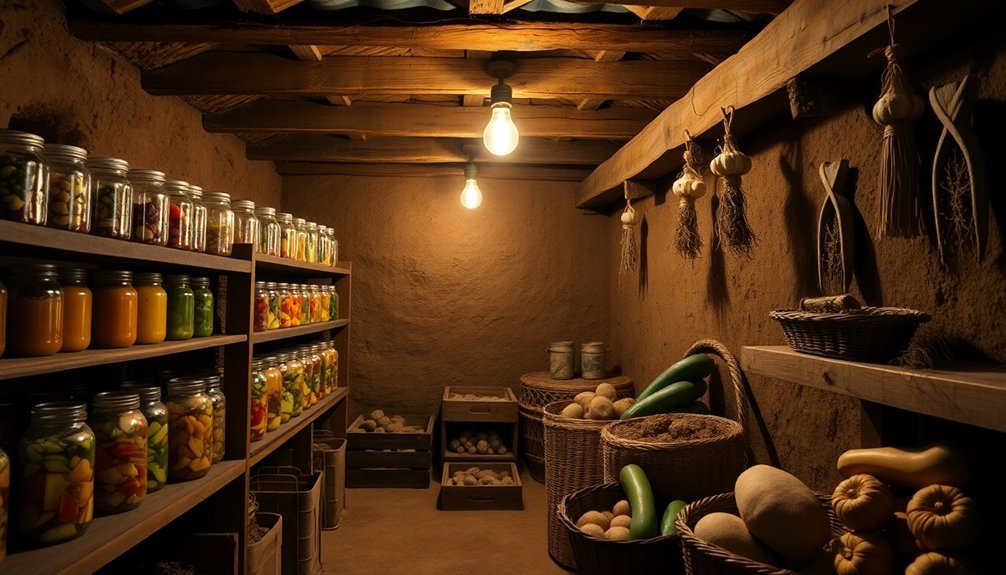
Traditional root cellar storage relies heavily on proper layering techniques to maximize food preservation throughout the year. You'll need to maintain specific conditions to guarantee your food stays fresh, including temperatures between 32-40°F and humidity levels of 85-95%.
When storing your root vegetables, you'll want to follow these essential layering steps:
- Start with a base layer of slightly damp sawdust at the bottom of your storage area.
- Place your vegetables in a single layer, ensuring they don't touch each other.
- Cover the vegetables completely with another layer of sawdust.
- Repeat these layers until you've stored all your produce.
You'll find that different foods require specific storage considerations. Keep your apples separate to prevent their ethylene gas from affecting other produce.
Root vegetables like potatoes, carrots, and beets work well with the sawdust layering method, while cole crops and leeks can be stored similarly. The key is maintaining consistent darkness and humidity levels throughout your cellar.
If you're storing multiple food types, remember to group them according to their temperature and humidity requirements to prevent spoilage and maintain freshness.
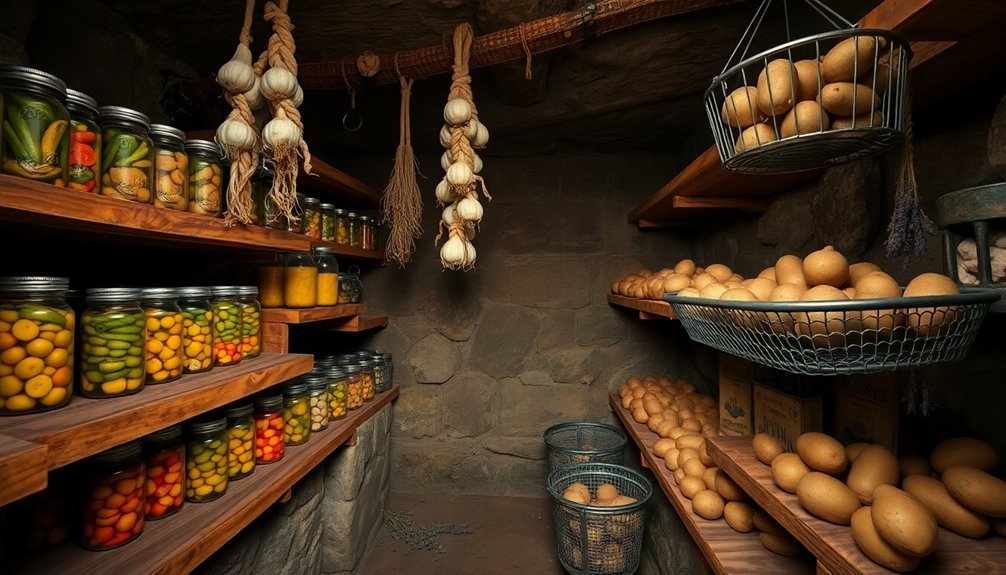
Container And Bin Systems
Beyond layering methods, modern root cellar storage benefits greatly from well-organized container and bin systems. You'll find various options, from round Cambro Camwear containers to square Rubbermaid storage solutions, all designed to maximize your storage space while protecting your food cache.
Your container choices should focus on durability and food safety. Look for heavy-duty polypropylene or polyethylene containers that are BPA-free and food-grade. These materials resist scratches and cracks, ensuring long-term reliability.
You'll want containers with secure, airtight lids to maintain freshness and prevent contamination. For efficient organization, opt for stackable containers like the Quantum QUS265RD bins. You can enhance accessibility with specialized features such as lids with built-in scoops for easy portion control.
Don't forget to implement a clear labeling system to track your stored items. Proper ventilation is essential for root cellar storage. Select containers with strategic drainage holes to manage moisture levels.
You can also incorporate straw or hay between layers for insulation and separation. Remember to regularly inspect your stored produce and maintain appropriate temperature and humidity levels within your container system.
Natural Material Storage Methods
For centuries, natural materials have proven essential for effective root cellar storage, offering sustainable and chemical-free solutions for preserving food. These time-tested materials provide specific benefits that modern synthetic alternatives can't match.
- Glass containers excel at storing fats, proteins, and produce without chemical leaching or odor absorption, making them perfect for preserving leftovers and acidic foods.
- Clay and earthenware vessels naturally preserve pickles and spices for months without refrigeration, while ceramic containers keep dry goods fresh and maintain ideal temperatures.
- Bamboo and wooden containers work well for short-term storage of baked goods and dry items, though you'll need to maintain them with food-grade mineral oil.
- Food-grade silicone offers flexibility and airtight seals, ideal for portable snacks and meals.
The root cellar's packed earth floor maintains optimal conditions of 32-40 degrees and 80-90% humidity.
You'll want to incorporate breathable materials like mesh or coir shelving for proper air circulation. Using straw, sawdust, or peat moss helps prevent food from drying out, while dark conditions stop potatoes from greening or sprouting.
Seasonal Produce Selection Guide
Selecting the right produce for root cellar storage begins with understanding seasonal planting and harvesting cycles. You'll want to focus on late-maturing varieties that are specifically bred for long-term storage, avoiding early-maturing types that don't keep as well.
Plan your garden space strategically by starting with early-season crops like onions and garlic, which you can harvest to make room for fall vegetables. For root vegetables, time your planting carefully – sow carrots between late June and mid-July after spring brassicas are done. Choose storage-specific varieties like 'Bolero' and 'Chantenay' carrots rather than fresh-eating types like 'Mokum.'
You'll need dedicated space for full-season crops like potatoes and winter squash. Start most vegetables indoors under lights four weeks before transplanting to maximize your harvest window.
When selecting cabbage, opt for late-maturing varieties that store well. Timing your harvest is essential – wait until vegetables are fully mature but harvest before the first hard frost.
Only select unblemished produce for storage, and properly prepare them by trimming leaves and stems as needed. Remember, damaged items should be used immediately rather than stored.
Extending Food Shelf Life
Success in extending food shelf life depends on mastering four key elements: temperature control, humidity levels, storage environment, and proper handling practices.
You'll need to maintain temperatures between 32-40°F (0-4°C) while keeping humidity at 85-95% for ideal preservation.
Your root cellar's effectiveness relies on these critical preservation factors:
- Temperature stability prevents premature sprouting and decay, mimicking autumn conditions that naturally preserve produce.
- Consistent humidity levels stop vegetables from drying out while preventing excess moisture that leads to mold.
- Proper ventilation removes harmful ethylene gas buildup and maintains air quality.
- Regular monitoring catches spoilage early, preventing it from spreading to other stored items.
You'll want to check your stored produce frequently for signs of decay and remove affected items immediately.
Verify your cellar stays well-insulated using materials like straw bales or foam board to maintain steady conditions.
The environment should remain dark and cool, with proper ventilation to prevent gas accumulation.
Humidity Management Techniques
You'll find natural moisture control in your root cellar starts with the basics: a dirt floor that naturally holds moisture and strategically placed pans of water or damp materials like burlap bags and sawdust.
Your monitoring toolkit should include reliable thermometers and hygrometers to track humidity levels, which need to stay between 85-95% for ideal food preservation.
To maintain these conditions, you can create humid microclimates using straw bales or moss while keeping a close eye on your measurements to adjust ventilation as needed.
Natural Moisture Control Methods
Moisture management lies at the heart of a well-functioning root cellar, where natural methods often prove most effective.
You'll find that starting with the right floor material makes a significant difference. Dirt or gravel-on-earth floors naturally maintain ideal moisture levels, while porous materials like cement can help regulate humidity without creating excess dampness.
When you're setting up your root cellar's moisture control system, consider these proven methods:
- Sprinkle water on dirt floors during drier seasons, especially in fall.
- Place damp burlap bags over produce to maintain consistent humidity.
- Set water-filled pans on the floor to increase ambient moisture.
- Use perforated containers that allow proper airflow while retaining humidity.
You can enhance moisture control by packing root vegetables in damp sawdust, sand, or moss.
This traditional method prevents surface evaporation and maintains favorable humidity levels around your produce. For areas that need less moisture, create micro-climates using sealed containers with moisture-absorbing materials.
Remember to adjust your storage methods based on your cellar's location – basement cellars typically need more humidity, while naturally damp spaces might require less intervention.
Humidity Monitoring Tools
Tracking humidity levels effectively requires reliable monitoring tools in your root cellar. You'll find wireless sensors particularly useful, as they can be mounted on walls or placed anywhere in your storage space. These sensors use Bluetooth to transmit both humidity and temperature data directly to your mobile device, with a single gateway supporting up to five sensors throughout your cellar.
You can monitor conditions in real-time through mobile applications, which display current readings and generate long-term tracking graphs. These apps let you set custom alerts when humidity levels fall outside your desired range of 80-95% for vegetable storage.
For more thorough monitoring, you'll want to take into account a remote monitoring system that connects to your internet router, allowing you to check conditions even when you're away from home. The data analysis features help you spot trends and make informed decisions about ventilation adjustments.
You can use the detailed insights to fine-tune your storage conditions and prevent excess moisture buildup. With detachable probes, you'll get precise measurements in different areas of your cellar, ensuring ideal preservation conditions for your stored produce.
Natural Preservation Solutions

Nature's time-tested methods provide effective solutions for preserving food in root cellars without electricity or modern refrigeration. You'll find that utilizing natural materials and simple techniques can maintain ideal storage conditions while protecting your harvest through the winter months.
- Pack root vegetables in layers of clean, dry straw or hay to regulate moisture and prevent direct contact between produce items. This natural insulation helps maintain temperatures between 32-40°F while allowing proper airflow.
- Create separated storage zones using woven baskets or wooden crates filled with sand, which helps preserve root crops like carrots, beets, and parsnips by mimicking their natural growing environment.
- Harness the natural cooling properties of earth by burying 5-gallon buckets or containers with drainage holes, effectively maintaining consistent temperatures and humidity levels between 85-95%.
- Use natural barriers between ethylene-producing fruits (like apples and pears) and ethylene-sensitive vegetables by placing straw bales or wooden dividers between storage areas.
These preservation methods work together with your root cellar's natural environment to create autumn-like conditions that slow down decay while maintaining produce quality throughout the storage period.
Ventilation System Requirements
A properly designed ventilation system serves as the lifeline of your root cellar, working around the clock to maintain ideal storage conditions.
You'll need two strategically placed vents – one near the floor for cool air intake and another near the ceiling for hot air and ethylene gas exhaust. These vents, typically 3-4 inches in diameter, should be positioned on opposite walls to maximize airflow.
You'll want adjustable vents that you can control based on seasonal needs. During summer, keep them open to maintain cool temperatures, especially at night when the air is cooler.
In winter, seal them tightly using packed cloth, expanding foam, or rubber gaskets to maintain stable conditions. Don't forget to cover vent openings with mesh to prevent pest entry.
Your ventilation system works hand-in-hand with temperature and humidity control, helping maintain the ideal range of 32-40°F and 80-95% humidity.
This airflow prevents mold growth, reduces ethylene gas buildup that can cause premature sprouting, and helps preserve food quality.
Position your vents to take advantage of natural air movement, remembering that hot air rises while cool air sinks.
Pest Prevention Strategies
Keeping unwanted visitors out of your root cellar requires a multi-layered defense strategy combining physical barriers, natural deterrents, and regular maintenance.
Start by ensuring your cellar's structural integrity with tight-fitting lids, wire mesh coverings over ventilation holes, and properly sealed gaps. You'll want to elevate storage containers on bricks or blocks to prevent access from burrowing rodents.
Natural deterrents can greatly enhance your pest prevention efforts. Consider these proven methods:
- Create a perimeter of pest-repellent herbs like mint, lavender, and garlic
- Apply essential oil mixtures containing peppermint or eucalyptus around entry points
- Sprinkle diatomaceous earth along the cellar's edges to control insects
- Install ultrasonic pest repellents for a modern, humane approach
Don't overlook the importance of regular maintenance. Keep the surrounding area clear of debris, promptly remove spoiled vegetables, and maintain a weed-free zone around your cellar.
Establish a routine inspection schedule to check for signs of pest activity, such as droppings or gnaw marks. A gravel barrier around the perimeter can provide additional protection while making it easier to spot pest activity.
Emergency Backup Storage Plans
Every well-planned root cellar needs a reliable backup system for when primary storage methods fail. You'll want to establish multiple storage locations and methods to protect your food cache during emergencies.
Consider creating a secondary storage area that maintains similar temperature and humidity conditions as your primary cellar. You should pack critical items in airtight containers with oxygen absorbers and Mylar bags for extended shelf life. Store these in a separate section of your cellar or in an alternate location.
Don't forget to include specialized foods for family members with dietary restrictions, infants, or elderly relatives. If your main cellar's temperature control fails, you'll need portable coolers or insulated containers ready to transfer sensitive items quickly.
Keep a rotation schedule for your backup supplies and check them regularly for signs of spoilage. When temperatures fluctuate unexpectedly, you'll want to have refrigerated spaces available as temporary holding areas.
Stock your backup storage late in the season when produce is naturally cooler, and maintain proper ventilation in all secondary storage areas to prevent moisture buildup and food spoilage.
Frequently Asked Questions
Can a Root Cellar Serve as an Emergency Shelter During Natural Disasters?
Yes, you'll find root cellars can effectively protect you during disasters. They're naturally insulated, underground structures that shield you from extreme weather, radiation, and strong winds while providing storage for emergency supplies.
How Do You Prevent Cross-Contamination of Smells Between Different Stored Foods?
You'll prevent food smells from mixing by using airtight containers, keeping ethylene-producing fruits separate, maintaining good ventilation, and storing strong-smelling items like onions and garlic away from other foods.
What Traditional Non-Food Items Were Historically Stored in Root Cellars?
You'll find traditional non-food items like farm tools, food preservation equipment, storage containers, and cooling devices in root cellars. Folks also kept insulation materials and ventilation tools to maintain ideal storage conditions.
Does Storing Produce in Root Cellars Affect Their Nutritional Value?
You'll actually preserve more nutrients in root cellars compared to modern refrigeration. The cool, humid conditions slow down decay while maintaining vitamins and minerals better than commercial storage methods for your produce.
Can Modern Technology Like Sensors Improve Root Cellar Storage Efficiency?
Yes, you'll find sensors dramatically improve root cellar efficiency by monitoring temperature, humidity, and ventilation. They'll alert you to problems, automate adjustments, and help maintain ideal storage conditions for your preserved foods.
In Summary
You'll find that a well-planned root cellar food cache offers reliable food security through proper storage methods and careful environmental control. By selecting the right location, using appropriate containers, maintaining temperature, and implementing effective pest prevention, you're creating a sustainable food storage solution. Remember to check your stored items regularly and rotate stock to guarantee you're always prepared for unexpected situations.


Leave a Reply