For open-air drying, you'll want to choose lean white fish species with minimal fat content. Your best options include cod, haddock, flounder, and pollock, as their firm flesh structure holds up well during the drying process. Freshwater alternatives like sunfish, perch, and walleyes also work effectively. Before drying, you'll need to clean, scale, and properly salt the fish – using about a quarter of the fish's weight in salt. The ideal drying conditions require temperatures between 35-40°C (95-104°F) with steady airflow and 50-60% humidity. Traditional drying methods from around the world offer fascinating insights into perfecting this ancient preservation technique.
Best Lean Fish Species

The four major categories of lean fish provide excellent options for air-drying: freshwater, saltwater, traditional white fish, and shellfish.
For freshwater options, you'll find that sunfish, crappies, perch, walleyes, and bass work exceptionally well. These species have naturally low fat content, which makes them less likely to spoil during the drying process. Setting your oven to 200°F helps achieve optimal drying results.
If you're looking for saltwater alternatives, consider sole, flounder, halibut, pollock, or rock cod. These ocean-dwelling fish dry effectively due to their lean meat structure.
Traditional white fish species offer reliable choices for air-drying. Cod and haddock, both containing less than 1% fat, are particularly suitable. You'll also get great results with snapper, whiting, and smelt, as their low fat content guarantees proper preservation.
Don't overlook shellfish and specialty options. You can successfully dry shrimp, lobster, and crab, though you'll need to precook them first.
Tilapia and sea trout round out your choices with their consistently low fat content. When selecting fish for drying, remember that lower fat content typically yields better results, as fat can become rancid during the preservation process.
Traditional Air Drying Methods
To successfully air-dry fish, you'll want to harness both wind and sunlight, with wind being the more critical factor for removing moisture effectively.
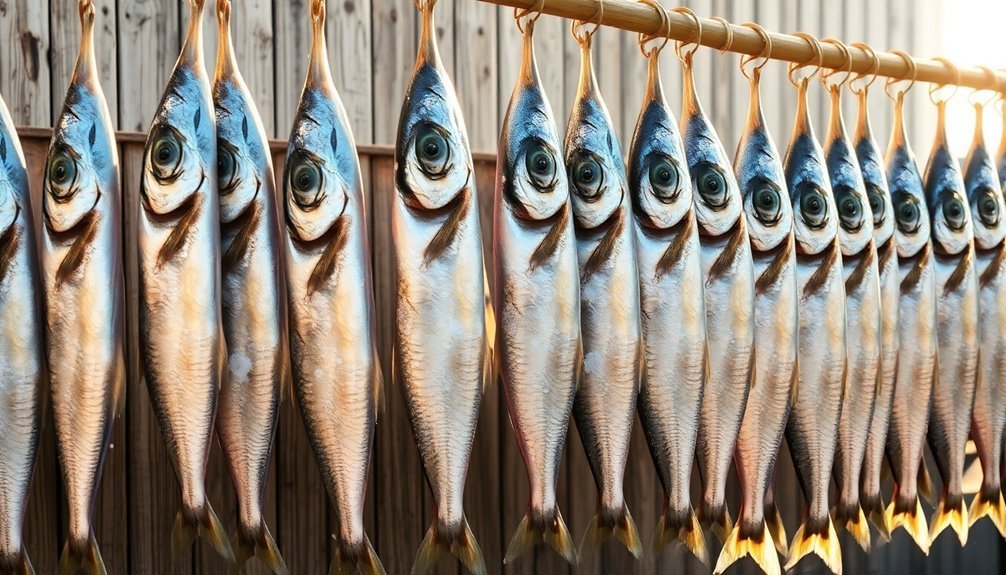
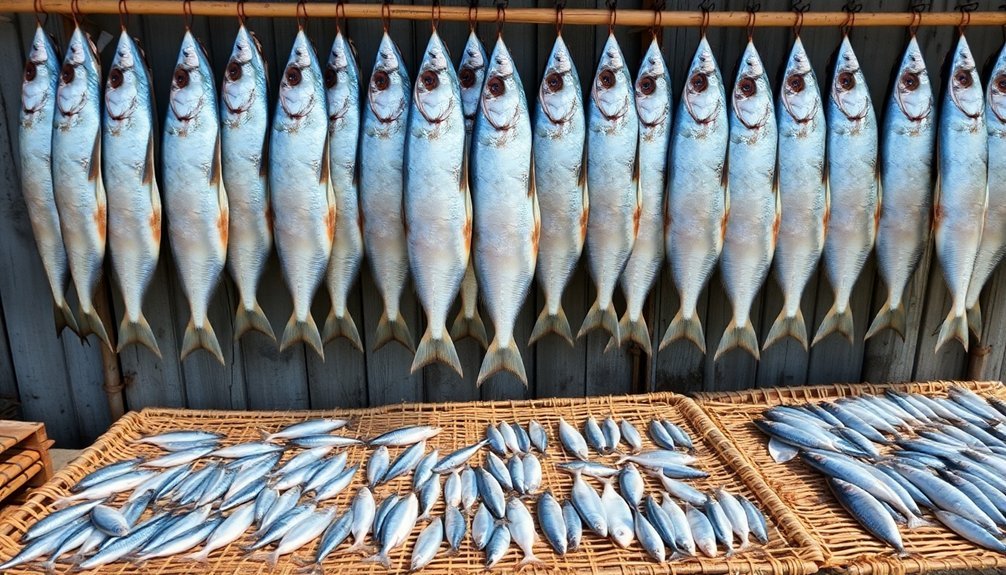
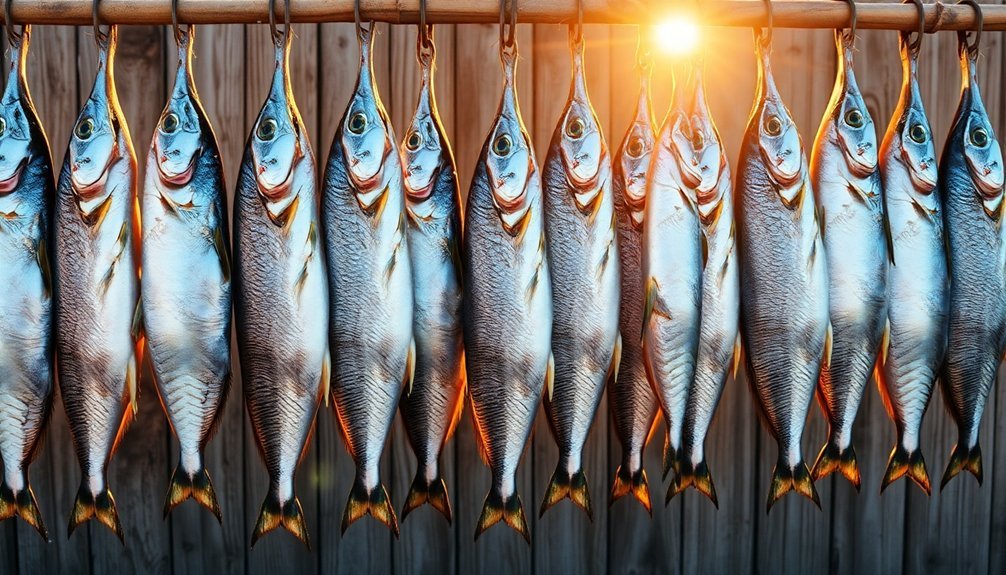
Set up your drying frames in an area that gets consistent airflow, ideally in a spot that catches prevailing winds while avoiding direct afternoon sun that can cook rather than dry the fish. Hanging fish by their tails on strings allows for optimal air circulation during the drying process.
Your drying frames should be elevated off the ground with enough space between fish pieces to allow air circulation on all sides, and positioned at an angle that maximizes wind exposure while protecting against rain.
Wind and Sun Benefits
Nature's perfect partnership of wind and sun creates ideal conditions for traditional fish drying methods.
You'll find that wind plays a vital role by increasing air velocity around the fish, which reduces the thickness of the slow-moving air layer and accelerates moisture removal.
Meanwhile, sunlight provides essential heat energy for evaporation and helps sterilize the fish, protecting it from microbial growth.
When you combine wind and sun exposure, you'll achieve peak drying conditions that maximize efficiency and quality.
The process begins with cleaning and gutting the fish thoroughly to prepare it for drying.
The synergy of these natural elements offers:
- Enhanced drying rates through simultaneous heat provision and moisture removal
- Improved air circulation that prevents localized humidity buildup
- Natural sterilization that helps preserve the fish while deterring insects and animals
For the best results, you'll want to position your fish where it can receive both consistent airflow and direct sunlight.
Make sure to elevate the fish above ground level to increase air movement and monitor the process regularly.
You'll know you've achieved peak conditions when the air is warm and dry, with low relative humidity.
This natural approach not only saves energy but also produces high-quality dried fish with even moisture distribution.
Location and Frame Setup
Setting up an effective drying location and frame structure forms the backbone of successful air-dried fish production. You'll want to position your drying setup above ground level to maximize air movement, choosing a well-ventilated area with low humidity.
Spring and autumn are ideal seasons, as they offer cool temperatures below 10°C and consistent winds.
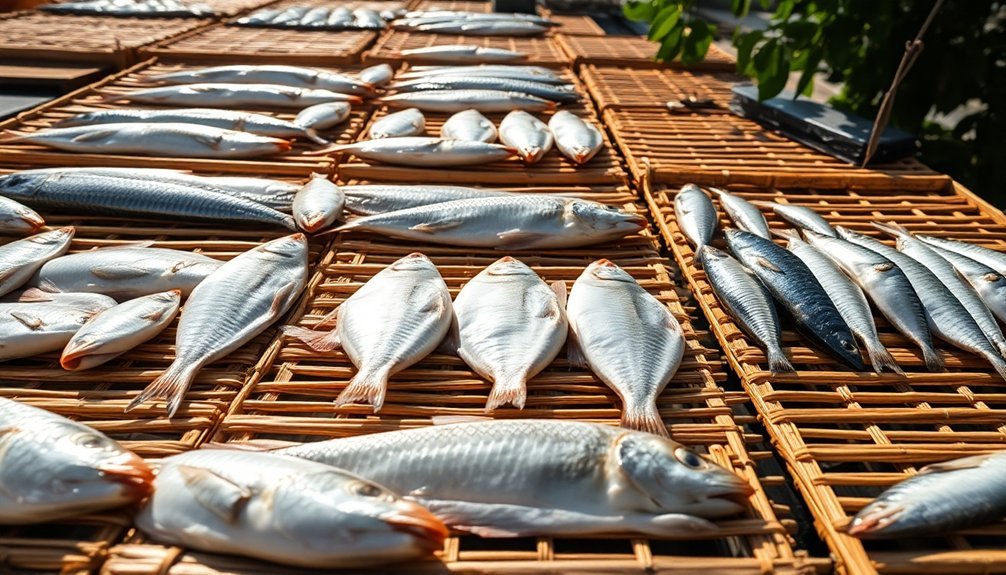
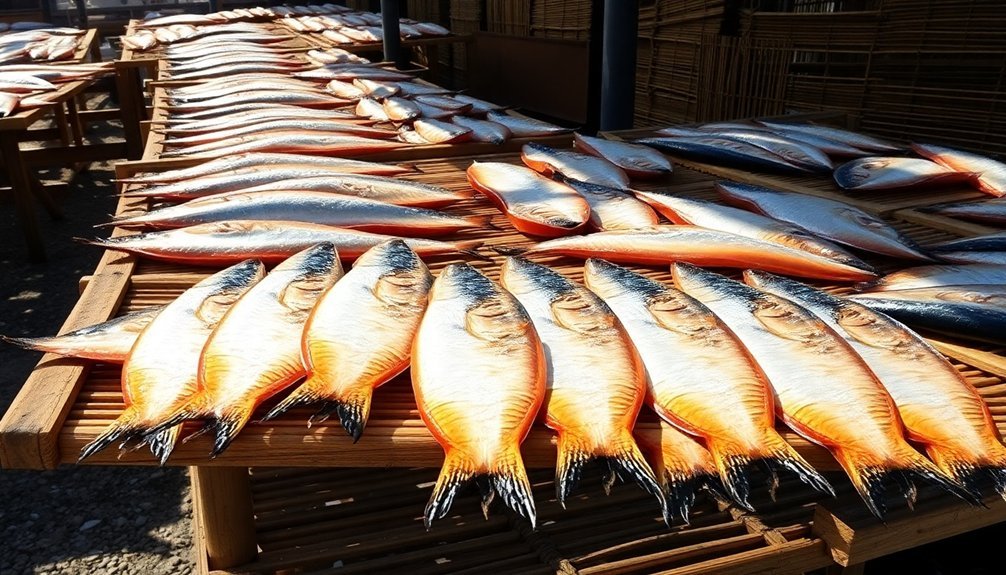
For your frame structure, you've got several reliable options. You can use wooden trellises or lattice structures to hang fish vertically, which allows for better fluid drainage.
Alternatively, set up racks or mats for horizontal drying, making certain you space the fish evenly to prevent contact. Bamboo skewers work well for smaller fish, while metal rods provide sturdy support for larger catches.
You'll need to secure your fish using twine or cord, making sure they're properly suspended. Consider installing simple drip trays beneath your setup to collect fluids.
If you're working with a permanent structure, stainless steel trolleys offer durability and easy cleaning.
Remember to maintain proper spacing between fish, whether they're hung vertically or laid horizontally, as this guarantees uniform drying and prevents cross-contamination.
Salting Before Drying

Preservation begins with proper salting, an essential first step before air-drying your fish. You've got two main options: dry salting, where you'll sprinkle salt directly on the fish, or wet salting (brining), where you'll submerge it in a salt solution.
For dry salting, you'll need about a quarter of your fish's weight in salt, while brining requires 270g of salt per liter of water for a strong solution or 120g for a weak one.
Your salting time depends on several key factors:
- Size matters – allow 1 hour per 500g of fish, or 12-14 hours for fish weighing 2kg or more.
- Fish type affects timing – oily fish needs 25% longer than non-oily varieties.
- Temperature impacts duration – cooler temperatures (20°C or less) work best, and chiller storage can double the required time.
Remember that skin slows salt absorption, while exposed flesh takes it up more quickly.
You'll know your fish is properly salted when its water content drops below 48%. After salting, rinse off excess salt before moving on to the drying process.
This preparation guarantees your fish will dry effectively and develop the right texture and flavor for long-term storage.
Fish Size and Shape
When you're selecting fish for open-air drying, small to medium species like sardines and anchovies will give you the best results due to their quick drying time and lower risk of spoilage.
You'll find butterflied fish work exceptionally well since the split configuration allows better air circulation and more even drying throughout the flesh.
Cutting your fish into uniform strips not only speeds up the drying process but also guarantees consistent results across your entire batch.
Small To Medium Species
Among the various fish sizes suitable for open-air drying, small to medium species typically yield the best results. You'll find these fish dry more uniformly and efficiently, requiring less time than larger species while maintaining better quality throughout the process.
When you're working with smaller fish, they'll typically reach the desired "tacky" texture within the standard 22-28 hour drying period under ideal conditions.
For successful drying of small to medium fish, you'll want to focus on these critical factors:
- Proper washing and drainage before placement on drying trays or hanging systems
- Even spacing to allow adequate air circulation between each fish
- Strategic positioning to take advantage of natural air conditions while minimizing contamination risks
Small to medium fish are particularly well-suited for traditional sun drying methods, though you'll need to monitor weather conditions carefully.
These species work effectively in both open-air and controlled environments, making them versatile choices for various drying methods. When properly prepared, they're less likely to break at the head during the drying process and maintain better color and luster compared to larger fish.
Butterflied Fish Benefits
The benefits of butterflying fish for open-air drying extend well beyond simple aesthetics. When you butterfly a fish, you'll create an even thickness throughout the flesh, which promotes uniform drying and reduces the risk of spoilage. This preparation method works exceptionally well with lean species like cod, haddock, and wolffish, allowing you to maintain better control over the drying process.
| Benefit | Impact |
|---|---|
| Even Drying | Prevents moisture pockets that can lead to bacterial growth |
| Air Circulation | Allows wind to reach both sides of the fish effectively |
| Space Efficiency | Lets you dry more fish in a smaller area |
You'll find that butterflied fish dry faster than whole fish because of their increased surface area. When you make even cuts through the flesh to the skin, you're creating pathways for moisture to escape more efficiently. The process also makes it easier to spot and remove any remaining bones or bloodstains that could affect the final quality. Remember to cut a hole in the tail end for hanging – this guarantees proper air circulation and makes it simple to string multiple fish on your drying racks.
Uniform Strip Preparation
Proper strip preparation stands as a crucial factor in successful open-air fish drying. You'll need to cut your fish into uniform strips that allow for consistent drying throughout the pieces. When you're working with larger fish, it's important to cut them into smaller rectangles or strips to guarantee adequate drying and proper air circulation.
For best results, you'll want to follow these key sizing guidelines:
- Cut your fish or fillets into strips that are 1/4 to 3/8-inch thick
- Make transverse cuts approximately 3-4 inches apart
- Maintain consistent breadth and thickness across all pieces
You'll find that uniform sizes and shapes promote even air circulation, which greatly reduces drying time.
Before placing your fish on the drying racks, make sure to rinse it under cold water and pat it dry with paper towels. When arranging the strips on your drying racks, don't let them touch each other, as this can impede airflow.
If you're using a marinade, let the excess drip off before placing the fish on the racks to guarantee proper drying conditions.
Weather Requirements

Successful outdoor fish drying hinges on specific weather conditions that must be carefully monitored.
You'll need temperatures between 35-40°C (95-104°F) for low-temperature drying, while higher temperatures up to 70°C (158°F) can accelerate the process. The humidity level should stay between 50-60% for ideal results, as anything above 75% will impair drying and cause your fish to reabsorb moisture.
Wind plays a vital role in your drying success. You'll want to maximize air flow around your drying racks, as this helps carry moisture away from the fish's surface during the constant rate period.
During daytime hours, take advantage of natural sunlight and lower humidity levels for the best drying conditions. However, you'll need to protect your fish at night when humidity rises.
If you're facing rain or high humidity, you've got several options. You can cover your fish with plastic sheeting or use press-piling, where you stack the fish with weights overnight to encourage moisture movement to the surface.
For more consistent results, you might consider using mechanized dryers that maintain ideal conditions regardless of weather variations.
Essential Tools and Equipment
To successfully dry fish in the open air, you'll need basic hanging tools like sturdy ropes, hooks, and clips to securely suspend your fish.
You'll want to set up adjustable bamboo or wooden drying racks that allow you to control spacing and maximize air circulation around each fish.
Simple tools for managing airflow, such as removable screens or adjustable covers, will help you protect your drying fish from rain while maintaining proper ventilation.
Basic Hanging Tools Needed
Setting up a fish drying station requires four core categories of tools and equipment.
You'll need drying racks and trays made of stainless steel or other durable materials, with adjustable heights to accommodate different fish sizes. The trays should be spaced properly to guarantee even air circulation and must be easy to clean for ideal hygiene.
For hanging your fish, you'll want nets and cages made from durable nylon or polyester. These should be foldable for easy storage and feature appropriate mesh sizes for proper air flow.
Environmental control is essential, so you'll need:
- Protective shelters or canopies to shield fish from direct sunlight and rain
- Hooks and hangers for suspending fish strips or fillets
- Fans for enhanced air circulation in your well-ventilated drying area
Don't forget your additional equipment, which includes twine for hanging individual pieces, clips or clamps for securing fish to racks, and cleaning tools for maintenance.
You'll also want salt or seasonings for marinating, plus paper towels to pat fish dry before the drying process begins.
Keep these tools clean and organized for efficient fish drying operations.
Air-Flow Control Equipment
Professional fish drying depends heavily on proper air-flow control equipment to achieve consistent results.
You'll need reliable fans and ventilation systems that can maintain consistent air circulation throughout your drying chamber. These systems help create homogeneous temperatures while reducing moisture around your fish, which is essential for proper drying.
You'll want to invest in adjustable speed fans that let you control air velocity, as higher speeds increase drying rates by thinning the slow-moving air layer around the fish.
Make certain your equipment includes air ducts to guarantee even distribution of airflow across all drying areas. For best results, you'll need temperature control systems that can maintain levels below 30°C for temperate fish and 45°C for tropical species.
Consider adding desiccant dehumidifiers to your setup, especially when working with low initial temperatures. They'll enhance drying efficiency and help maintain consistent moisture levels.
Your air-flow control system should respond quickly to environmental changes, such as when doors open, to maintain stable conditions. This responsiveness helps prevent uneven drying and guarantees your fish maintains its structural integrity throughout the process.
Fish Drying Racks Setup
Beyond air-flow systems, proper drying racks serve as the foundation of successful fish drying operations.
You'll need to set up your racks in an exposed location with low humidity and good air circulation, keeping them away from swampy areas. For best results, position your racks 1-1.5 meters above ground using either metallic supports or hardwood boards that can resist heat, fungi, and insects.
When constructing your drying racks, you'll want to take into account these critical design elements:
- Use mesh or chicken wire secured with small nails to support the fish while allowing maximum airflow from all directions.
- Implement a sloping design to help water drain from fish gills more effectively.
- Build removable trays that can each handle about 12 kg of fish.
You'll need to protect your drying operation from rain and night moisture using tarpaulins or shelters.
At ideal conditions with 42°C ambient temperature, you can achieve drying times of just 8 hours. Remember to turn your fish periodically during the drying process, and keep the racks clean through regular sanitation to maintain proper hygiene standards.
Fish Cleaning Process
Before diving into open-air fish drying, proper cleaning and preparation of your catch is essential. Start by setting up your cleaning station with newspaper spread around the cutting board, and guarantee you've got all necessary tools and a disposal container within reach.
Begin the cleaning process by making a careful cut along the fish's belly from the anal fin toward the head. You'll need to remove all entrails thoroughly, making sure to cut out the anus in a V-shape. Don't forget to rinse the cavity with clean water to remove any remaining bits.
If your fish has scales, you'll want to remove them by scraping from tail to head with a scaling tool. It's best to do this underwater to prevent scales from scattering.
Once scaled, trim off all fins to make handling easier. Complete the process with a thorough rinse under cold running water, cleaning both inside and outside the fish.
Pat it dry with paper towels, and scrape out any remaining debris from the cavity. If needed, remove the head or gills, and don't forget to clean under the jaw and genital area.
Hanging and Drying Techniques
Successful fish drying relies heavily on proper hanging and drying techniques. You'll need to guarantee your fish are properly hung to allow maximum air circulation while maintaining the right environmental conditions.
For air drying, create a hole in the tail end and thread sturdy twine through it to suspend the fish from wooden trellises or lattice structures.
The most effective drying process includes these critical steps:
- Position your drying racks in an area with consistent airflow, keeping temperatures below 10°C/50°F for air drying, or up to 70°C for smoking.
- Space your fish evenly on the racks, ensuring they don't touch each other, and turn them every few hours if you're using the sun-drying method.
- Monitor humidity levels carefully – they should stay below 75% to prevent moisture absorption and potential spoilage.
You'll know your fish are drying properly when they progress through two distinct phases: first, the constant rate period removes surface moisture, followed by the falling rate period that draws out deeper moisture.
If you're using a smoker, wait until the fish feel tacky before applying smoke, and maintain consistent temperature control throughout the process.
Preservation Time Frames
Proper drying and storage techniques determine how long your fish will stay preserved. When you've followed correct drying procedures and maintain appropriate storage conditions, you can expect your dried fish to last between 6 to 12 months.
If you're making traditional klippfisk, you'll be pleased to know it can remain viable for up to 2 years when stored in a cool, dark environment.
It's important to understand how preservation timeframes differ across various storage methods. If you're working with fresh fish, you'll need to use it within 2-3 days when refrigerated.
Should you choose to freeze your fish instead of drying it, you'll have about 30 days before you need to think about alternative storage methods. For smoked fish, you can expect it to last up to 14 days in your refrigerator after the smoking process.
To maximize your dried fish's shelf life, you'll want to store it in airtight containers away from moisture and direct light.
You should also regularly check for any signs of spoilage, particularly during the first few weeks of storage, to confirm your preservation process was successful.
Signs of Proper Drying
Identifying the right level of dryness in your fish requires careful attention to several key indicators. When you're checking your drying fish, you'll want to feel for firmness while guaranteeing it maintains some pliability. The fish shouldn't be so dry that it breaks when bent, as this indicates you've left it drying for too long. A properly dried fish will feel completely dry to the touch but still retain enough flexibility to be workable.
During the drying process, you'll need to watch for these vital signs of proper drying:
- Complete absence of moisture anywhere on the fish's surface
- Firm texture throughout the entire piece
- Ability to bend without breaking or crumbling
Make certain you're checking your drying fish regularly and keeping the strips separated from each other to guarantee even drying throughout. You don't want any pieces touching, as this can create moisture pockets that lead to uneven drying or potential spoilage.
If you notice any areas that feel damp or soft, continue the drying process until you achieve uniform firmness across all portions of the fish.
Storage After Drying
Once you've finished drying your fish, storing it correctly becomes essential for maintaining its quality over time.
You'll need to keep your dried fish in a cool, dry place where the temperature stays below 10°C/50°F. Choose a storage area with good air circulation and avoid damp, swampy locations that could compromise your preserved fish.
For packaging, you've got several effective options: vacuum-sealed bags, plastic zipper bags, or glass mason jars. Make sure you're using food-grade, airtight containers to prevent moisture from getting in.
If you've used the salting method, don't remove the remaining salt before storage – it'll help preserve the fish longer.
You can extend your dried fish's shelf life by implementing a few key practices. Store it in a dark place to prevent light degradation, and consider adding desiccants or silica gel packets to control humidity.
Don't forget to label your packages with dates and contents. You'll want to check your stored fish regularly for any signs of deterioration or pest problems.
For the longest possible shelf life, you can freeze your properly packaged dried fish.
Common Air Drying Mistakes
While storing dried fish correctly safeguards your hard work, you'll want to avoid common mistakes during the drying process itself. The most vital errors occur during cutting, environmental control, and handling phases. You'll need to cut your fish to the right thickness and properly score it to expose enough surface area for effective drying.
Don't forget to maintain proper ventilation and protect your fish from damp weather conditions.
To prevent spoilage and guarantee success, follow these key guidelines:
- Cut fish thinly and score it properly, cutting away from the backbone and ribs to create adequate folds for air exposure.
- Position your drying racks in a well-ventilated area, preferably on elevated ground, and maintain proper balance between smoke and fresh air.
- Keep your drying area clean, avoid overcrowding the racks, and regularly monitor for signs of spoilage or pest infestation.
Don't rush the process – patience is essential for proper preservation.
You'll need to adjust your cutting thickness based on weather conditions and confirm your fish is completely dry before storage. Remember that damp conditions are your biggest enemy, so protect your fish from overnight moisture and maintain consistent environmental control throughout the drying period.
Regional Drying Specialties
Regional drying traditions showcase the remarkable diversity of fish preservation methods across the globe. You'll find unique techniques that have evolved to match local climates and cultural preferences, from Norway's stockfish to the Philippines' daing.
| Region | Method | Notable Product |
|---|---|---|
| Northern Europe | Cold-air drying | Stockfish (Norway) |
| Mediterranean | Salt-curing & drying | Baccalà (Italy) |
| Southeast Asia | Sun-drying | Daing (Philippines) |
In Northern Europe, you'll discover how fishermen hang cod and pollock in the frigid winter air to create stockfish, while Portuguese and Italian traditions rely on salt-curing methods to produce bacalhau and baccalà. Asia offers its own specialties, with India's karuvadu and Korea's bugeo showcasing regional preferences for specific fish species and drying techniques.
African traditions adapt to tropical conditions, with Kenya's obambo (dried tilapia) demonstrating how local communities have perfected preservation methods suited to their environment. In the Americas, from Maine's historic cod-drying practices to Central American hard-cure techniques, you'll find variations that reflect both cultural heritage and practical necessities for food preservation.
Frequently Asked Questions
Can I Dry Fish Indoors Using Fans if Outdoor Conditions Aren't Suitable?
Yes, you can dry fish indoors using fans! You'll need good ventilation, proper temperature control, and drying racks. It's effective when weather's poor, but make sure you monitor moisture levels carefully.
How Do Different Spices Affect the Drying Time of Fish?
You'll find that spices like turmeric, pepper, and Ajwain speed up drying by reducing moisture content naturally. However, if you're adding oil with spices, it'll actually slow down the drying process.
Does Frozen Fish Dry Differently Than Fresh Fish?
Yes, you'll find frozen fish dries differently than fresh fish. It's harder to dry properly because ice crystals damage cell structures, leading to uneven moisture loss and potentially inferior texture in your final product.
Can I Mix Different Types of Fish When Drying Together?
You shouldn't mix different types of fish when drying together. They've got different drying rates and fat contents, which can lead to uneven results. You'll also risk cross-contamination and mixed flavor profiles.
What Are the Health Risks of Eating Improperly Dried Fish?
You're risking serious illness from toxins and bacteria like S. aureus and E. coli when eating improperly dried fish. You'll also be exposed to harmful chemicals, heavy metals, and potential food poisoning hazards.
In Summary
You'll find the most success air-drying lean white fish like cod, haddock, and pollock. Before you start, make sure you've properly salted the fish and chosen a day with low humidity and good airflow. Don't rush the process – properly dried fish should be stiff and slightly bendable without breaking. If you store your dried fish in an airtight container in a cool place, it'll last for several months.


Leave a Reply