
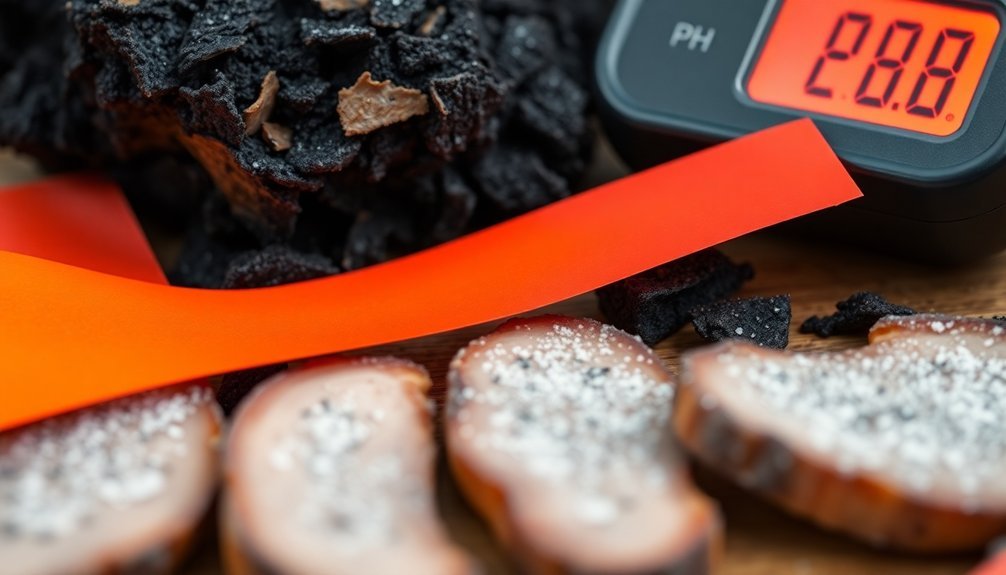
You'll need different pH levels for various ash-cured food preservation methods. For meat curing, maintain pH between 9-13 using clean hardwood ash. Egg preservation requires pH above 9 with proper water activity below 0.92. Root vegetables need pH 5.5-7.0, while potatoes prefer slightly acidic conditions of 4.5-6.0. Hard cheese preservation targets pH 5.2-5.5 during aging. For general food storage, keep pH below 4.6 at lower temperatures. Wood ash typically provides pH 10-12, making it ideal for most preservation needs. Understanding these critical pH ranges will reveal the secrets to successful traditional food preservation.
Optimal Ph Range for Hardwood Ash
Understanding hardwood ash's pH range is crucial for food preservation applications. You'll find that hardwood ash consistently maintains a strongly alkaline pH between 10 and 12, making it a powerful agent for adjusting acidity levels. This high alkalinity comes from its rich calcium content, which comprises 25 to 50% of the ash's composition.
When you're working with hardwood ash, you'll need to take into account its water-soluble components. The potassium content of 5-7% will leach out when exposed to moisture, while the less soluble carbonates remain, helping maintain the alkaline properties. Regular soil testing every 2-3 years will help monitor pH changes and nutrient levels.
You should be aware that the ash's effectiveness depends on proper combustion temperatures between 500 and 900°C, which guarantees ideal nutrient retention.
For consistent pH control, you'll want to assess the application rate carefully. The recommended amount is 5 to 10 pounds per 100 square feet, but for food preservation purposes, you'll need to adjust these ratios based on your specific requirements.
Remember that fresh ash can be caustic, so you must handle it carefully and avoid direct contact with food products during the initial application stages.
Preserving Eggs With Alkaline Ash
When you're preserving eggs with ash, you'll need to carefully select hardwood ash that can achieve a pH above 9, as this level effectively inhibits microbial growth.
Traditional processing typically takes 15 to 30 days before the eggs are ready for consumption.
To properly layer your eggs, you'll first coat them with an alkaline paste made from the ash mixture, and then roll them in rice hulls for additional protection.
The success of your preservation depends on maintaining complete coverage of the eggs, so guarantee each egg is thoroughly coated and stored in a sealed container to prevent dehydration and cross-contamination.
Ash Selection For Eggs
Selecting the right ash plays an essential role in preserving eggs through alkalization. You'll need to focus on wood ash, calcium oxide, or sodium carbonate as your primary alkaline sources. If you're looking for alternatives, you can use calcium carbonate or oyster shell ash, which provide similar alkaline properties. Similar to hydrated lime preservation, ash methods work best with fresh, unwashed eggs that retain their natural protective bloom.
| Ash Type | Key Component | Best Use Case |
|---|---|---|
| Wood Ash | Natural Alkali | Traditional Methods |
| Calcium Oxide | CaO | Professional Production |
| Oyster Shell | Calcium-rich | Natural Alternative |
| Quick Lime | Ca(OH)2 | Industrial Scale |
When you're preparing your ash solution, you'll want to mix it with salt, lime, and either tea or water to create a paste. The coating should be about 1cm thick around each egg. You must confirm your ash mixture is free from heavy metal oxides and other contaminants that could compromise food safety.
To assure successful preservation, you'll need to maintain a pH above 9 and water activity below 0.92. Before applying the ash paste, make sure you've thoroughly cleaned and dried your raw eggs to reduce pathogen risks. Regular monitoring of these levels throughout the preservation process will confirm your eggs remain safely preserved.
Proper Layering Techniques
To achieve ideal preservation, proper layering of your alkaline ash mixture demands careful attention to detail and precise application techniques. You'll need to create a mixture combining clay, ash, salt, quicklime, and rice hulls, ensuring it's thoroughly blended for consistent alkalinity.
When applying the mixture, you must completely surround your eggs with a thick, uniform layer that prevents any exposure to air. For best results, you'll want to submerge the eggs fully in the alkaline solution, as this maintains consistent pH levels throughout the preservation process.
If you're working with other foods like cheese, apply a 1 to 1.5-inch layer of sifted wood ashes around the entire item. The layering process isn't just about coverage – it's about creating a stable environment that prevents spoilage and supports the chemical transformation process.
You'll need to keep the layering intact throughout the preservation period, as any disturbance can affect the pH levels and compromise the preservation process.
Remember that the alkaline environment you're creating through proper layering is essential for denaturing proteins and inhibiting bacterial growth, particularly in century eggs.
Root Vegetable Ph Requirements

Since root vegetables require specific pH levels for ideal growth and preservation, understanding these requirements is crucial for successful storage. Most root vegetables thrive in a pH range of 5.5 to 7.0, though there's some variation among different species.
You'll find that potatoes prefer slightly more acidic conditions, between 4.5 and 6.0, while beets can handle more alkaline soils up to 7.5.
When you're preserving root vegetables, you'll need to take into account how pH affects nutrient availability. The best range of 5.5 to 7.0 guarantees that essential nutrients remain bioavailable.
If you're using wood ash in your preservation process, you'll need to be cautious, as it can greatly raise soil pH. Don't add wood ash to soils that already have a pH of 7.5 or higher, and avoid using it with potatoes since it can promote fungal diseases.
You should regularly test pH levels to maintain prime conditions. If you're adding wood ash to your compost, do so in thin layers to prevent dramatic pH changes.
This careful monitoring will help guarantee your root vegetables maintain their quality during storage.
Curing Meats in Wood Ash
When you're setting up a wood ash curing environment for meat, you'll need to start with clean, dry ash from hardwoods like hickory, ensuring it's free from contaminants and stored in a proper stoneware container.
Your meat selection should focus on cuts that aren't too thin, as they need to withstand the highly alkaline environment of the wood ash, which typically ranges from pH 9-13.
For the best results, choose fresh, high-quality cuts of meat and maintain consistent ash coverage throughout the curing process.
Preparing Ash Curing Environment
Creating a safe ash curing environment demands careful attention to both materials and setup. You'll need to start with properly sourced and prepared wood ash, guaranteeing it comes only from untreated wood and is free from contaminants like coal, plastics, or industrial residues.
Before using the ash, sift it thoroughly to remove any large charcoal pieces or active embers that could affect the curing process.
For best results, maintain these critical elements in your curing setup:
- Use a non-reactive stoneware container that allows you to surround your food with 1 to 1.5 inches of ash on all sides
- Store your curing vessel in a location with stable temperature and moderate humidity levels
- Keep the ash dry throughout the process, as moisture can leach essential nutrients like potassium
- Maintain minimal ventilation to preserve the alkaline environment while preventing contamination
When handling ash, always protect yourself by wearing appropriate safety gear, including gloves, masks, and long sleeves.
Keep your curing setup at least 50 feet from water sources, and increase this distance to 100 feet in areas with high erosion risk or limited vegetation buffers.
Essential Meat Selection Guidelines
Proper meat selection serves as the foundation for successful ash curing. You'll need to choose high-quality cuts from healthy animals, particularly focusing on hams, picnics, and butts that can withstand the curing process. These cuts should maintain their integrity throughout preservation while being thick enough to properly absorb the cure.
When selecting your meat, verify it's thoroughly cleaned and free from any contaminants. You'll want to handle it in a sanitary environment to prevent cross-contamination from hides, intestinal matter, or equipment.
It's vital to chill your meat quickly to an internal temperature of 40°F and maintain consistent refrigeration between 32°F and 40°F before beginning the curing process.
Check that your chosen cuts align with standard curing calculations – typically allowing seven days per inch of thickness. You'll need to take into account the meat's pH levels, which should fall between 5.5 and 6.6 for best results.
This pH range guarantees proper protein solubility, water retention, and effective preservation. Remember that warmer meat can spoil before the salt penetrates, so temperature control is fundamental from selection through storage.
Hard Cheese Preservation Levels

The preservation of hard cheese hinges on maintaining specific pH levels throughout the aging process. You'll need to carefully monitor pH levels from the initial milk stage at 6.6-6.7 down to the final desired level for hard cheeses, which should fall between 5.2 and 5.5. This controlled pH drop isn't just about preservation – it's essential for developing the right texture, flavor, and safety characteristics of your cheese.
- pH below 4.5 creates an environment that's hostile to most pathogens, making your cheese naturally safer
- Target a pH of 5.4 during the salting phase to achieve ideal moisture content and texture
- Monitor the drop to 6.0-6.2 when draining whey to guarantee proper calcium solubilization
- Keep pH between 5.2 and 5.5 to promote beneficial lactic acid bacteria growth
When you're preserving hard cheese, you'll find that lower pH levels lead to firmer textures and sharper flavors. The acid development breaks down proteins and fats, creating complex flavor profiles while simultaneously acting as a natural preservative.
Remember that if your pH stays too high, you'll end up with cheese that's too moist and potentially unsafe, while extremely low pH levels can make it unpalatably sour.
Temperature Effects on Ash Ph
Understanding temperature's influence on ash pH plays an essential role in food preservation success. You'll find that temperature and pH have a direct relationship that affects how well your preservation methods work.
When you're dealing with acidic foods (pH below 4.6), you can use lower temperatures for processing, which helps maintain better flavor, color, and texture.
You'll need to adjust your preservation techniques based on pH levels. If you're working with foods in the 4.3 to 4.5 pH range, you should aim for a pasteurization temperature of 210°F (99°C).
Remember that microorganisms become more vulnerable to heat in acidic environments, so you can often use gentler heat treatments for acidic foods.
Pay attention to texture changes as you work with different pH levels and temperatures. You'll notice that protein-rich foods like meat and fish react differently under varying pH conditions.
When you're preserving foods through acidification, you can use less aggressive heat treatments, but you must still maintain proper temperature control to guarantee safety.
Keep in mind that the FDA requires acidified foods to have a pH of 4.6 or below for safe preservation.
Long-Term Storage Ph Stability

Maintaining stable pH levels during long-term storage presents unique challenges for food preservation. You'll need to carefully monitor and control several factors to guarantee your ash-cured foods remain safe and flavorful over time.
- Storage temperature directly impacts pH stability – keeping products at 5°C results in minimal changes.
- Higher storage temperatures can cause significant pH decreases and compromise preservation.
- Added sugars and microbial contamination can alter pH levels unexpectedly.
- Proper packaging prevents chemical reactions that could affect food safety.
When you're storing ash-cured foods long-term, it's vital to understand that pH levels aren't static. They'll change based on various environmental and chemical factors.
For ideal preservation, you'll want to maintain pH levels between 5.5 and 6.6 for cured meats, while ensuring they don't rise above 4.6 for acidified foods. The presence of lactic acid bacteria and other microorganisms can gradually alter pH levels, so you'll need to implement regular monitoring protocols.
Remember that water activity and salt content work together with pH to guarantee shelf stability.
You'll need to maintain proper documentation of these measurements to comply with regulatory requirements and assure consistent product quality throughout the storage period.
Frequently Asked Questions
Can Different Types of Wood Ash Affect Preservation Ph Differently?
Yes, you'll find that different wood types create varying ash pH levels. Hardwoods typically produce more alkaline ash than softwoods, which directly impacts how effectively they'll preserve your food through pH modification.
How Do Seasonal Temperature Changes Impact Ash Preservation Effectiveness?
You'll notice seasonal temperature changes affect ash preservation considerably. Higher temps speed up chemical reactions and microbial growth, while cooler weather helps maintain preservation effectiveness. You'll need to adjust ash quantities accordingly.
What Container Materials Are Unsafe for Ash Preservation Methods?
You shouldn't use containers made of reactive metals like aluminum, copper, or brass. Avoid those with lead, cadmium, non-stick coatings, or porous materials. Don't use containers with poor seals or hazardous material history.
Does Ash From Burnt Herbs Add Beneficial Properties to Preservation?
No, you won't get extra preservation benefits from using herb ash instead of regular wood ash. They share the same alkaline properties and antimicrobial effects. You'll achieve similar preservation results with either type.
Can Ash-Preserved Foods Be Safely Consumed During Pregnancy?
You shouldn't consume ash-preserved foods during pregnancy due to increased risks of bacterial and parasitic contamination. The preservation method isn't reliable enough to guarantee safety when your immune system is compromised.
In Summary
You'll find that maintaining proper pH levels between 8.5-11 when using wood ash is essential for safe food preservation. Keep testing your ash solution regularly, as temperature fluctuations can affect alkalinity. Remember that different foods require specific pH ranges – eggs need 12-13, root vegetables 9-10, and meats 6-7.5. For best results, store your ash-preserved foods at consistent temperatures and monitor pH monthly.
Leave a Reply