Our ancestors mastered these seven root cellar secrets that you can still use today: Pick a north-facing hillside location below the frost line for natural cooling, build with materials like earthbags or concrete blocks for ideal insulation, maintain 85-95% humidity using dirt floors and water pans, guarantee proper ventilation with adjustable vents, separate produce into temperature-staged zones, manage moisture through strategic drainage systems, and construct a well-sealed door to control airflow. You'll find these time-tested techniques just as effective now as they were generations ago, with each traditional method offering deeper insights into sustainable food preservation.
Natural Temperature Control Methods

Deep beneath the earth's surface, root cellars harness nature's own temperature control systems to preserve fresh produce.
You'll find that by building your root cellar below the frost line, you're taking advantage of the earth's constant temperature of 50-55°F, creating an ideal environment for food storage without requiring electricity or mechanical cooling systems.
When you dig your root cellar into a hillside, you're maximizing the earth's natural insulation properties. This cost-saving design allows you to significantly reduce reliance on modern refrigeration methods.
This strategic placement helps maintain stable temperatures while reducing temperature fluctuations that can spoil your stored vegetables.
You'll want to incorporate passive geothermal cooling systems to maintain temperatures between 32-40°F, which is perfect for most produce.
To enhance your cellar's natural cooling abilities, you'll need proper ventilation.
Install solar-powered fans to improve airflow, and implement a system that takes advantage of the "hot air rises" principle.
You can optimize temperature control by opening vents at night to let in cool air and closing them during the day.
This combination of earth's natural insulation and strategic ventilation creates an energy-efficient storage solution that's stood the test of time.
Location Makes All The Difference
Selecting the perfect location for your root cellar can make or break its effectiveness. You'll want to position it underground or into a hillside, taking advantage of the earth's natural insulation properties. The north-facing side of your property is ideal, as it receives minimal sun exposure and helps maintain consistently cool temperatures. Maintaining 32-40°F conditions is crucial for optimal food preservation.
| Location Factor | Why It Matters |
|---|---|
| Underground Depth | Must be below frost line (36-48") but above permafrost |
| Ground Conditions | Avoid flood-prone areas and excessive rocky terrain |
| Home Proximity | Close enough for convenient access year-round |
| Structural Integration | Can utilize existing basement or foundation walls |
When choosing your spot, you'll need to take into account both practical and environmental factors. Don't place your cellar in low-lying areas where water might collect, and make certain it's deep enough to stay below the frost line. If you're dealing with rocky terrain, think about building an above-ground cellar with a soil berm. You can also integrate your cellar into existing structures – whether that's underneath your home or as a converted corner of your basement. Remember to plan for adequate ventilation access and enough space for shelving and maintenance activities.
Essential Ventilation Design Secrets

For best results, open your vents overnight to capture the coolest air, and keep them open during summer to prevent overheating.
Proper ventilation helps maintain ideal humidity levels for preserving your harvest.
Monitor your cellar's temperature with a remote readout thermometer, aiming to maintain 32-50 degrees Fahrenheit.
Remember to cap or close vents when they're not in use, and you'll create the perfect environment for long-term produce storage.
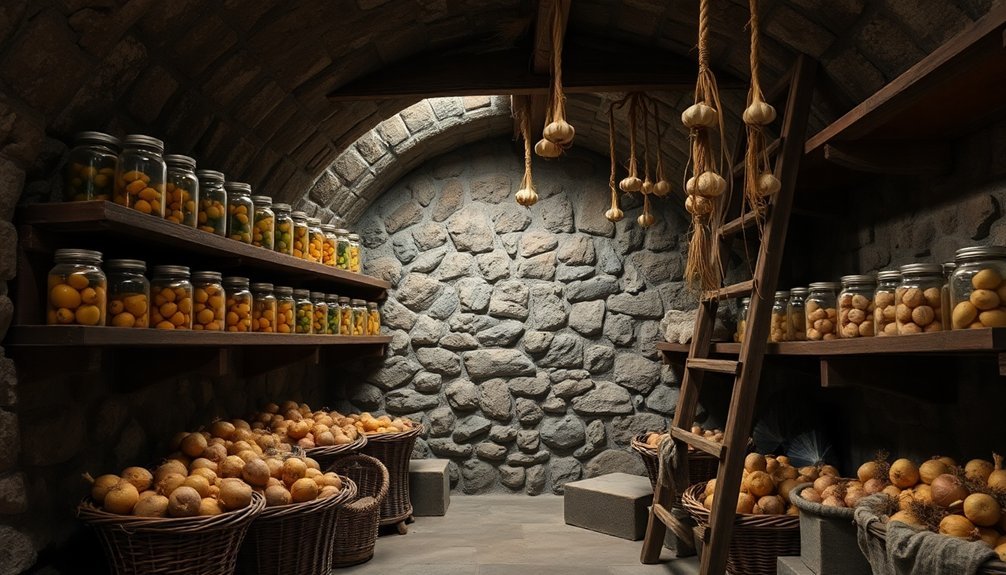
Food Separation and Storage Zones
Your root cellar's success depends on creating distinct zones to prevent cross-contamination between produce types and managing ethylene gas exposure from ripening fruits.
You'll want to establish temperature-staged areas, keeping fruits like apples and pears separate from root vegetables and moving from cooler to slightly warmer zones as needed.
To maintain ideal freshness, verify proper spacing between different food groups, using wooden crates and bins to keep produce elevated while maintaining proper airflow between storage zones.
Cross-Contamination Prevention Zones
Three distinct zones in your root cellar help prevent cross-contamination among stored foods.
You'll need to strategically separate produce based on their ethylene gas production, moisture content, and specific storage requirements to maximize shelf life and maintain quality.
Create these essential prevention zones in your root cellar:
- Zone 1: Place ethylene-producing fruits (apples, pears) in their own designated area, preferably near a ventilation outlet to draw gases away from other produce.
- Zone 2: Store root vegetables and tubers (potatoes, carrots) in dark containers with breathable materials like straw or sawdust, keeping them elevated for proper air circulation.
- Zone 3: Dedicate a separate space for leafy greens and moisture-rich vegetables, using covered containers to maintain humidity while ensuring adequate airflow.
To maintain these zones effectively, you'll need clean, labeled storage containers and proper ventilation throughout.
Install vents with low intakes and high outlets to promote natural air movement.
Keep fermented foods isolated from other produce, and always maintain gaps between storage units and walls.
Monitor your zones regularly, removing any spoiled items immediately to prevent contamination spread.
Produce Temperature Staging Areas
Successful root cellar storage depends on properly staged temperature zones that protect your harvest throughout the season.
You'll need to create distinct storage areas that maintain specific temperature ranges for different types of produce. The most critical zone should maintain temperatures between 32-40°F (0-4°C), which is ideal for most root vegetables.
Set up your staging areas by designating spaces near the ceiling for produce that tolerates slightly warmer temperatures in the 40-50°F range.
You'll want to establish separate zones for fruits like apples that produce ethylene gas, keeping them away from other vegetables to prevent premature ripening.
Create a cool, well-ventilated section for salad greens and dairy products.
To maintain these temperature zones effectively, you'll need proper ventilation and humidity control.
Install louvered vents or small fans to regulate air circulation, which helps prevent ethylene gas buildup and manages condensation.
Monitor humidity levels to maintain 85-95% moisture content, using the earth's natural dampness to your advantage.
If you're storing various produce types, consider using anterooms or divided chambers to create multiple microenvironments within your root cellar.
Ethylene Gas Spacing Rules
Building on proper temperature zones, understanding ethylene gas management creates the foundation for effective produce storage.
You'll need to separate fruits from vegetables since ethylene-producing fruits like apples, bananas, and citrus can trigger premature ripening in nearby vegetables.
Create distinct storage zones and maintain proper spacing to prevent ethylene gas from compromising your harvest.
To effectively manage ethylene gas in your root cellar, follow these critical spacing rules:
- Place high-ethylene producers (apples, pears, bananas) on upper shelves with good ventilation, at least 3 feet away from vegetables.
- Store root vegetables (carrots, beets, potatoes) in covered bins with sawdust or peat moss on lower shelves, away from fruit zones.
- Arrange middle shelves with less sensitive produce, using breathable containers and maintaining 6-inch gaps between storage bins.
You'll want to organize your shelves to allow proper air circulation, using bins and feed sacks that provide adequate ventilation.
Monitor your storage zones regularly and rotate produce to guarantee consistent conditions.
Maintaining Ideal Moisture Levels

Your root cellar's natural dirt floor serves as the foundation for ideal moisture control, helping maintain the essential 90-95% humidity needed for most produce.
You'll want to spread gravel over the packed earth to keep your feet dry while preserving the natural moisture-retaining benefits of the soil beneath.
Setting up proper drainage systems and using techniques like water pans or damp burlap bags will help you fine-tune the humidity levels for perfect vegetable storage.
Natural Dirt Floor Benefits
The earth beneath your feet plays an essential role in maintaining ideal moisture levels for root cellar storage. A natural dirt floor works as a remarkable moisture regulator, creating the perfect environment for your stored produce. Unlike concrete floors that block moisture circulation, dirt floors allow the earth's natural humidity to rise and circulate freely throughout your storage space.
You'll find that dirt floors contribute to optimal storage conditions in three key ways:
- They maintain consistent humidity levels between 90-95%, which is vital for keeping your root crops and leafy vegetables fresh.
- They work with the soil's natural properties to conduct minimal heat, helping maintain cool, steady temperatures.
- They create a natural microclimate that you can easily adjust by adding gravel when conditions become too wet.
If you're working with a concrete basement floor, don't break it up. Instead, you can achieve similar moisture levels by placing containers of water throughout your storage area and wrapping produce in damp burlap or moss.
For the best results, store your vegetables in small piles raised above the floor level, allowing proper air circulation while benefiting from the natural humidity.
Drainage System Essentials
Proper drainage serves as the cornerstone of a successful root cellar, protecting your stored produce from excess moisture and potential rot. You'll need to start by laying a 4-inch perforated drainpipe across the back of your cellar, guaranteeing it rests on a 3-inch gravel bed. The pipe should slope 1 inch for every 8 feet to maintain proper water flow.
When backfilling, you'll want to install the drainage system when you're 2-3 feet below the final soil surface. Cover the pipe with roofing paper or 6-mil plastic sheeting to prevent clogging, and add a protective layer of gravel around it.
| Drainage Component | Essential Requirements |
|---|---|
| Main Pipe | 4-inch perforated, 1:8 slope |
| Protective Layer | Heavy roofing paper or 6-mil plastic |
| Gravel Bed | 3-inch depth under pipe, 6-inch around cellar |
Don't forget to protect the drain exit by cementing around it and covering it with heavy wire mesh. You'll also need to integrate your drainage with proper ventilation – guarantee you've got both intake and outtake vents positioned strategically to prevent moisture buildup while maintaining ideal storage conditions.
Humidity Control Techniques
Maintaining ideal humidity stands as one of the most critical factors in root cellar storage, with perfect levels ranging between 85-95% for most vegetables.
Since most produce contains about 90% water, you'll need to keep moisture levels high to prevent withering and preserve flavor. The exception to this rule includes cucurbits and onions, which actually prefer drier conditions.
You can control humidity through several proven methods. A dirt floor naturally helps maintain consistent moisture, but if you've got concrete or wood flooring, you'll want to place water-filled pans throughout your cellar.
Building into a hillside also leverages the earth's natural insulation properties to maintain suitable humidity levels.
Here's how to maintain ideal moisture conditions:
- Monitor humidity levels daily using a reliable gauge, adjusting ventilation as needed.
- Keep your cellar well-stocked, as fuller spaces naturally maintain higher humidity.
- Install fans or vents to guarantee proper air circulation while preventing moisture from becoming stagnant.
Remember to check your stored items regularly and remove any spoiled produce promptly.
Proper ventilation prevents ethylene gas buildup while distributing humidity evenly throughout your storage space, creating the perfect environment for long-term vegetable preservation.
Building Materials and Construction
Building a successful root cellar starts with selecting the right materials and following proper construction techniques. You'll need to begin by excavating a hole roughly 6 feet deep and 8 x 12 feet at the base, ensuring it's level for proper wall construction. Save the excavated dirt, as you'll use it later for earthbags or additional insulation.
For the walls, you've got several viable options. Earthbags filled with dirt and secured with rebar and barbed wire offer a cost-effective solution. Alternatively, you can use traditional materials like bricks, concrete blocks, or stone with mortar.
The roof needs special attention – construct it with an arch design using plywood covered in plastic sheeting and reinforced with rebar. Don't forget to create a bond beam with 2 x 8 lumber to anchor the roof securely to the walls.
You'll want to incorporate essential structural elements like concrete footers to prevent wall shifting and a proper drainage system. Add 2×6 board flooring spaced for air movement, and finish with a protective layer of cement stucco or earthen plaster.
For the entrance, construct sturdy stairs and a landing using ready-mix concrete and native rock.
Traditional Door Design Principles

Selecting the right door design makes or breaks your root cellar's effectiveness. You'll want to position your door on the north side to maximize natural air circulation while avoiding the south-facing placement that can lead to unwanted heat gain.
When designing your root cellar door, focus on proper ventilation integration by guaranteeing you've got both low intake and high outlet vents to maintain ideal air flow.
Your door's security system shouldn't be an afterthought. Install robust locks and consider modern security features like keypad entry or motion sensors to protect your stored goods.
You'll need to maintain your door regularly by cleaning, inspecting, and lubricating all moving parts to guarantee it continues functioning properly.
Here's what your traditional root cellar door must accomplish:
- Create an airtight seal when closed to maintain consistent temperature and humidity levels
- Include integrated ventilation features, such as built-in vent pipes or strategically placed gaps
- Withstand environmental stresses while providing easy access for regular harvesting and storage
Remember to position your door in a slightly elevated area to prevent water accumulation, and guarantee it's sturdy enough to handle frequent use while maintaining its insulating properties.
Frequently Asked Questions
How Long Did Traditional Root Cellars Typically Last Before Needing Major Repairs?
You'll find that traditional root cellars could last 50+ years before needing major repairs, but only if you've used durable materials like stone or brick and maintained proper temperature, humidity, and ventilation conditions.
What Indigenous Food Preservation Techniques Influenced Early Root Cellar Designs?
You'll find that indigenous drying, smoking, and fermentation methods shaped root cellar designs. Their use of earth insulation, natural ventilation, and temperature control techniques directly influenced how early settlers built underground storage spaces.
How Did Families Handle Pest Control in Root Cellars Without Modern Chemicals?
You'd control pests naturally by using peppermint oil, bay leaves, and garlic as repellents. You could also store vegetables in sand, seal entry points, and maintain cleanliness while using breathable storage containers.
Which Crops Were Historically Considered Incompatible for Root Cellar Storage Together?
You'll need to keep potatoes away from onions since they cause sprouting. Don't store apples with other vegetables, and keep your leafy greens separate from root crops due to different storage needs.
What Emergency Backup Systems Did Ancestors Use During Unexpected Temperature Fluctuations?
You'll find your ancestors used extra straw or sand layers, temporary snow packs, and adjustable ventilation flaps as emergency temperature controls. They'd also quickly transfer produce to cooler spots during warm spells.
In Summary
By incorporating these seven time-tested root cellar principles into your storage design, you'll preserve your harvest naturally and efficiently. You're not just building a storage space – you're continuing a tradition that's served generations of homesteaders. Whether you're constructing a new cellar or upgrading an existing one, these ancestral secrets will help you maintain fresh produce throughout the year without modern technology.


Leave a Reply