You'll get safe sun-dried fruit by following key temperature and humidity guidelines during the drying process. Keep temperatures at least 85°F with humidity below 60% to prevent mold growth, and use clean drying trays elevated for proper air circulation. Pretreat your fruits with ascorbic acid or citrus juice solutions to preserve quality, and guarantee uniform cutting for even drying. Monitor the process carefully – properly dried fruit should feel leathery and pliable without excess moisture. Store your dried fruit in airtight containers at temperatures between 32-45°F with 55-60% humidity. Understanding these essential factors will help you master the art of fruit preservation.
Optimal Weather for Sun Drying

The success of sun-dried fruit hinges on having the right weather conditions. To safely dry fruit in the sun, you'll need temperatures of at least 85°F, with ideal conditions around 92°F. Areas like the San Joaquin Valley provide these perfect temperatures, making them particularly suitable for sun-drying operations.
You'll want to guarantee humidity levels stay below 60%, with around 30% being ideal. High humidity, which is common in southern regions, can greatly hamper the drying process and increase the risk of spoilage. When combined with proper temperatures, low humidity helps prevent mold growth and guarantees thorough drying.
Proper air circulation is equally essential for safe sun drying. You should use drying racks that allow air to flow freely around the fruit, as good ventilation speeds up the drying process and promotes even results. Place the racks on concrete or metal surfaces to prevent moisture from seeping up from the ground.
Don't forget to protect your fruit from the elements – you'll need to cover it with cheesecloth to keep insects away and bring it inside during the night to prevent moisture from condensing on the surface. When rain threatens, you must move your fruit to a sheltered location to avoid spoilage.
Choosing the Right Fruits
Selecting suitable fruits for sun drying makes all the difference in achieving successful results. You'll want to focus on fruits with high sugar and acid content, like apricots, grapes, and dates, as these natural components act as preservatives and prevent spoilage during the drying process. A slatted drying rack provides essential airflow to help moisture escape evenly from your produce.
When choosing your fruits, they must be fresh, clean, and perfectly ripe. Don't use any produce with blemishes, wormholes, or bruises, as these imperfections can lead to contamination. You'll need to wash your selections thoroughly to remove dirt, debris, and insects before beginning the drying process.
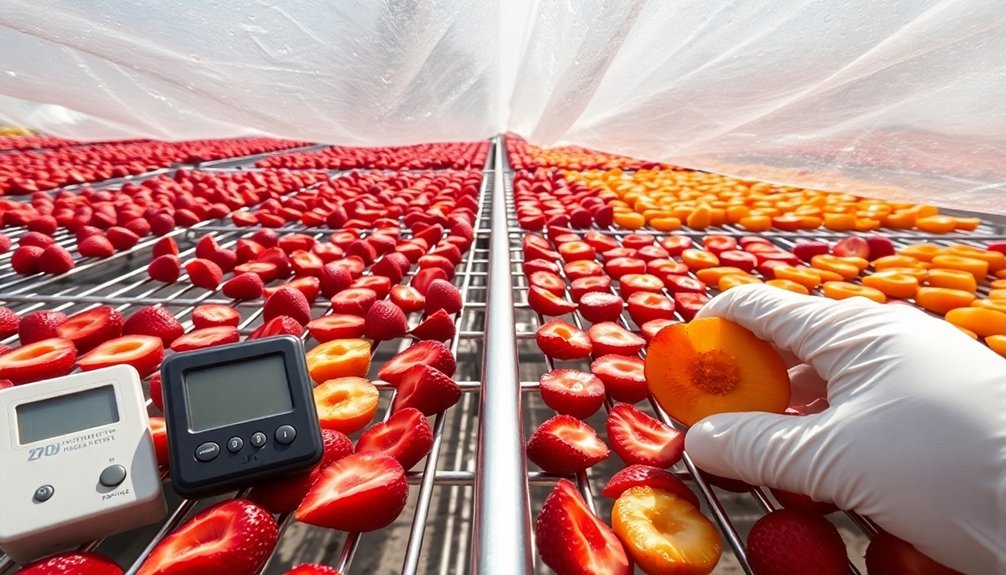
To guarantee even drying, cut your fruits into uniform sizes, removing seeds and pits where necessary. Smaller items like grapes can remain whole, while larger fruits should be cut into smaller pieces. You can also successfully dry hot peppers, chilies, and tomatoes using this method.
Load your prepared fruits onto clean trays immediately after cutting to prevent them from sticking together. Don't delay in transferring the loaded trays to your drying area, as you'll want to start the process quickly for best results.
Essential Pretreatment Steps
Before exposing your fruits to sunlight, proper pretreatment will prevent discoloration and extend shelf life. You'll need to choose between several effective methods, each with its own benefits and considerations.
For a natural approach, you can use ascorbic acid by mixing one teaspoon of powder into two cups of water. Soak your prepared fruit for 3-5 minutes, then drain thoroughly. For optimal results, commercial preservers containing ascorbic acid and sugar provide an easy-to-use alternative.
Alternatively, you can use fruit juices high in vitamin C, such as lemon, orange, or pineapple juice. Mix equal parts lemon juice and cold water, soak your fruit for 3-5 minutes, but remember that these juices will add their distinct flavors.
For longer-term preservation, sulfite dips offer superior protection. Dissolve ¾ to 1½ teaspoons of sodium bisulfite per quart of water, soaking fruit slices for 5 minutes or halves for 15 minutes.
While effective, sulfites may trigger asthmatic reactions in sensitive individuals.
Steam-blanching provides another option – dip fruits in boiling water for 30-60 seconds, followed by an ice-water bath. This method cracks the skin's waxy coating, speeding up the drying process, though it might alter the fruit's original texture and flavor.
Setting Up Your Drying Area
With your fruit properly pretreated, it's time to set up an ideal drying environment. You'll need drying trays that promote good air circulation, such as wooden frames covered with mesh or cooling racks placed over rimmed baking sheets. Avoid pine or cedar trays, as their strong odors can affect the fruit's taste.
Select a location with full sun exposure where temperatures exceed 85°F and humidity stays below 60%. You can boost drying efficiency by placing trays on a concrete driveway or using aluminum sheets to reflect sunlight. Elevate your trays on cement blocks or sawhorses to guarantee proper airflow around the fruit.
Protect your drying fruit by covering trays with cheesecloth or nylon netting, making sure the covering doesn't touch the fruit. You'll need to guard against insects by using a second screen-covered tray on top and placing table legs in water-filled cans.
Don't forget to bring your fruit inside at night to prevent moisture condensation.
To maximize drying efficiency, consider placing a pane of glass above the tray while maintaining adequate ventilation. Turn your fruit periodically and spray trays with nonstick cooking spray to prevent sticking.
Monitoring the Drying Process
Once you've placed your fruit in the drying area, maintaining proper temperature and moisture control becomes critical to success.
You'll want to keep temperatures between 60-70°C for most fruits while ensuring proper air circulation to prevent spoilage and case hardening – a condition where the outer layer dries too quickly, trapping moisture inside.
Monitor your drying area's ventilation carefully. If you notice excess moisture building up, open the door slightly and cover it with mosquito mesh to keep out insects and debris.
Avoid direct sunlight, as it can bleach the fruit's color and reduce its vitamin content.
You'll know your fruit is properly dried when it reaches 10-15% moisture content. To test this, squeeze a handful – if no moisture transfers to your hand, it's likely ready.
The fruit should feel leathery and pliable, with no visible moisture when cut in half. For berries, they should rattle when you shake the drying trays.
If you're unsure about the dryness, place a sample in an airtight container for a day and check for any moisture accumulation.
If it's still too moist, continue the drying process until achieving the desired consistency.
Proper Storage Methods
After ensuring your fruit is properly dried, proper storage becomes the next key step in preserving your sun-dried bounty.
You'll need to store your dried fruit at temperatures below 45°F (7°C), with 32-45°F being ideal. Keep the relative humidity between 55-60% to prevent moisture problems that could lead to spoilage.
Choose airtight containers like mason jars, plastic containers with secure lids, or vacuum-sealed bags to protect your dried fruit from air and moisture.
If you're storing sulfured fruit in metal containers, first place it in plastic bags to prevent color changes. Glass containers are particularly useful as they let you easily spot any moisture buildup.
Store your dried fruit in a cool, dark pantry or cupboard away from heat sources and direct sunlight.
For extended shelf life, you can use your refrigerator or freezer, especially for lighter cut fruits. Your dried fruit can last up to a year when stored properly, but you'll need to check it regularly for moisture reabsorption or spoilage.
If you notice moisture but no spoilage, you can redry and repackage the fruit. However, if you spot any mold, discard the affected fruit immediately.
Signs of Safe Dried Fruit

When examining sun-dried fruit for safety, you'll want to check that it has a consistent color without dark spots and maintains a leathery, pliable texture that's not too hard or soft.
You can test the moisture content by squeezing the fruit – it should spring back without leaving wetness on your hands.
Look carefully for any signs of mold growth, which appears as fuzzy or discolored patches and indicates the fruit isn't safe to eat.
Proper Color and Texture
Safe dried fruits display distinct visual and textural qualities that help you identify their freshness. When you're selecting sun-dried fruit, look for pieces that maintain their natural color, though slightly darker than fresh fruit. You'll want to avoid fruits that appear overly dark, as this can indicate improper drying or spoilage.
The texture should be pliable yet firm – not too soft or too hard. If you're finding fruits that are extremely tough or unusually soft, they've likely been improperly dried or have begun to spoil. Don't purchase dried fruits with visible discoloration, strange odors, or any signs of mold.
| Fruit Type | Proper Color | Ideal Texture |
|---|---|---|
| Apricots | Deep orange | Flexible, not sticky |
| Raisins | Dark purple-brown | Soft but firm |
| Figs | Light to medium brown | Slightly chewy |
Remember that proper selection starts with choosing fully ripened fruits that have been thoroughly cleaned and pretreated. If you notice any white spots, unusual textures, or off-putting smells, it's best to avoid those products. Quality dried fruits shouldn't require added sugars or syrups to enhance their flavor.
Moisture Content Test
Beyond visual inspection, testing moisture content provides a reliable way to determine if your dried fruit is properly preserved. You can use an oven-drying method by weighing your fruit before and after drying it at 221°F for 18 hours, or at 100°C for 4 hours.
Calculate the moisture content by subtracting the final weight from the initial weight, multiplying by 100, and dividing by the initial weight.
For quicker results, you'll find a moisture analyzer more convenient, as it provides immediate readings. Your dried fruit needs to meet specific moisture content levels to be safe: apples should be at 15%, apricots and peaches at 12-14%, bananas at 15%, and raisins at 11%.
Most fruits should reach 80% solids level for safety.
You can also perform a simple physical test: properly dried fruit should feel leathery and pliable but not hard. When cooled, it shouldn't feel sticky or show visible moisture.
Berries should rattle when shaken, and fruits should spring apart when squeezed and released. After drying, let your fruit condition for 4-10 days before packaging to guarantee even moisture distribution.
No Mold Growth
A watchful eye for mold is your first line of defense in ensuring dried fruit safety. You'll need to inspect your dried fruit carefully under good lighting, looking for any unusual spots, discoloration, or fuzzy growths that could indicate mold presence.
Compare your fruit's appearance with freshly dried samples to spot any concerning differences.
To prevent mold growth, you'll want to focus on proper storage and handling. Store your dried fruit in airtight containers in cool, dry places, and consider refrigeration or freezing for long-term storage.
When drying fruit, cover your racks with cheesecloth that doesn't touch the fruit, and elevate the drying surfaces to improve air circulation. Don't forget to bring your fruit indoors at night to avoid dew condensation.
Pasteurization adds another layer of protection against mold. You can either freeze your dried fruit at 0°F for 48 hours or use oven pasteurization at 160°F for 30 minutes.
This process eliminates insects, eggs, and potential contaminants that could lead to mold growth. Remember to minimize handling the fruit directly, as oil from your hands can create conditions that encourage mold development.
Food Safety Best Practices
For maximum safety, pretreat light-colored fruits with ascorbic acid to prevent browning, and guarantee the final product achieves a water activity of 0.85 or less.
You'll need to maintain strict cleaning practices before and after handling the fruit.
Once dried, store your fruit in a cool, dry place and label it with dates.
Remember to check regularly for any signs of spoilage to maintain food safety standards.
Frequently Asked Questions
How Do Sun-Dried Fruits Compare Nutritionally to Fresh Fruits?
You'll find sun-dried fruits are more concentrated in calories, sugar, and most minerals than fresh fruits. While they retain fiber and antioxidants, they've got less vitamin C. Still, they're nutritionally valuable in smaller portions.
Can Medications Interact Negatively With Sulfur-Treated Dried Fruits?
You don't need to worry about medication interactions with sulfur-treated dried fruits. While it's always smart to check with your doctor, there aren't any known conflicts between common medications and sulfites in dried fruits.
Why Do Some Dried Fruits Cause Digestive Discomfort?
You'll experience digestive discomfort from dried fruits due to their concentrated fiber and natural sugars that ferment in your gut. If you're sensitive to sulfites, these preservatives can also cause stomach issues.
Are Pesticide Residues Concentrated in Dried Fruits?
Yes, you'll find concentrated pesticide residues in dried fruits since the drying process reduces water content but leaves chemicals intact. Raisins can contain residues from up to 26 different pesticides per sample.
Can People With Diabetes Safely Consume Sun-Dried Fruits?
Yes, you can safely eat sun-dried fruits if you have diabetes. You'll need to watch portion sizes and choose options with lower glycemic indexes. It's best to pair them with protein or fiber sources.
In Summary
Proper sun-drying of fruit requires your careful attention to multiple safety factors. You'll need the right weather conditions, clean equipment, and appropriate pre-treatments to prevent spoilage. Watch for signs that your fruit is completely dry – it should be leathery and contain no moisture pockets. Store your dried fruit in airtight containers and check regularly for any signs of mold or deterioration to guarantee safe consumption.


Leave a Reply