You can preserve root vegetables for up to nine months using wood ash from untreated timber sources. Start by selecting firm, unblemished vegetables and sifting dry wood ash to remove debris. Layer your vegetables in a sturdy container, starting with 1.5 inches of ash at the bottom. Keep the container in a cool, dry place between 50-60°F with high humidity. Always wear protective gear when handling wood ash and check your stored vegetables every two weeks for quality. While this traditional preservation method requires attention to detail, mastering these time-tested techniques will transform how you store your harvest.
Understanding Wood Ash Properties

Wood ash, a powdery byproduct of burned timber, contains a rich blend of minerals and compounds that make it valuable for preservation. You'll find significant amounts of calcium (7-33%) and potassium (3-10%), along with smaller quantities of magnesium and phosphorus. These minerals create an environment that's naturally hostile to mold and pests. Ancient farmers perfected high-temperature firing techniques to produce more concentrated potash for preservation.
What makes wood ash particularly effective for storage is its sterile nature and high alkalinity, with a pH ranging from 9 to 13. You're working with a complex mixture of non-volatile minerals that remain after combustion, creating a protective barrier around your stored items.
The ash's chemical composition varies depending on the burning temperature and wood type, but it consistently maintains its preservative properties.
Before you use wood ash, you'll need to understand its moisture-absorbing capabilities. The high solubility of its potash content means you must keep it dry before use.
When properly stored, wood ash maintains its sterility and preservation properties, making it an excellent medium for protecting root vegetables. You'll want to avoid using wet or compromised ash, as it can lose its effectiveness and potentially harm your stored produce.
Selecting Your Root Vegetables
When you're picking root vegetables for long-term storage, focus on firm, undamaged specimens that show no signs of disease, cuts, or blemishes.
Your best storage candidates will be medium-sized vegetables, as oversized ones tend to be woody or hollow while undersized ones dry out quickly.
Choose uniform, well-shaped vegetables with intact skin, paying special attention to potatoes, carrots, and onions, which can last up to nine months when properly selected and stored. Regular monitoring of temperature is crucial to maintain optimal storage conditions between 32°F to 40°F for most root vegetables.
Best Root Storage Options
Different root vegetables have specific storage needs.
Store your beets in an open bowl with a damp towel, while carrots and parsnips belong in the refrigerator's crisper drawer. Regular checks for mushiness and sprouting will help maintain the quality of stored root vegetables.
Keep potatoes in cool, dark places using baskets or paper bags, but remember to store them away from onions.
For longer-term storage, vegetables like rutabagas can last up to 6 months when layered with damp sawdust, while turnips stay fresh for up to 5 months in similar conditions.
Winter squash requires a warmer, drier environment and proper curing for ideal preservation.
Vegetable Quality Indicators
Before selecting root vegetables for storage, you'll need to evaluate both external and internal quality indicators to guarantee the best preservation results.
Look for vegetables with unblemished surfaces, free from mechanical damage, bruises, or cracks that could lead to rot during storage. You'll want firm, well-developed specimens that show proper maturity through their color and texture.
Check the internal quality by gently pressing to test firmness – your vegetables shouldn't be too soft or show signs of internal defects.
If you're harvesting your own roots, don't leave them exposed to direct sunlight for long periods, though a brief drying period of a few hours can help prepare the root hairs for storage.
When preparing your selections, trim the greens to within an inch of the root's top, but don't cut into the vegetable itself.
Remove any long stems or excess foliage that could promote decay. Sort through your vegetables carefully, setting aside any that show even minor imperfections – these should be used first rather than stored.
Size and Shape Matters
Building on your quality assessment, the size and shape of root vegetables play a key role in successful storage outcomes.
You'll want to harvest your roots when they've reached the size of a golf ball, typically six to eight weeks after planting. Larger roots are your best choice for storage, as they're less likely to dry out and become rubbery compared to their smaller counterparts.
When selecting roots for storage, choose those that are intact and free of cuts, bruises, or other imperfections. You'll need to set aside any damaged roots for immediate use, as they're more prone to rotting.
Remember that different root vegetables have specific storage requirements – onions need curing and dry storage in mesh bags, while carrots can be stored in damp sand.
Store your roots in a single layer to prevent contact between them, and use containers that allow proper ventilation to avoid moisture buildup.
Don't forget to elevate your storage boxes or sacks off the ground to protect them from rodents.
If you've got smaller roots that aren't suitable for storage, consider freezing, dehydrating, or canning them instead.
Essential Tools and Materials
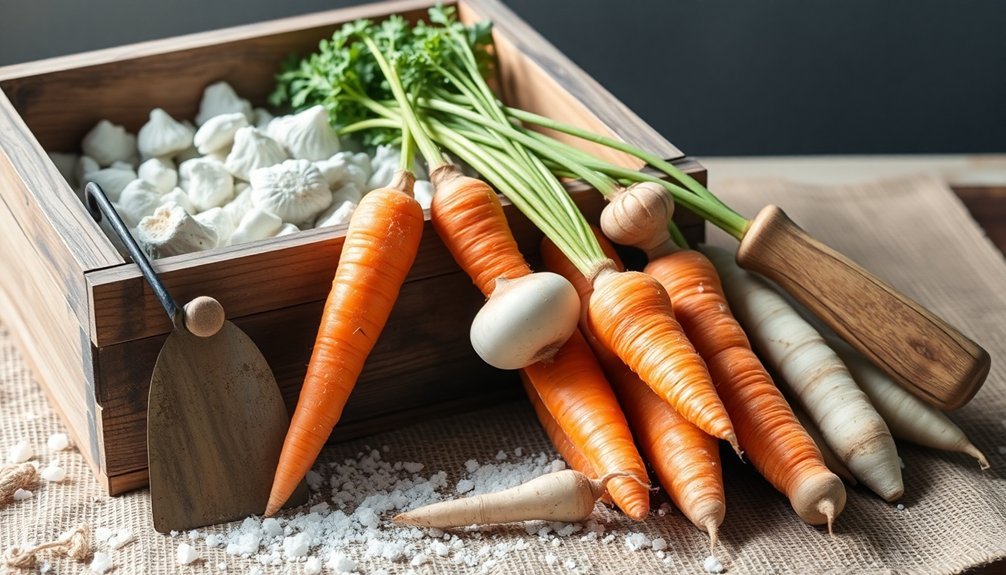
You'll need a few basic items to get started with root vegetable preservation: a sturdy wooden or cardboard box (or woven basket), moisture-resistant containers, and tools for handling ash like a shovel and sifter.
For your safety while working with ash, it's crucial to wear protective gloves and a dust mask to prevent respiratory irritation.
Your workspace should include a flat, well-ventilated area with enough room to sort vegetables and layer them with ash properly.
Basic Equipment Needed
Successfully preserving root vegetables requires a few essential tools and materials that you'll likely find around your home.
You'll need containers like wooden boxes, cardboard boxes, or woven baskets that can accommodate multiple layers while allowing you to arrange vegetables in a single layer. The containers must be sealable to maintain proper preservation conditions.
For the preservation medium, you'll need wood ash collected from cooking fires, chimneys, or wood stoves. Make sure you're using ash from hardwoods or lumpwood charcoal, as these provide better nutrient content.
Don't use ash from coal or treated timber, and always let it cool completely before collection. You'll need to sift the ash to remove any sharp particles or debris.
Line your chosen container with paper before starting the layering process. You'll create a base layer of ash about 1.5 inches thick, then arrange your vegetables upside down.
Continue alternating between thin ash layers and vegetables until the container is full. Store your packed container in a cool, dry basement or similar location, away from moisture and direct sunlight.
Protective Gear Requirements
When working with wood ash for root vegetable preservation, proper protective gear keeps you safe from potential hazards.
You'll need to wear long pants and a long-sleeve shirt to protect your skin from irritation, along with sturdy boots to shield your feet from ash and any sharp debris. Don't forget protective gloves to prevent direct contact with the ash.
Your respiratory system needs protection, so wear a dust mask with a filter to prevent inhaling ash particles. Eye goggles are essential to keep ash out of your eyes, and you'll want to add a hat or head covering to protect your scalp from falling ash.
In windy conditions, these protective measures become even more vital.
When handling wood ash, you'll need to work in a well-ventilated area and avoid touching your face or eyes. Use a shovel or scoop to handle the ash, and always sieve it before use to remove larger particles and debris.
Store your ash in a dry, covered container to maintain its effectiveness and keep it away from children and pets. Consider wearing gaiters or leg coverings for extra protection during extended preservation work.
Wood Ash Safety Guidelines
Four essential principles govern the safe handling of wood ash during root vegetable preservation.
First, always store your wood ash in metal containers with secure lids, keeping them at least 10 feet away from buildings and flammable materials. Don't dispose of ashes until they've cooled completely for 96 hours, and never use plastic, cardboard, or paper containers for storage.
When handling wood ash, you'll need to wear protective gear including gloves, goggles, and a face mask or respirator.
Don't forget to apply barrier cream to exposed skin areas and wear long-sleeved protective clothing. If you're working in dusty conditions, disposable outer garments are recommended.
You'll need to keep wood ash at least 50 feet away from water sources to prevent contamination.
Remember that wood ash is highly alkaline, with a pH between 9 and 13, so always wash exposed skin thoroughly after handling.
Before using ash for preservation, sieve it to remove debris and avoid ash from treated timber or coal.
Never let wood ash get wet during storage, as this will leach out the potassium.
When applying ash to root vegetables, use small amounts to maintain proper pH levels.
Preparing Your Storage Container
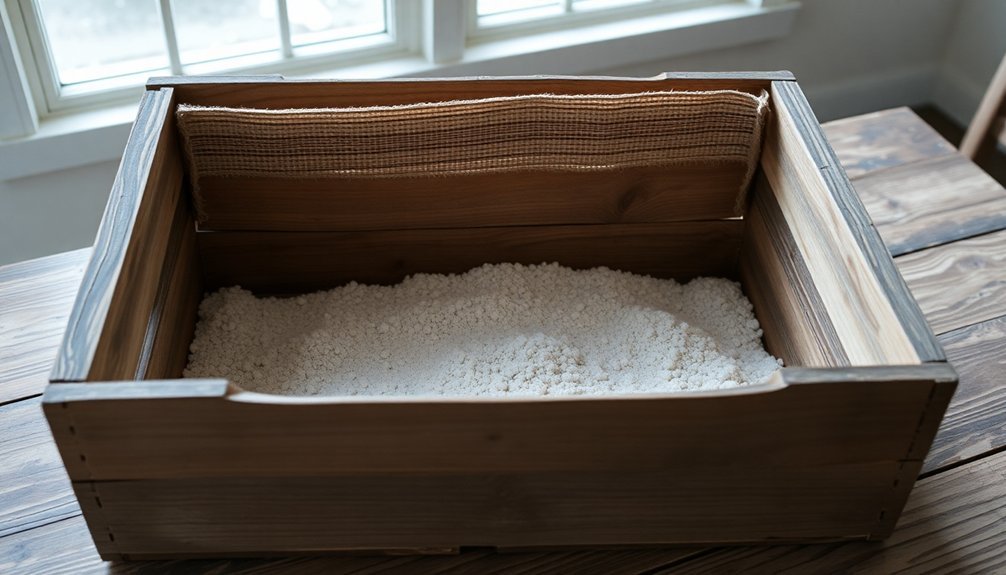
Proper storage container selection forms the foundation of successful root vegetable preservation. You'll want to choose sturdy materials like wood or plastic, avoiding cardboard which can deteriorate. A container measuring roughly 3 feet long, 1 foot wide, and 1 foot deep will serve your needs well, with Rubbermaid totes being an excellent choice.
| Storage Element | Requirement |
|---|---|
| Location | Cold, dark corner of basement |
| Temperature | Consistently cool |
| Humidity | High moisture levels |
| Monitoring | Regular checks needed |
To prepare your container, start by adding a base layer of moist material. If you're using peat moss, lay down a 3-inch layer; for soil, 1-2 inches will suffice. Don't let the material become soggy – it should be just moist enough to maintain humidity.
You'll need to maintain the storage environment actively. Check moisture levels regularly and spray water when needed. Keep the container sealed but remember to inspect it periodically for any signs of vegetable spoilage. Remove any rotting produce immediately to prevent spread, and guarantee the layering material stays consistently damp but never waterlogged.
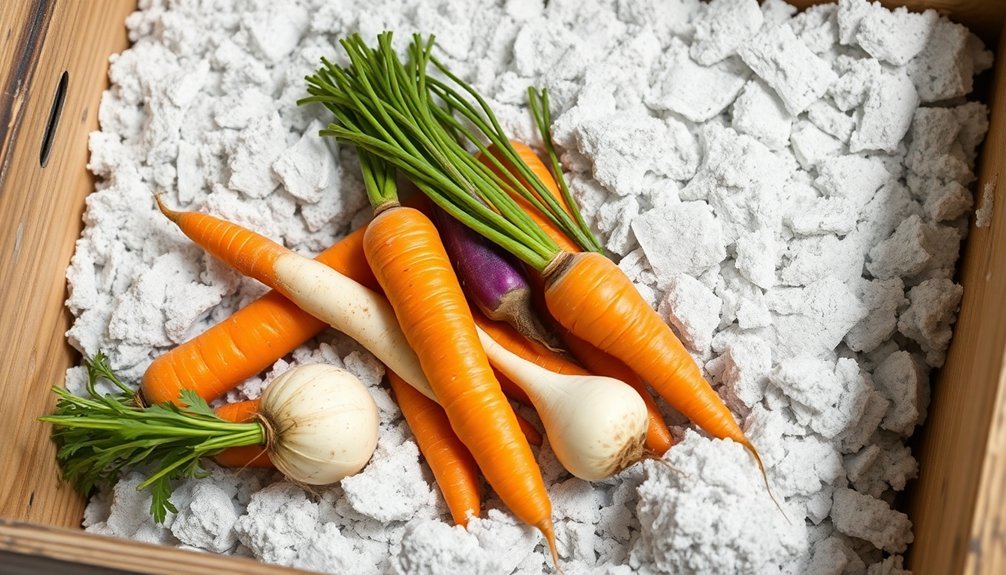
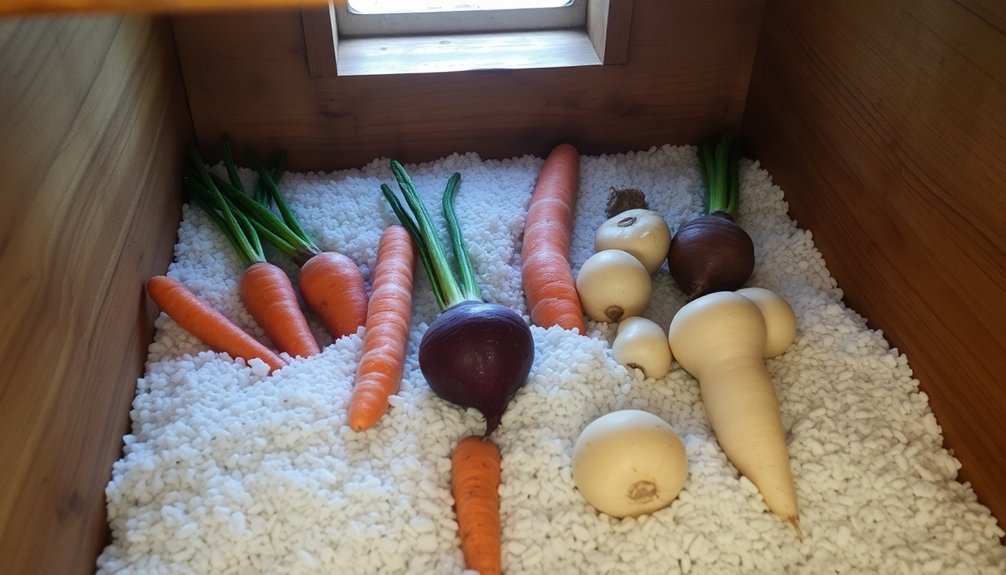
Step-by-Step Layering Process
You'll want to start by spreading a 1.5-inch layer of sifted wood ash at the bottom of your storage container, creating a clean foundation for your vegetables.
Next, place your root vegetables stem-side down in a single layer, making sure they don't touch each other to prevent moisture transfer and decay.
Once you've positioned the vegetables, cover them completely with another thin layer of ash before starting the next layer.
Layering Base Materials First
The foundation of successful root vegetable preservation starts with proper container preparation and ash layering. You'll need to select a suitable container – either wooden, cardboard, or a woven basket – and line it with paper to create a protective barrier between the ash and container material.
Make certain your chosen container is clean, dry, and can be properly sealed.
Before you begin layering, you'll need to sift your wood ash carefully to remove any debris or sharp particles. Use only ash from wood fires, such as bonfires or wood-burning stoves, and avoid ash from coal, anthracite, or treated timber, as these can harm your vegetables.
Once you've sifted the ash, spread an initial layer approximately 1.5 inches (4 cm) thick at the bottom of your lined container.
This base layer is critical for preservation success, as it creates the foundation for your vegetable storage system. You'll want to make sure this first layer is even and well-distributed across the container's bottom.
This careful preparation sets the stage for the subsequent layers of vegetables and ash you'll add, ultimately creating an effective preservation environment.
Vegetable Placement Techniques
After preparing your base layer of ash, successful vegetable placement requires methodical attention to detail. You'll need to carefully position each vegetable to maximize storage efficiency while preventing premature spoilage. For root vegetables like carrots, cut off the tops and approximately half an inch of the stems before placement.
To guarantee ideal preservation, follow these essential layering steps:
- Arrange your vegetables in a single layer, leaving small gaps between each piece for proper ash coverage.
- Cover the vegetables with a thin, even layer of wood ash (approximately 1.5 inches).
- Continue alternating vegetable and ash layers until your container is full.
- Seal the container with a loose-fitting cover or packing tape to keep the ash undisturbed.
Remember to select only unblemished vegetables for storage, as damaged produce can lead to premature decay.
Before placing your vegetables, let them dry in the sun for several hours to help root hairs go dormant. You'll want to position most root vegetables with adequate spacing, while tomatoes should be placed stem-end down.
Monitor your stored vegetables regularly and remove any that show signs of spoilage to protect the rest of your harvest.
Ideal Storage Conditions
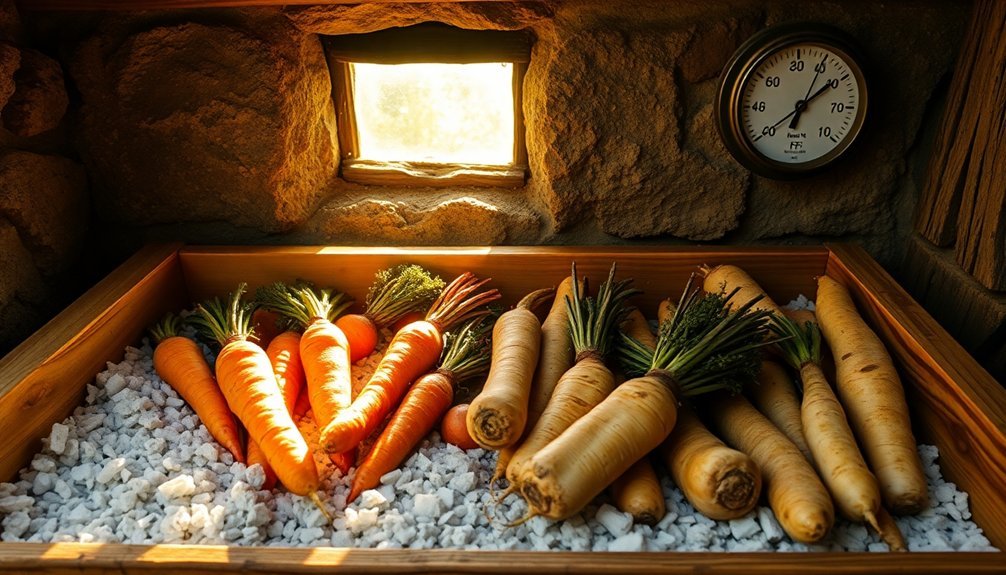
Proper storage conditions play an essential role in preserving root vegetables effectively. You'll need to select a cool, dry location like a basement, unheated cellar, or underground storage facility where you can maintain consistent temperatures between 50°F to 60°F (10°C to 15°C).
Make certain your chosen space is free from rodents and protected from direct sunlight.
Temperature stability is vital for long-term storage success. You'll want to guarantee your storage area is well-insulated to prevent fluctuations that could compromise your vegetables. Wood ash helps maintain stable temperatures while acting as a protective barrier against moisture and air exposure.
When setting up your storage system, you'll need to pay careful attention to humidity control and air protection. Start by sifting your wood ash to remove any sharp particles or debris.
Create alternating layers of vegetables and ash, making sure you've got thick layers at the bottom and top of your container. Each vegetable should be completely surrounded by ash to minimize air contact.
Finally, cover your storage container with a loose-fitting lid that allows minimal air exchange while keeping the ash undisturbed. This setup will help maintain ideal preservation conditions throughout the storage period.
Checking for Quality
Regular monitoring throughout the storage period stands as your first line of defense against quality issues. You'll need to check your stored root vegetables every two weeks to verify ideal preservation. While some wrinkling of the outer skin might occur, don't be alarmed as long as the inner flesh remains firm and juicy.
When you're examining your stored vegetables, focus on these key quality indicators:
- Visual appearance – check for any unusual discoloration or mold growth
- Texture firmness – gently press to verify the vegetable hasn't become soft
- Moisture levels – look for signs of excess moisture or drying
- Overall container condition – inspect for any ash clumping or container damage
Keep in mind that the high pH levels of wood ash (ranging from 9-13) can affect preservation outcomes.
You'll want to maintain detailed records of your observations during these quality checks, noting any changes in preservation effectiveness. If you notice significant changes in quality, remove affected vegetables immediately to prevent potential spread to others.
Remember that different wood ash sources may yield varying results, so documenting which ash types work best for your specific root vegetables can help improve future storage success.
Common Mistakes to Avoid
Many gardeners make critical errors when using wood ash for root vegetable preservation, potentially compromising their entire harvest. One of the most serious mistakes is using ash from the wrong sources – never use ash from treated timber, coal, or briquettes, as these can contain harmful chemicals that'll contaminate your vegetables.
Instead, stick to organic wood ash from fireplaces or wood burners.
You'll want to be careful with application methods too. Don't dump large quantities of ash onto your root vegetables; instead, apply it in thin, even layers. When you're working with the ash, make sure you're wearing protective gear, including a face mask and gloves, to avoid inhaling dust or irritating your skin.
Storage mistakes can also derail your preservation efforts. Keep your wood ash completely dry by storing it in containers with tight-fitting lids – if it gets wet, the nutrients will leach out.
Before using the ash, sieve it to remove any debris. Remember to take into account your soil's pH levels; if you're planning to use these root vegetables for future planting, excessive ash can make the soil too alkaline for successful growth.
Traditional Storage Success Stories
Successful root vegetable storage traditions have endured for generations, with countless families passing down their time-tested techniques. You'll find that the most remarkable success stories often come from those who've mastered the delicate balance of temperature and humidity control in their root cellars and storage spaces.
Consider the proven methods of traditional farmers who've maintained root vegetables throughout harsh winters by following these essential practices:
- Creating layered storage systems with straw and vegetables in underground pits, maintaining steady temperatures between 32-38°F.
- Using slightly dampened sphagnum moss as bedding material to keep humidity above 90%.
- Harvesting only during dry soil conditions and minimal handling before storage.
- Implementing proper ventilation in storage containers while using insulating materials.
You'll discover that families who've successfully stored root vegetables for months typically utilize unheated cellars or back porches, carefully monitoring temperature consistency.
They're meticulous about preparing their vegetables, cutting tops properly, and avoiding unnecessary washing. By following these time-honored methods, you can achieve the same impressive results that have kept communities self-sufficient through winter months for centuries.
Frequently Asked Questions
Can Wood Ash From a BBQ Grill Be Used for Vegetable Preservation?
You can use wood ash from your BBQ grill for vegetable preservation, but only if it's from pure wood fires. Don't use ash from charcoal or treated wood, and make sure to sift it thoroughly first.
How Many Times Can the Same Wood Ash Be Reused?
You shouldn't reuse wood ash once it's been used. It loses its potency after first use since nutrients leach out. Any moisture exposure further depletes its beneficial properties, making it ineffective for subsequent applications.
What Happens if Vegetables Accidentally Touch Each Other During Storage?
When your vegetables touch during storage, they'll risk increased decay and damage. You'll see faster deterioration where contact occurs, as moisture transfer and bacterial spread become more likely. Keep them separated whenever possible.
Will the Ash Preservation Method Affect the Vegetables' Cooking Time?
You won't notice much difference in cooking times. Since wood ash preservation helps vegetables retain their natural moisture content, they'll cook similarly to fresh ones. Just prepare them as you normally would.
Can Vegetables Preserved in Wood Ash Be Used for Seed Saving?
Yes, you'll find that vegetables preserved in wood ash can be used for seed saving. The ash's protective properties will actually help maintain your seeds' viability and protect them from pests and fungi.
In Summary
You'll find wood ash preservation to be an effective, time-tested method for storing your root vegetables through winter. With proper preparation and monitoring, you can keep carrots, beets, and other root crops fresh for months. Don't forget to check your stored vegetables regularly and maintain consistent storage conditions. Once you've mastered this traditional technique, you'll have a reliable, chemical-free way to preserve your harvest.


Leave a Reply