To restore your colonial spring house, you'll need to follow seven essential steps. Start by evaluating the structure's condition, including walls, roof, and foundation. Next, clear and clean your water source by removing vegetation and debris. Repair the stone foundation walls using Type N mortar and proper drainage techniques. Restore the original airflow systems by clearing ventilation points and repairing ducts. Rebuild interior storage shelving with period-appropriate materials. Install water management features like French drains and gutters. Finally, test the cooling performance to verify proper temperature control. These fundamental steps will set you on the path to a fully functioning historical spring house.
Assess Spring House Structure
Before beginning any restoration work, you'll need to conduct a thorough assessment of your spring house's structural condition. Start by examining the exterior walls for damage, looking closely for cracks, deterioration, or signs of weakness in the stone, brick, or wood materials.
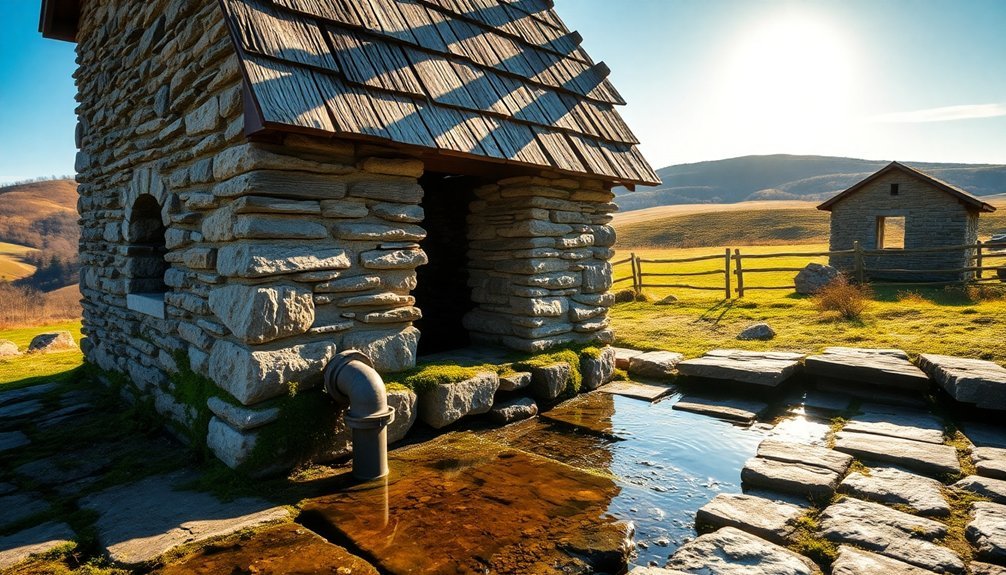
Spring houses were typically built into hillsides, following the natural terrain to maximize cooling efficiency. Don't forget to check the roof's integrity and confirm there aren't any leaks that could compromise the structure.
Next, inspect the foundation carefully, as it's essential for the building's stability. Look for signs of erosion, water damage, or shifting that might affect the structure's integrity.
Check that the spring house remains properly leveled and positioned away from the main house and barn to maintain water quality. You'll want to examine the earth floor and drainage channels to verify they're functioning correctly.
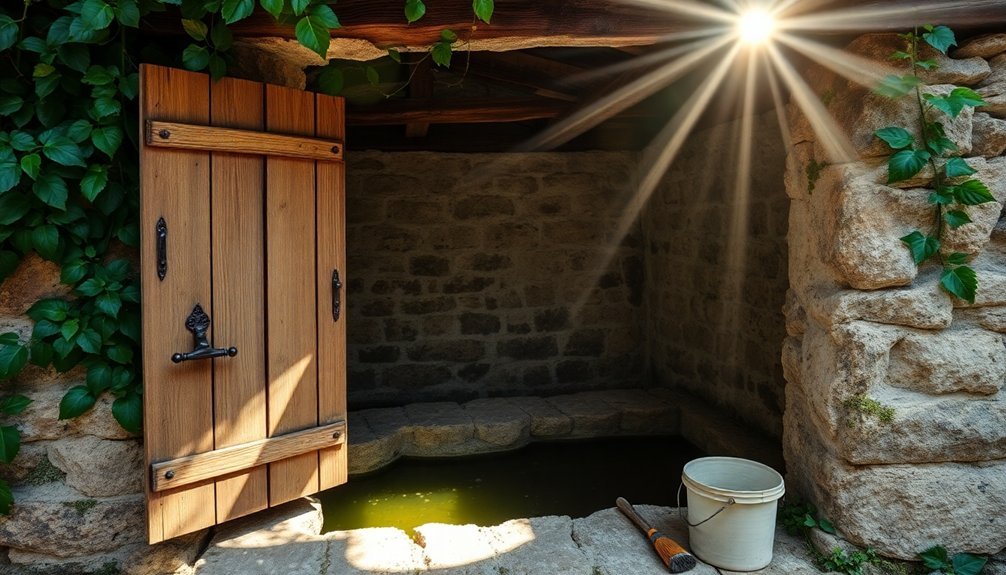
Inside the structure, assess the walls, storage ledges, and spring pool for any signs of deterioration. Check for dampness, mold, or pest infestations that could indicate ventilation issues.
If your spring house has multiple levels or specialized rooms for butter and cheese making, verify their stability and structural soundness. Pay particular attention to load-bearing elements and confirm all doors and windows are secure and operational.
Clean and Clear Water Source
After completing your structural assessment, the next major task involves cleaning and clearing the spring house's water source. You'll need to start by removing all vegetation, trees, and brush that could obstruct the water flow or damage the structure.
Use chainsaws and clippers to clear the area, creating a burn pile for organic debris while properly disposing of any old equipment or trash. Early settlers often used these structures to store milk and dairy products, as evidenced by discoveries of old milk containers from the 1930s and 1940s.
Next, you'll need to locate and clear any blockages affecting the spring's water flow. Carefully excavate around existing pipes using mini-excavators or skid steers to inspect for damage.
Replace damaged pipes, making certain they're properly angled downhill, and connect them using compatible couplers.
Install a new drainage system using perforated pipe wrapped in stones and landscape fabric to prevent erosion.
As you restore the water flow, implement proper erosion control measures like curlex to stabilize the ground.
You'll want to monitor water quality throughout the process, checking for leaks and maintaining the gravel basin and collection pipes.
Regular inspections of the spring and outflow pipe will help guarantee your water source remains clean and unobstructed, providing reliable flow for your spring house.
Repair Stone Foundation Walls
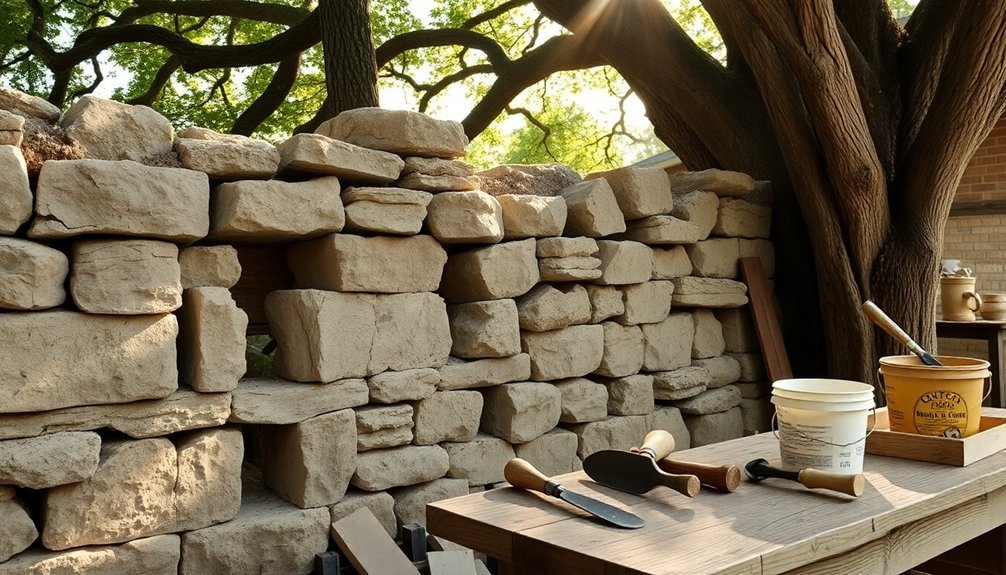
Repairing your spring house's stone foundation walls begins with a thorough inspection for structural issues. Check for crumbling mortar, visible gaps, and cracks in the joints. Look for signs of water damage, bulging walls, or significant shifts in the foundation.
You'll also want to guarantee proper drainage around the structure to prevent future damage. Mother Nature's elements can quickly deteriorate unprotected foundations.
Start the repair process by removing at least 2 inches of old mortar from the joints. You'll need basic tools like chisels, hammers, and pry bars. Don't forget to wear a respirator, especially when working inside the spring house.
Use a shop vac to clean out debris and dust from the joints.
Mix Type N mortar in a wheelbarrow, adding water and a bonding agent to improve adhesion. Using a pointed trowel, force the new mortar deep into the joints. Smooth the surface with a wet paintbrush to expose the aggregate and create a clean finish.
After completing the repairs, maintain your work by conducting annual inspections. Keep vegetation away from the foundation walls and address any new cracks promptly.
Ensure water drains away from the structure to protect your restored foundation.
Restore Air Flow Systems
Restoring proper airflow in your colonial spring house requires a methodical assessment of the existing ventilation system.
Check for any blockages or damage that might impair air circulation, and document the current state of all vents, ducts, and natural airflow channels. You'll need to understand how the original design managed temperature control through passive ventilation before making any improvements.
Clear all obstructions from both interior and exterior ventilation points. Remove accumulated dirt, vegetation, and organic matter that's blocking air movement. If you find damaged components, repair them using historically appropriate materials whenever possible.
Remember that proper airflow is essential for maintaining the spring house's cooling function.
Here's what you'll need to address for ideal ventilation:
- Remove sediment and debris from air channels while preserving original construction materials
- Repair or replace damaged vent covers using period-appropriate materials
- Restore traditional cross-ventilation patterns by clearing all original air passages
- Install discrete modern ventilation components only where necessary, guaranteeing they don't compromise historical integrity
When implementing improvements, verify any modifications support rather than replace the original airflow design.
Consider adding subtle modern ventilation only if it's essential for proper functionality.
Rebuild Interior Storage Shelving
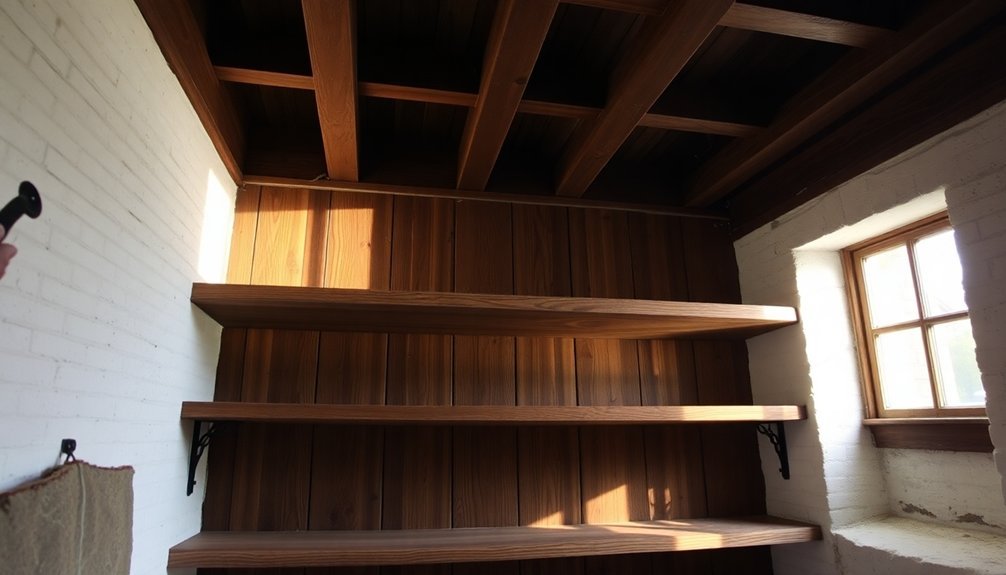
When you're rebuilding storage shelving in your spring house, you'll want to study the original design features to maintain historical accuracy and proper cooling function.
Your storage layout needs careful planning to maximize space while preserving the natural air circulation that keeps food items cool and fresh.
Using period-specific materials like locally sourced wood or traditional stone not only maintains authenticity but also guarantees your shelving system works harmoniously with the spring house's original cooling design.
Original Design Features Matter
In Colonial spring houses, the original interior storage shelving served both practical and aesthetic purposes. As you restore your spring house, maintaining these authentic design elements helps preserve the building's historical integrity while guaranteeing functionality.
The shelving systems typically followed Colonial Revival principles of symmetry and practicality, incorporating hardwood materials and simple yet elegant construction methods.
To properly restore your spring house's storage features, consider these essential elements:
- Install traditional wooden shelving with period-appropriate joinery, using mortise and tenon or dovetail joints to maintain authenticity while guaranteeing structural stability.
- Incorporate wainscoting or wood paneling behind the shelves to protect walls and add architectural depth, matching the style found in Colonial Revival homes.
- Design shelf heights to accommodate various storage containers while maintaining symmetrical proportions typical of Colonial architecture.
- Add subtle modern weatherproofing elements beneath the shelving units without compromising the original aesthetic.
Keep the central hallway clear and maintain the original traffic flow patterns.
When selecting materials, opt for traditional hardwoods that match existing elements, and guarantee any replacement pieces mirror the original construction techniques and proportions.
Proper Storage Space Planning
A thoughtful storage plan serves as the foundation for rebuilding your spring house's interior shelving system. Start by measuring your available space, taking note of structural elements like doors, windows, and load-bearing walls.
You'll need to take into account the spring house's unique cooling properties and how water flow affects the interior environment.
When selecting your shelving system, choose materials that can withstand cool, damp conditions. You'll want to incorporate both static and adjustable shelving units to maximize vertical space.
Built-in shelves can be integrated directly into the stone walls, creating a seamless storage solution that preserves the structure's historical character.
Organize your storage layout based on usage patterns. Keep frequently accessed items at eye level and within easy reach, while placing heavier items on lower shelves for stability and safety.
Don't forget to use overhead space – installing rafters for hanging items like milk pails can greatly increase your storage capacity.
Ensure your design maintains proper ventilation and distributes weight evenly throughout the space. Create dedicated areas for specific items such as stoneware crocks, and leave adequate space between shelves to accommodate items of varying sizes.
Restore Period-Specific Materials
Restoring period-specific materials for your spring house's interior storage shelving requires careful consideration of historically accurate components.
You'll need to select hardwoods like oak, maple, or pine that match colonial-era materials while guaranteeing they come from sustainable sources. The wood's grain and texture should align with period-specific characteristics, and you'll want to finish them using traditional oil-based stains or natural waxes in muted earth tones.
When rebuilding your storage shelving, incorporate these essential colonial-era construction elements:
- Use traditional joinery techniques such as mortise and tenon or dovetail joints to guarantee authentic structural integrity.
- Include handcrafted details like simple balusters or period-appropriate trim work.
- Design symmetrical shelving units that don't obstruct the central fireplace area.
- Add functional features like operable shelves or small-paned glass doors when appropriate.
Remember to maintain proportional dimensions that complement your spring house's existing architecture.
If you're including wainscoting or paneling, guarantee it matches the colonial interior style. Keep detailed documentation of your restoration process and materials for future maintenance reference, and regularly inspect your shelving for any signs of wear that require traditional preservation methods.
Install Water Management Features
To protect your restored spring house, you'll need a proper slope that directs water away from the foundation at a rate of 2 feet per 10 horizontal feet.
You can install a French drain system using 4-inch perforated pipe wrapped in landscape fabric and surrounded by graded gravel to manage underground water flow.
Connect your downspouts to extension pipes that carry water at least 10 feet away from the structure, ensuring they tie into your French drain network for maximum drainage efficiency.
Slope Away From Foundation
Properly managing water flow around your colonial spring house begins with creating an effective slope away from the foundation.
You'll need to establish a minimum 6-inch decline within the first 10 feet surrounding the structure, ideally achieving a 1-inch drop per foot. Before starting the grading work, mark all utilities, pipe covers, and vents to prevent accidental coverage during the process.
Select soil that offers proper drainage while maintaining structural integrity. A balanced mix of silt and clay works best, with fill dirt for the base layers and nutrient-rich topsoil for the final 5-10 inches.
Remember to keep the foundation exposed by 4-6 inches above the soil line.
- Remove existing plants carefully and store them for replanting
- Strip away several inches of old topsoil before adding new material
- Fill low areas systematically, working outward from the foundation
- Rake the new soil smooth and compact it thoroughly
Complete your slope construction by integrating proper drainage solutions.
Install gutters, downspouts, and catch basins to direct water away from your spring house effectively. These features work together with your newly graded slope to protect your historic structure's foundation from water damage.
French Drain Installation Guide
Installing a French drain system effectively manages groundwater around your colonial spring house and prevents foundation damage. Before you begin, identify areas of water accumulation and plan your drain's path, guaranteeing it's clear of utility lines. Mark the exit point where water will flow away from your structure.
You'll need to dig a trench 6 inches wide and 18-24 inches deep, maintaining a consistent slope throughout. Create an angled path that directs water away from your spring house's foundation. Line the trench with water-permeable fabric to prevent soil infiltration and clogging.
Add a base layer of gravel, then install your perforated pipe with holes facing downward. Connect it to a catch basin that'll collect surface runoff. The pipe should maintain its downward slope to guarantee proper drainage.
Cover the pipe with more gravel, then wrap the excess fabric over the top to create a barrier against soil intrusion. Complete the installation by adding a final layer of gravel, followed by topsoil or mulch.
You'll want to monitor the system regularly, especially after heavy rains, to guarantee it's functioning correctly and protecting your spring house's foundation.
Downspout Extension Systems
Along with your French drain system, effective downspout extensions provide another layer of protection for your colonial spring house.
You'll need to start by evaluating your drainage needs, observing water flow patterns during rainfall, and identifying low spots where water tends to collect around the structure.
Before installation, gather your materials including downspout extensions, adapters, pipes, and appropriate fasteners.
You'll want to plan your extension route carefully using stakes and string, ensuring water flows away from both your spring house and neighboring properties.
Install your downspout extension system following these critical steps:
- Cut your existing downspouts at the appropriate angle using a hacksaw or reciprocating saw.
- Secure new brackets to the wall using screws and anchors suitable for your surface material.
- Attach elbows and extensions to create the planned drainage route.
- Install straps every 4-5 feet to properly support the system.
Maintain your system by conducting bi-annual inspections in spring and fall.
Check for cracks, loose connections, and proper water flow.
Consider adding rain barrels with overflow mechanisms to manage excess water during heavy rainfall periods.
Test Cooling Performance
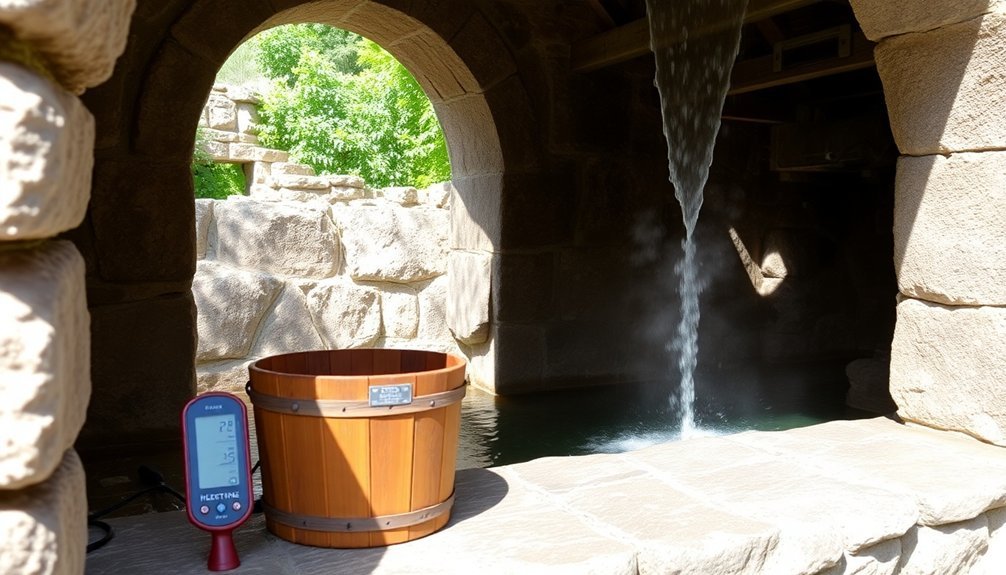
Testing your spring house's cooling performance starts with understanding how air moves through the structure. The stack effect plays an essential role, as warm air naturally rises and escapes through the top while cooler air gets pulled in at lower levels. In your spring house, this natural phenomenon can greatly impact temperature control.
You'll want to begin with a professional blower door test to identify air leaks and breaches in your thermal envelope. This test will help you pinpoint areas that need immediate attention through air sealing, insulation, or weather-stripping.
Pay special attention to the foundation, walls, and roof connections where leaks commonly occur.
Once you've addressed the structural issues, conduct seasonal testing of your HVAC system during peak cooling periods. You can optimize performance by adjusting control sequences and utilizing free cooling during shoulder seasons.
If you're installing a new system, confirm proper sizing by calculating heat loads based on your spring house's fuel consumption and efficiency ratings.
Position return registers away from supply vents, and consider using mini-duct systems if you're working with limited space. These steps will help maintain consistent temperatures throughout your spring house.
Frequently Asked Questions
How Long Does a Typical Spring House Restoration Project Take?
You'll typically spend 3-6 months restoring a spring house, though it can take up to a year depending on the project's complexity, weather conditions, permitting requirements, and your available resources.
What Permits Are Required Before Starting a Spring House Restoration?
You'll need building permits for structural work, separate permits for mechanical/electrical/plumbing changes, and historic district approvals. If you're expanding the structure or modifying windows, get Minor Repairs & Renovation permits too.
Can Spring Houses Be Converted for Modern Residential Use?
Yes, you can convert spring houses for residential use if you comply with local zoning laws and obtain proper permits. You'll need to address structural updates, modern utilities, and safety requirements while maintaining historical integrity.
What Was the Historical Purpose of Spring Houses in Colonial Times?
You'll find that colonial spring houses served three main purposes: protecting your natural water source, keeping food cool through natural refrigeration, and providing a workspace for dairy processing and household tasks.
How Much Does a Complete Spring House Restoration Typically Cost?
You'll typically spend between $13,500 to $427,500 for a complete spring house restoration, depending on your location, materials, and scope. For a 900-square-foot structure, expect to pay $15-$475 per square foot.
In Summary
You've taken important steps to bring your colonial spring house back to its original purpose. By methodically addressing the structure, water source, foundation, ventilation, storage, and drainage, you'll now have a functioning spring house that can naturally cool and preserve food items. Remember to monitor its performance through the seasons and make minor adjustments as needed to maintain this historic preservation method.


Leave a Reply