To design a spring-fed root cellar, you'll need to locate a natural spring on a north-facing hillside with at least 10 feet of soil depth. Start by measuring the spring's flow rate and excavate an 8×8 foot space at least 4 feet deep with a 6-foot ceiling. Install a gravity-fed water system using pipes along the cellar walls to maintain temperatures between 32-40°F. Add proper drainage with gravel layers and perforated pipes sloping away from the structure. Include low and high vents for natural airflow, and organize storage based on temperature zones. Understanding the complete design process will guarantee your cellar provides ideal food preservation year-round.
Natural Spring Water Integration
A natural spring can be both a blessing and a challenge when building a root cellar. You'll need to carefully manage the water flow to prevent it from damaging your storage space while potentially harnessing its cooling benefits. Start by accurately measuring the spring's flow rate and designing a collection system that diverts water away from your cellar's foundation. Maintaining stable temperatures year-round helps ensure optimal food preservation conditions.
You'll want to install a thorough drainage system that includes gutters and a French drain to redirect the spring water. This setup prevents soil saturation around your cellar walls and protects the structure's integrity. Make sure you're using erosion-resistant materials that can withstand constant water exposure.
To protect your cellar's interior, apply waterproof coatings like DryLok to the walls and install impermeable liners on both walls and floor. Don't forget to lay plastic sheeting over the gravel floor to stop ground moisture from rising.
You should also position vents strategically – intake ones near the floor and exhaust vents near the ceiling – to maintain proper airflow. Consider adding solar-powered fans if natural ventilation isn't sufficient, and verify there's adequate space between your shelving and walls for proper air circulation.
Site Assessment and Location Selection
When planning your spring-fed root cellar, proper site selection becomes your foundation for success.
You'll need to find a location that maintains temperatures between 32-40°F and humidity levels of 85-95%. The north side of a hillside offers ideal conditions, providing natural earth insulation and consistent shade throughout the day.
Your chosen site should have at least 10 feet of soil depth for temperature stability, while ensuring proper drainage to prevent water accumulation. Stone or wood materials can be used for constructing sturdy walls that withstand soil pressure.
Don't select low-lying areas that could flood; instead, look for elevated spots that still allow easy access during winter months. The soil should retain enough moisture to support high humidity without becoming waterlogged.
Consider how you'll incorporate ventilation systems to prevent ethylene gas buildup and maintain air circulation.
You'll want to protect against pests by selecting a location that's less prone to rodent activity and allows for protective measures like mesh-covered vents.
The site should also accommodate your lighting needs and organizational systems.
If possible, choose a spot that can serve multiple purposes, such as doubling as a storm shelter, maximizing your investment in the structure.
Excavation and Drainage Planning
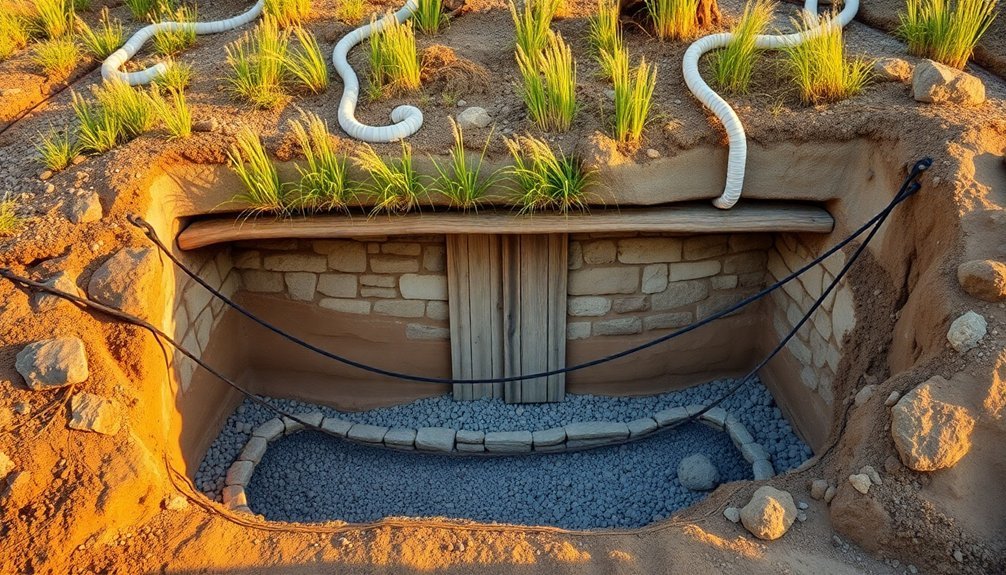
Successful excavation of your spring-fed root cellar begins with precise planning of both the dig site and drainage systems.
You'll need to dig at least 4 feet below ground level, ensuring adequate headroom with dimensions like 8×8 feet and a 6-foot ceiling. You should expect to move about 22 cubic yards of soil during the excavation process. Plan your entrance carefully, positioning it to minimize cold air entry while maintaining easy access.
Start by digging a footer that's 18 inches wide and 8 inches deep for your foundation. As you excavate, use hand tools for precise control and pile the removed soil around the site for later use.
You'll need to install a drainage system that's almost level with your cellar floor, sloping away and extending to daylight. Use perforated drainage pipes covered with gravel, and cement the exit point to prevent rodent entry.
For water management, you'll create a 6-inch gravel layer around the exterior walls. Install tin sheets 6 inches from the walls and fill the space with gravel as you back-fill.
Apply waterproof coatings like DryLok to interior walls and use plastic sheeting over the gravel floor to prevent moisture seepage. Remember to incorporate rain gutters to direct water away from your structure.
Spring Water Capture Methods
When you're planning your spring-fed root cellar, you'll need to establish a gravity-fed collection system that naturally channels water from higher ground into your storage area.
You can direct spring water through a series of stepped channels or pipes that maintain a consistent downward flow, reducing the need for mechanical pumping systems.
Natural spring diversion methods, such as catchment basins and strategic pipe placement, will help you maximize water collection while minimizing erosion and water loss.
Gravity-Fed Collection Systems
Capturing spring water effectively requires a well-designed gravity collection system, and you've got several proven methods to choose from.
You'll need to select between spring box capture, subterranean collection, or the CODEINSE method, depending on your site's conditions and needs.
If you're working with a visible spring eye, you'll want to take into account a spring box – a concrete structure that protects the water source from surface contamination.
You'll need to include a diversion trench to redirect surface runoff and guarantee proper overflow management.
For shallow groundwater areas, you'll find the subterranean method most effective.
You'll dig trenches and install perforated pipes surrounded by gravel, which creates an efficient collection pathway.
This system's particularly good at filtering water through both soil and gravel layers.
The CODEINSE method offers you enhanced protection by combining plastic sheeting, geotextile fabric, and a concrete cut-off wall.
You'll appreciate its proven track record in reducing microbial contamination and improving spring yields.
Whichever method you choose, you'll need to incorporate gravity-fed distribution components, including properly sized tanks and pipes.
This approach eliminates the need for pumps while guaranteeing consistent water flow to your root cellar.
Natural Spring Diversion Methods
Properly diverting spring water requires choosing between four proven capture methods: spring box capture, subterranean collection, CODEINSE systems, or seepage spring development. Your choice will depend on your spring's characteristics and desired protection level.
For your root cellar project, consider these critical factors when selecting a diversion method:
- Spring box capture works best for single-point springs, using a concrete box that's simple to maintain but requires careful construction to prevent contamination.
- Subterranean collection excels at capturing water over large areas using perforated pipes and gravel filtration, making it ideal for dispersed springs.
- CODEINSE systems offer superior protection through plastic sheeting and geotextile fabric, though they're more complex to install.
- Seepage spring development suits shallow groundwater areas, requiring trenches and collection tiles built into impervious layers.
You'll need to excavate the area and install appropriate drainage systems regardless of your chosen method.
Guarantee you incorporate diversion trenches to redirect surface water away from your collection point.
Each system requires regular maintenance checks for sediment buildup and potential contamination sources, so plan for easy access to inspection points in your root cellar design.
Temperature Regulation Through Water
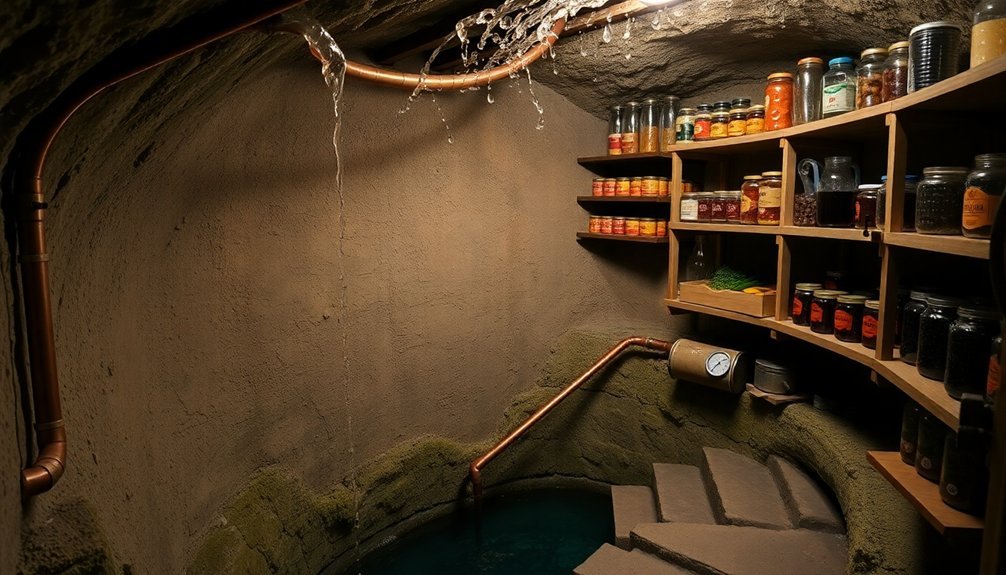
The natural chill of spring water provides an excellent cooling mechanism for root cellars. When you're using spring water for temperature regulation, you'll want to maintain temperatures between 32 and 40 degrees Fahrenheit for ideal food preservation. The flowing water helps stabilize the temperature and reduces the need for additional cooling methods like ice storage.
You can maximize the cooling effect by routing spring water through pipes or channels along the cellar walls, creating a natural cooling system that works year-round. This setup helps you avoid the labor-intensive process of ice harvesting and storage that traditional root cellars require. Since spring water maintains a relatively constant temperature, you won't need to dedicate one-third of your cellar space to ice storage.
To prevent excess moisture, you'll need to incorporate proper drainage and ventilation systems. Install vents near the ceiling and floor to promote air circulation, which helps control humidity and removes ethylene gas from stored produce.
Make sure your ventilation can be adjusted during extreme weather conditions to maintain the perfect temperature range and prevent freezing in winter months.
Humidity Control Systems
You'll find that spring-fed root cellars offer excellent natural moisture generation through the continuous presence of flowing water.
To maximize humidity control, you can install collection troughs along the cellar walls to gather and redistribute water through a passive drip system.
You can further enhance moisture distribution by incorporating gravel flooring and strategically placed water containers that work alongside the spring's natural humidity contribution.
Natural Moisture Generation Methods
Maintaining ideal humidity levels in your root cellar requires understanding natural moisture generation methods that work with the earth's inherent properties.
You'll find that utilizing the ground's natural moisture through a properly constructed root cellar built into a hillside provides stable temperature and humidity control. By packing your cellar floor with earth and occasionally moistening it, you can effectively maintain preferable humidity levels, especially in dry climates.
Consider incorporating these natural moisture control methods into your root cellar design:
- Install ventilation systems that capture condensation from cooler outside air
- Use bins filled with damp sand near produce storage areas
- Place moisture-absorbing materials like charcoal or rice strategically throughout the space
- Implement a regular wet-mopping schedule for packed earth floors
- Monitor humidity levels with a hygrometer and adjust ventilation accordingly
You'll need to maintain proper air circulation between stored items while managing moisture levels.
During periods of excessive humidity, particularly in spring, you might need to use a dehumidifier.
Remember to check moisture-absorbing materials regularly, ensuring they don't dry out completely, and adjust your ventilation systems based on temperature and humidity readings.
Water Collection And Distribution
Droplets of collected rainwater form the backbone of an effective root cellar humidity control system. You'll need to set up a thorough water collection network that starts from your rooftop and flows through a series of containers and pipes. Install rainwater collection systems with overflow mechanisms that direct excess water to garden beds or swales.
| Component | Function |
|---|---|
| Cisterns | Store collected water underground, protected from environment |
| PVC Pipes | Transport water using gravity feed to root cellar |
| Filters | Screen debris and guarantee clean water distribution |
| Smart Misters | Maintain 85-95% humidity through automated control |
Connect your cisterns to the root cellar using PVC pipes, taking advantage of gravity feed wherever possible. You'll want to seal all joints and seams with waterproof sealants to prevent leaks. Position your water storage tanks near the root cellar for efficient distribution, and install valves at key points to control water flow.
For humidity control, install ultrasonic misters connected to smart switches and ESP8266 microcontrollers. These will work alongside circulation fans to maintain ideal moisture levels while preventing ethylene gas buildup. Monitor conditions using humidity sensors to adjust misting frequency automatically.
Natural Insulation Techniques
When designing a spring-fed root cellar, natural insulation plays an essential role in maintaining consistent temperatures year-round.
You'll want to dig at least 10 feet underground or into a hillside to take advantage of the earth's natural insulating properties. The soil acts as a protective blanket, keeping temperatures stable regardless of external weather conditions.
For enhanced insulation, you can combine earth's natural properties with both organic and synthetic materials. Consider using thick rigid foam sheets between the walls and dirt, or implement closed-cell spray foam in areas prone to high humidity.
If you're looking for eco-friendly options, straw bales or hay provide effective insulation but require proper ventilation and periodic replacement.
Here are key insulation strategies to implement:
- Utilize earthbag construction for additional natural insulation if building above ground
- Install multiple layers of foam plastic sheets around the cellar's exterior
- Place insulating blankets between concrete walls and surrounding earth
- Incorporate geothermal cooling systems for enhanced temperature control
- Layer organic materials like pine needles or hay in simpler designs using bins or barrels
Your choice of insulation method should balance effectiveness, maintenance requirements, and your local climate conditions.
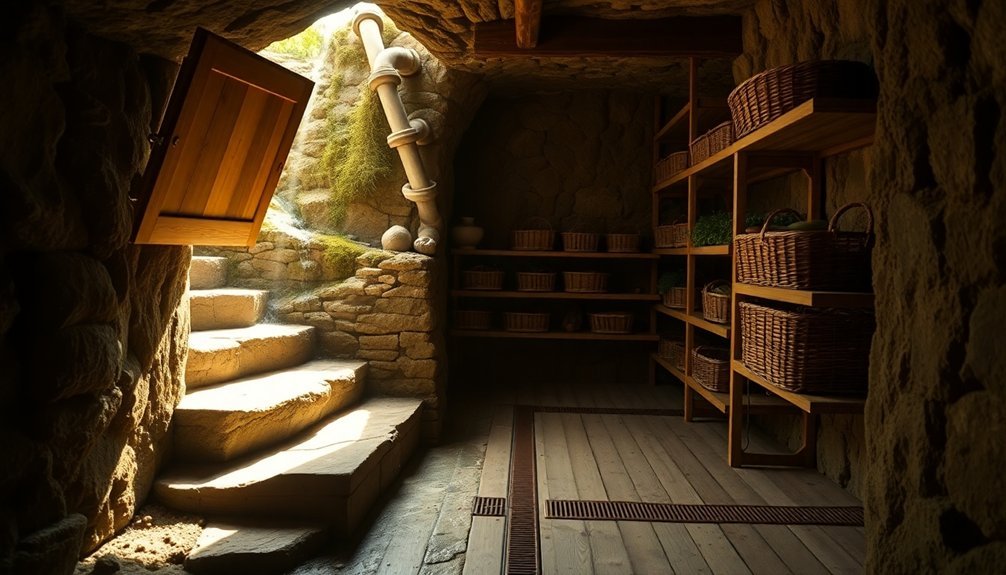
Ventilation and Air Circulation
You'll need to install both low and high vents in your spring-fed root cellar to create a natural convection current that keeps food fresh.
Position the inlet vent near the floor to draw in cool air, while placing the outlet vent high on the opposite wall or through the roof to let warm air escape.
This two-vent configuration works with nature's laws, as cool air naturally sinks and warm air rises, creating a continuous flow that prevents ethylene gas buildup and maintains ideal storage conditions.
Natural Airflow Design Basics
The foundation of a well-designed root cellar lies in its natural airflow system. By positioning inlet vents low to the ground and outlet vents high near the ceiling, you'll create a natural circulation pattern that keeps your stored goods fresh. This design takes advantage of the basic principle that warm air rises while cool air sinks, creating a continuous flow of air throughout your cellar.
To maximize airflow efficiency, you'll want to install your vents on opposite sides of the room. This cross-ventilation setup guarantees proper air movement and helps maintain consistent temperature and humidity levels.
Don't forget to leave 2-3 inches of space between your shelves and walls to allow air to circulate freely.
Key elements of natural airflow design include:
- Install inlet vents at floor level and outlet vents near the ceiling
- Position vents on opposing walls to create cross-ventilation
- Cover all vent openings with mesh screens to prevent pest entry
- Space shelving units away from walls for proper air circulation
- Open vents during nighttime hours to capture cooler air
Remember to seal your vents tightly during winter using packed cloth or rubber gaskets to maintain ideal storage conditions.
Cross-Ventilation Systems Setup
Building on the principles of natural airflow, an effective cross-ventilation system requires precise placement of multiple ventilation components.
You'll want to position your intake vents low to the ground and outlet vents near the ceiling, ideally on opposite walls to maximize air circulation. Use 3-4 inch diameter vents with Schedule 40 PVC tubing for durability and effectiveness.
To guarantee proper functionality, you'll need to install both internal and external screens to keep out unwanted pests.
Seal around your vents using packed cloth, expanding foam, or rubber gaskets to control airflow precisely. When installing multiple vents, you're creating a more efficient system that'll help manage ethylene gases and maintain ideal storage temperatures around 40°F.
You can adjust your ventilation based on seasonal needs. During summer, keep vents open to promote air circulation, while in winter, you might need to close or plug them to prevent freezing.
Don't forget to insulate between your house and root cellar to prevent heat transfer. Regular maintenance of your ventilation system is essential – check seals, screens, and vent operations to verify they're working correctly throughout the year.
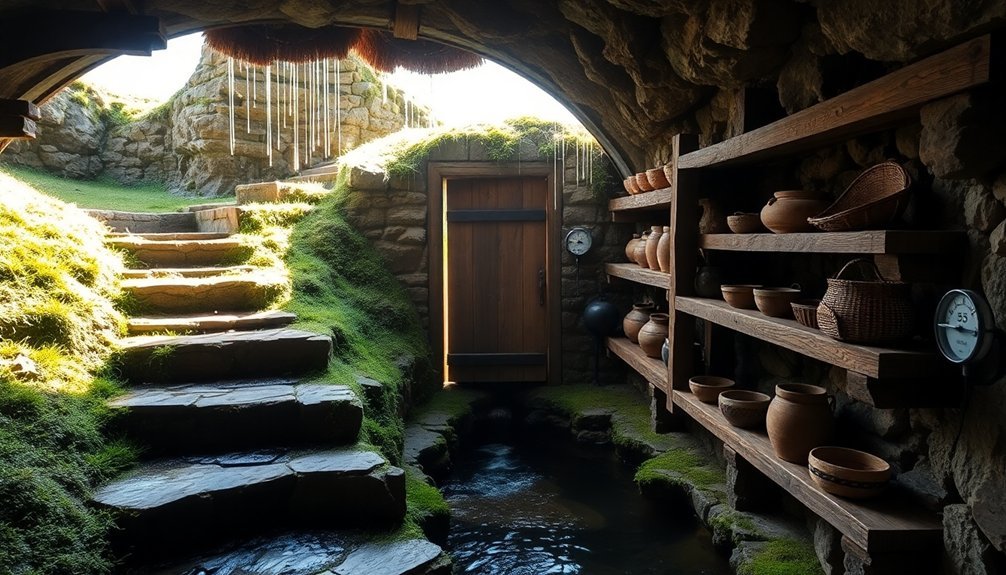
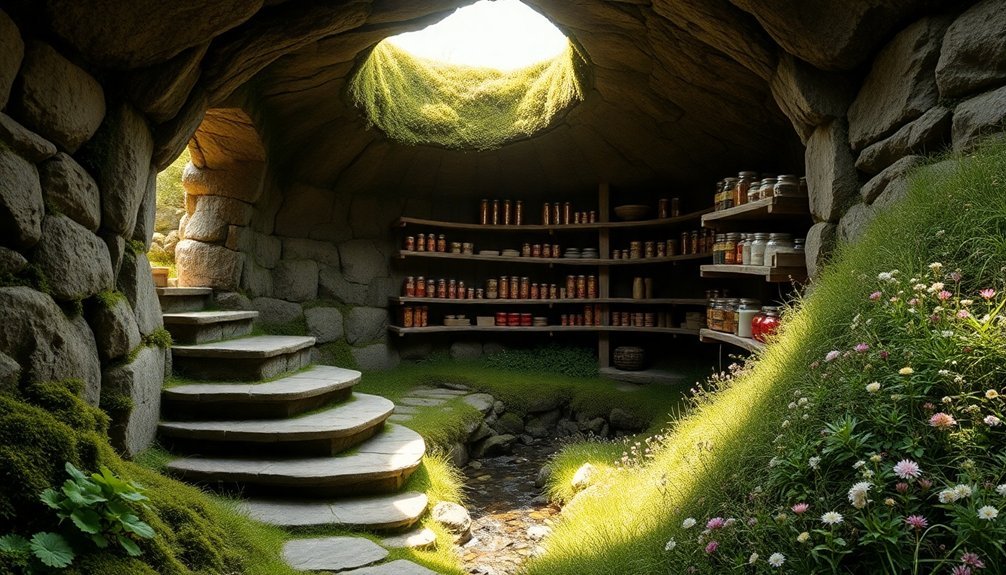
Food Storage Layout Design
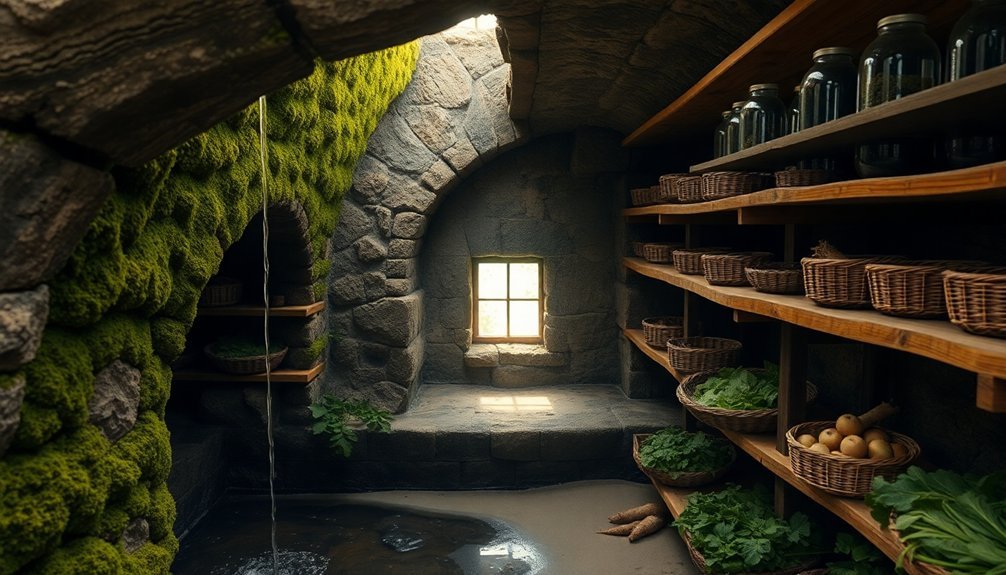
Successfully organizing a root cellar's storage layout requires careful attention to three critical factors: temperature zones, airflow patterns, and crop compatibility.
You'll need to arrange your storage space strategically to maintain ideal conditions for different types of produce while preventing cross-contamination from ethylene gas producers.
Start by mapping out your cellar's natural temperature gradients, placing root vegetables in the coolest spots (32-45°F) and less temperature-sensitive crops on higher shelves.
Remember to keep ethylene-producing foods separated from ethylene-sensitive ones to prevent premature ripening.
- Install shelving units with adequate spacing for air circulation
- Position root vegetables like carrots and beets in the lowest, coolest areas
- Store squash and tomatoes on upper shelves where temperatures are slightly warmer
- Use straw or peat moss between stored items to maintain humidity
- Label all storage areas clearly for easy inventory management
You'll want to maintain proper spacing between items to prevent moisture buildup and rot spread.
Line your storage containers with appropriate materials and implement a systematic labeling system to track your stored produce effectively.
This organization will help you maintain the 80-90% humidity level needed for ideal preservation while allowing for proper ventilation throughout the space.
Water Flow Management
Managing water flow in your spring-fed root cellar requires an all-encompassing approach that addresses both exterior and interior moisture control. Start by installing rain gutters and downspouts on the topside structure to divert rainwater away from your cellar.
You'll need to maintain these regularly to prevent debris buildup and guarantee proper water flow.
For underground protection, install French drains along the exterior base of your cellar walls, using gravel to enhance drainage. Layer the floor with gravel and cover it with plastic sheeting to control moisture seepage.
You'll want to monitor the surrounding soil's consistency to maintain ideal drainage conditions.
Waterproof your cellar's interior walls with DryLok or similar coatings, and install a plastic liner for additional protection.
Don't forget to seal any cracks or gaps that could allow water infiltration. For effective moisture control, you'll need multiple air vents positioned strategically throughout the cellar.
Install humidity gauges and thermometers to monitor conditions, and use dehumidifiers during particularly wet periods.
You can improve air circulation by adding fans, which help remove excess moisture and maintain consistent temperature levels throughout your storage space.
Seasonal Maintenance Requirements
Regular maintenance of your spring-fed root cellar changes with the seasons, requiring careful attention to key variables throughout the year. You'll need to monitor temperature and humidity levels consistently, adjusting ventilation and insulation as needed to maintain ideal conditions between 32-40°F and 85-95% humidity.
Throughout the growing season, you should focus on succession planting to guarantee a steady supply of vegetables for storage. Start seeds indoors under lights four weeks before transplanting, and time your plantings of root cellar crops like carrots, potatoes, and squash from late June through mid-July.
Your ongoing maintenance tasks should include:
- Daily temperature checks using strategically placed thermometers
- Weekly inspections of stored produce for signs of decay
- Monthly rotation of stored items to guarantee proper use-by dates
- Seasonal adjustments to ventilation systems
- Quarterly cleaning and drainage system maintenance
During storage months, you'll need to keep ethylene-producing vegetables separate from other produce and maintain proper air circulation. Use headlamps or flashlights when checking your cellar to avoid introducing heat from conventional lighting.
Remove any spoiled items immediately to prevent contamination of healthy produce.
Construction Materials Guide
A well-built root cellar starts with choosing the right materials for your specific site conditions and climate. You'll need to take into account three main components: walls and foundation, roofing, and flooring.
For walls and foundation, you've got several options. Traditional stone or brick provides durability and temperature regulation, while concrete blocks offer a budget-friendly alternative – you'll need about 350 blocks for an 8×8 foot cellar. If you're looking for sustainable choices, think about using recycled stones or bricks from old foundation walls or masonry yards.
Your roof needs robust support through wooden framework or reinforced concrete. You can create a solid bond beam by layering lumber and securing it with rebar. For the actual roofing, you can use tin, plywood, or 2×8 lumber laid flat across your walls.
Don't overlook your flooring system. Start with a gravel base for drainage, then add treated lumber boards spaced for air circulation.
You'll want to install drainage pipes and use landscape cloth around the perimeter to manage moisture. Contemplate adding a concrete pad at the entrance to prevent erosion and provide stable access.
Energy-Free Cooling Solutions

Four natural cooling methods can keep your root cellar at perfect storage temperatures without requiring electricity.
You'll get the best results by combining passive ventilation with earth tube systems, while leveraging natural ground temperatures and butane-based heat exchange for year-round temperature control.
Start by installing two ventilation pipes – one near the floor for cool air intake and another near the ceiling for warm air exhaust.
You can enhance this system by running PVC earth tubes under a shaded area, using the ground's natural cooling properties to pre-cool incoming air.
For additional cooling capacity, implement a butane-based heat exchange system that works with outdoor temperatures below 31°F to freeze water tanks, providing sustained cooling as they thaw.
Consider these key elements for peak performance:
- Position your cellar into a north-facing slope to minimize sun exposure
- Install remote temperature sensors to monitor conditions
- Place water trays throughout to maintain proper humidity levels
- Use lidded containers to preserve moisture and temperature stability
- Arrange storage bins with proper spacing for air circulation
These passive cooling methods work together to maintain temperatures between 32°F and 40°F, perfect for preserving your harvest.
Frequently Asked Questions
How Far Should the Root Cellar Be From Existing Water and Utility Lines?
You'll need to place your root cellar at least 10 feet from utility lines and 50 feet from water sources. Don't forget to call utility companies first to verify underground infrastructure locations.
Can Multiple Families Share Maintenance Responsibilities for a Community Root Cellar?
Yes, you'll find shared maintenance works well when families coordinate tasks, rotate responsibilities, and establish clear schedules. You can split costs, share expertise, and build community bonds through collective root cellar care.
What Permits Are Typically Required for Building a Spring-Fed Root Cellar?
You'll need building permits, zoning compliance approval, geological surveys, and water rights permits. If you're adding electricity, you'll also require electrical permits. Check with your local authorities for specific requirements.
How Do Wildlife and Pests Interact With Spring-Fed Root Cellars?
You'll find pests and wildlife naturally drawn to your spring-fed cellar's moist environment and stored food. They'll seek shelter and sustenance there, requiring careful prevention through sealing entries and using natural deterrents.
What Backup Systems Are Recommended During Periods of Spring Water Shortage?
You'll need a backup cistern system, rainwater collection setup, and moisture-retaining materials. Install a misting system and consider alternative storage like clamps. Always maintain emergency water reserves for dry spells.
In Summary
By building a spring-fed root cellar, you'll harness nature's cooling power to preserve your harvest year-round without electricity. You've learned how to assess your site, capture spring water, and manage flow for ideal temperature control. Remember to monitor drainage, maintain the structure seasonally, and use appropriate materials. With proper planning and construction, your root cellar will provide sustainable food storage using the earth's natural resources.

Leave a Reply