You can make fresh, nutrient-rich raw cream butter at home in under an hour using just raw cream and basic kitchen tools. Start by bringing your raw cream to room temperature, then pour it into a stand mixer or food processor. Churn at medium speed for 10-30 minutes until the butter solids separate from the buttermilk. Strain the mixture, then wash your butter in cold water until it runs clear. Knead in salt if desired, and mold into your preferred shape. Store in an airtight container or butter crock. This simple process opens the door to creating endless variations of artisanal butter.
Why Make Raw Cream Butter

Raw butter making offers a wealth of health benefits that you won't find in store-bought alternatives. When you make raw butter at home, you'll preserve essential enzymes and nutrients that are typically destroyed during commercial processing.
You'll benefit from improved digestion and enhanced nutrient absorption, thanks to the butter's natural ability to support bile production. The raw butter you create will be rich in fat-soluble vitamins A, D, E, and K, supporting your brain function, bone health, and hormone balance. The unique properties of raw butter help lubricate your cells for optimal bodily function.
You'll also get immune-boosting compounds like lauric acid and alkaline phosphatase enzyme, which help protect your body's defense mechanisms. The short- and medium-chain fatty acids make it easier for your body to digest and utilize.
Your homemade raw butter will provide conjugated linoleic acid (CLA), which is linked to better heart health and reduced body fat. You'll also benefit from omega-3 fatty acids and natural antioxidants that protect immune cells.
Essential Tools and Ingredients
You'll need a few basic tools to make raw cream butter, including a quality mixer (like a Kitchen Aid or Bosch), straining equipment, and proper storage containers.
When it comes to ingredients, the quality of your raw cream is paramount – whether you're using heavy cream, skimmed cream from whole milk, or previously frozen cream. Cold water will be essential for rinsing the butter during preparation.
The cream's temperature and consistency will greatly impact your butter-making success, so aim to work with cold cream between 55°F and 65°F for best results.
Basic Equipment Needs First
Before diving into butter making, gathering up the right tools and ingredients will guarantee a smooth process.
You'll need either a stand mixer with a whisk attachment or a blender as your primary equipment. Cold or room temperature raw cream can be used, based on preference. If you prefer a manual method, a mason jar will work for shaking the cream by hand.
To manage the separation process, you'll want a large bowl, colander, and cheesecloth or nut milk bag to strain the buttermilk.
Keep ice-cold water ready for washing your butter, and have a tea towel handy to prevent splashing during mixing. A spatula or wooden spoon will help you work with the butter once it forms.
For storage, you'll need an airtight container or a butter keeper crock if you'd like to preserve your butter at room temperature.
If you're working with raw milk directly from a dairy cow, you might want to invest in a cream separator.
The main ingredient you'll need is heavy raw cream, and while salt is optional, it's recommended for both taste and preservation.
If you're making cultured butter, you'll also need mesophilic culture, though this isn't necessary when using raw cream.
Raw Cream Quality Matters
With your equipment ready, the foundation of great homemade butter lies in selecting high-quality raw cream. You'll want to source your cream from grass-fed cows, as it's richer in heart-healthy omega-3 fatty acids, CLA, and essential vitamins. Look for cream that's been flash-chilled, properly filtered, and tested for quality.
You'll find the cream naturally settling at the top of whole raw milk that hasn't been homogenized. If you're using raw milk cream, you won't need a starter culture since it contains all the necessary bacteria for natural culturing. You can let it sit at room temperature for 24-48 hours to develop a richer, more complex flavor.
Before churning, take your cream out of the refrigerator for a couple of hours – room temperature cream converts to butter more efficiently than cold cream.
Preparing Your Raw Cream
From fresh raw milk to homemade butter, the journey begins with properly preparing your cream. Start by carefully skimming the heavy cream off the top of your raw milk using a ladle, cup, or turkey baster.
You'll want to verify you're using fresh, high-quality cream, ideally from grass-fed cows for maximum nutritional value.
Once you've collected your cream, you'll need to bring it to room temperature. Take it out of the refrigerator about two hours before you plan to make butter. While you can use cold cream, room temperature cream churns much faster and more efficiently.
While your cream is warming up, prepare your equipment. You'll need either a stand mixer, food processor, or blender for churning. If you're using a stand mixer, don't forget to place a shield or towel over the bowl to prevent splashing.
For blenders, keep the cream below the "full" line. Store your skimmed cream in a clean container until you're ready to churn.
If you're planning to culture your cream, you'll need to let it sit at room temperature for 24-48 hours until it thickens and develops a slight sour aroma.
The Churning Process
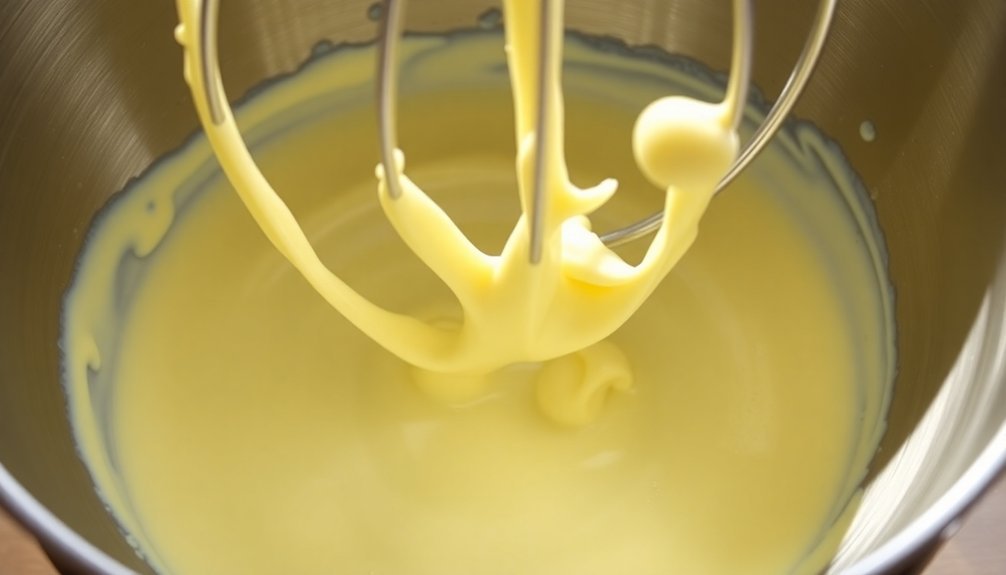
You'll see your raw cream transform through distinct stages as you churn, starting as liquid cream before becoming whipped and eventually breaking down into butter grains.
Your mixing speed needs to be consistent but not too aggressive, maintaining around 62-63 degrees Fahrenheit for ideal results.
Whether you're using a hand mixer, butter churn, or jar method, you'll know you're on track when small butter grains start forming and clumping together after about 10-15 minutes of churning.
From Liquid to Solid
Once you've properly prepared your cream at the ideal temperature of 62-63°F, the transformation from liquid to solid begins through the churning process.
You'll notice the cream initially fluffs up and expands, similar to making whipped cream. During this stage, maintain a consistent agitation whether you're using a hand-cranked churner, mixer, or sealed jar.
As you continue churning, you'll observe the mixture becoming increasingly thick, with air pockets forming throughout.
Don't be discouraged when the cranking or shaking becomes more challenging – this is a sign that butter is beginning to form. The process typically takes between 5 to 30 minutes, depending on your chosen method.
You'll know you're nearing completion when the mixture suddenly smooths out, followed by a clear separation of butter and buttermilk.
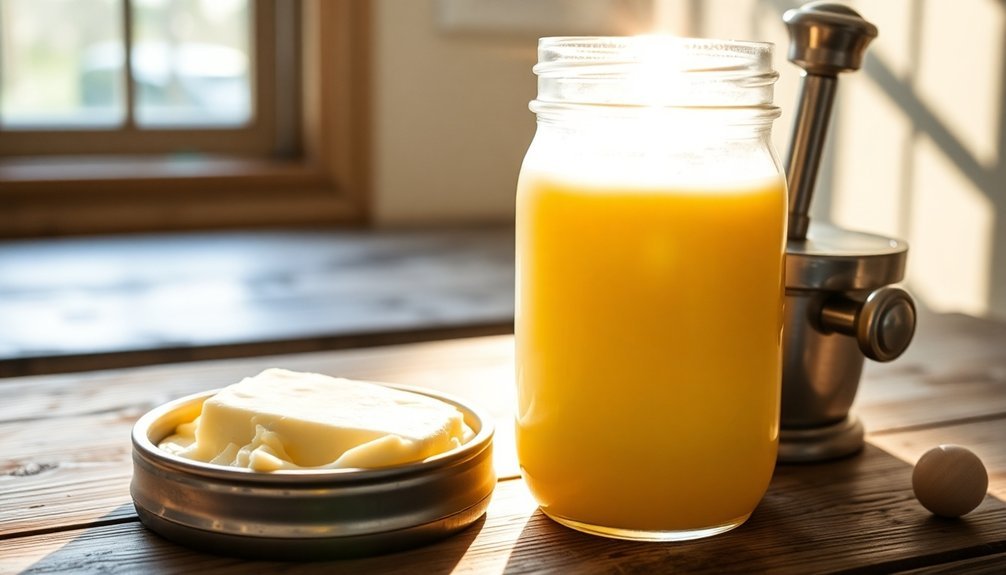
The butter will emerge as a solid mass, with its color varying seasonally – typically yellow in summer and white in winter.
Once you see this separation, stop churning immediately. The transformation is complete when you have distinct butter solids floating in the liquid buttermilk, ready for the final washing and shaping steps.
Breaking Down Butter Stages
Starting with properly concentrated cream at 75% fat content, the butter-making process unfolds through distinct and predictable stages. You'll watch your cream transform through a series of physical changes as you churn, each indicating progress toward finished butter.
| Stage | What You'll Observe |
|---|---|
| Initial Whipping | Cream expands and becomes light and fluffy |
| Peak Formation | Stiff peaks form, similar to whipped cream |
| Breaking Point | Mixture suddenly collapses and becomes grainy |
| Separation | Buttermilk releases as butter grains form |
| Final Formation | Butter solids collect into a cohesive mass |
During churning, you'll need to maintain consistent agitation at medium-high speed. The process typically takes 10-30 minutes, depending on your churning method. You'll notice the cream's temperature increasing as the fat crystallizes and phase inversion occurs. Once the butter forms distinct grains, drain the buttermilk through a cheesecloth. Rinse the butter with cold water to remove any remaining buttermilk, then press it into your desired shape. If you'd like, you can add salt before the final shaping.
Perfecting Your Mixing Speed
For successful butter-making, maintaining the right churning speed and temperature is critical. You'll want to keep your cream between 62-63 degrees Fahrenheit for ideal results, avoiding temperatures outside the 55-65 degree range.
Don't microwave the cream to warm it; instead, let it naturally reach room temperature on your counter.
When you're ready to churn, maintain a steady, consistent pace throughout the process. If you're using a manual churner, crank the handle at an even rate. For stand mixers, use the whisk attachment on high speed until the solids form.
You'll notice the cream progressing through distinct stages – first becoming fluffy like whipped cream, then developing air pockets as the churning becomes more challenging.
Keep your vessel half full to allow proper agitation, and don't make sudden changes in churning speed. You'll know you're on the right track when the process smooths out again and butter solids begin separating from the buttermilk.
Continue your steady pace until all the butter has formed into one solid mass. Stop churning once you see this clear separation between the butter and buttermilk.
Washing and Molding Methods
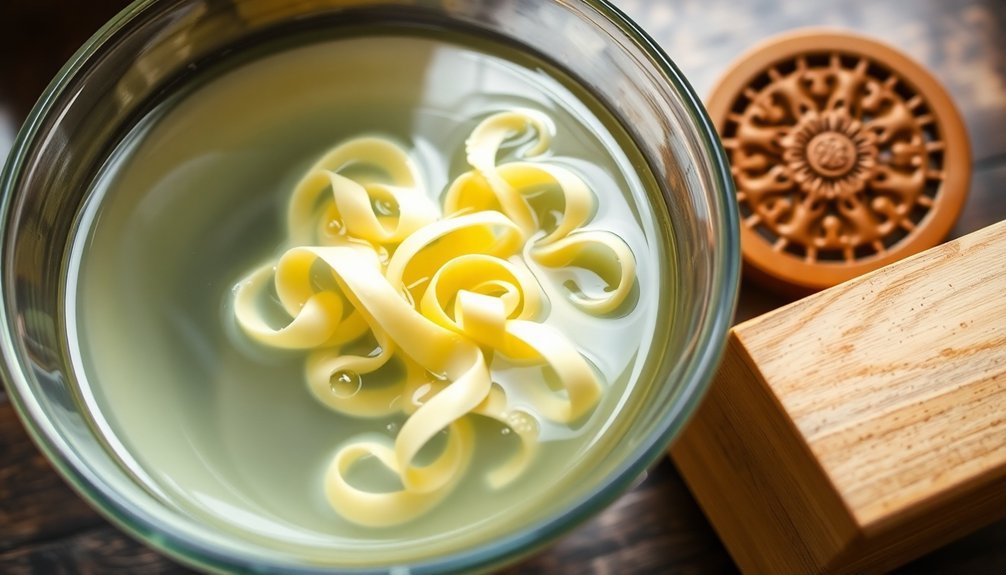
The essential washing and molding process transforms freshly churned butter into a clean, well-preserved product. You'll need to wash your butter thoroughly in cold water, pressing and folding it with a wooden utensil to remove all traces of buttermilk. Continue this process three to four times until the water runs clear.
Place your butter in a metal sieve and rinse it under cold running water, gently pressing to release any remaining buttermilk. This vital step prevents your butter from spoiling quickly.
Once you've removed all the liquid, you can add salt or seasonings by kneading them into the butter.
For molding, you'll want to chill your molds in ice water first. Press the softened butter firmly into the mold, making sure it fills all the details.
After about 10 minutes in the refrigerator, you can pop out your perfectly shaped butter. If you're using butter paddles, gather the butter into a ball and squeeze out any remaining liquid before shaping.
Finally, wrap your finished butter tightly in plastic wrap or parchment paper for storage.
Storage and Flavor Options
Proper storage dramatically impacts your raw butter's longevity and taste. When storing raw butter at room temperature, you'll get about a week of freshness if it's made from raw cream and kept in a covered butter dish.
For longer preservation, refrigerate your butter in an airtight glass container, which extends its life to several months. If you're planning for the long term, freezing is your best option, offering over a year of storage without quality loss.
You can enhance your butter's flavor profile through various methods. If you're using raw cream, you'll notice a unique, tart taste that's best appreciated at room temperature.
Consider culturing your butter for a richer, deeper flavor and added probiotic benefits. Adding salt not only enhances taste but also acts as a natural preservative, extending shelf life considerably.
For ideal storage, use a ceramic butter bell with cold water or stainless steel containers with tight-fitting lids.
Monitor your butter regularly for signs of spoilage, and keep it away from direct sunlight and heat sources. You'll know it's time to discard when you detect off-odors or spot any mold growth.
Frequently Asked Questions
How Long Does Homemade Raw Butter Last Before Going Bad?
Your homemade raw butter will last up to 3 months in the fridge if properly rinsed and wrapped. If you've added salt, it'll keep longer, but unsalted versions may only last a few weeks.
Can I Use Raw Cream That's Slightly Sour?
Yes, you can use slightly sour raw cream. It'll actually give your butter a tangy, cultured flavor that many people enjoy. Just guarantee you rinse the butter thoroughly after churning to maintain quality and shelf life.
Why Does My Butter Turn White Instead of Yellow?
Your butter's turning white likely because you're using cream from grain-fed cows or heavily processed cream. For yellow butter, you'll need cream from grass-fed cows, which contains more vitamin K and nutrients.
What Causes Butter to Become Too Soft While Churning?
Your butter's getting too soft while churning because you're working at temperatures that are too high or you're over-churning. This causes excessive breakdown of fat globules and disrupts the proper fat crystallization process.
Can I Freeze Homemade Raw Butter?
Yes, you can freeze your homemade raw butter for up to 6 months. Just wrap it tightly in freezer-safe packaging to prevent freezer burn, and store it away from strong-smelling foods.
In Summary
You'll find making raw cream butter at home incredibly rewarding and surprisingly simple. Now that you've learned the basics of cream preparation, churning, washing, and storage, you're ready to start your butter-making journey. Whether you choose to add herbs, honey, or keep it pure, your homemade butter will taste fresher and more flavorful than store-bought versions. Give it a try and enjoy the satisfying results of your efforts.


Leave a Reply