For successful salt-curing fish at home, you'll need to maintain strict temperature control throughout the process. Keep your brining environment between 34-35°F (1-2°C), never exceeding 38°F (3°C). Before curing, store cleaned and filleted fish in your refrigerator's coldest section, and prepare your brine solution at no more than 60°F (15.5°C). Use digital thermometers to monitor temperatures daily, and store your cured fish at 32-39°F in airtight containers. Position your setup away from heat sources and direct sunlight, and minimize fridge door openings. Mastering these temperature basics will set the foundation for your fish-curing journey.
Essential Pre-Curing Temperature Guidelines
Before beginning the salt-curing process, maintaining precise temperature control is crucial for food safety and quality. You'll need to verify your brining environment stays between 1 to 2°C (34 to 35°F), and never exceeds 10°C. This temperature range discourages bacterial growth while allowing for consistent salt absorption throughout the fish.
If you're using the dry salting method, keep your workspace temperature at or below 3°C. The type of fish you're working with will affect your temperature control needs. Fatty fish require more attention as they're harder to cure and don't keep as long, while firm-textured fish absorb salt more slowly than soft-textured varieties. Using a meat thermometer probe to monitor internal temperatures will help ensure food safety, just as you would when cooking fish to 145°F.
You'll need to stir your brine regularly to prevent salt from settling at the bottom of your container, and change it at least once daily. If you're dry salting, pay special attention to the edges of your fish pile and verify you're sprinkling fine salt over the napes.
Remember that previously frozen fish may absorb salt differently than fresh fish, so you'll need to adjust your process accordingly. Keep monitoring temperatures consistently throughout the pre-curing stage for best results.
Optimal Cold Storage Before Salting
Before you begin the salt-curing process, you'll need to store your fish at temperatures between 34°F and 38°F (1°C to 3°C) in a well-ventilated cold room or refrigerator.
You can maintain ideal freshness by placing the cleaned and dressed fish in a brine solution, using a ratio of ¼ cup salt to 1 quart cold water for lean fish. If using fatty fish, prepare a solution with 2 tablespoons ascorbic acid per quart of cold water instead.
For proper cold storage setup, verify your fish aren't packed too tightly together and monitor them regularly for any signs of spoilage while keeping them submerged in the brine with a weight.
Pre-Freezing Fish Requirements
Proper pre-freezing preparation is critical to successful salt-curing. If you can't begin the salting process immediately, you'll need to freeze your fish at 0°F or below to maintain its quality. Before freezing, verify you've cleaned the fish thoroughly and removed all scales, innards, and unwanted parts. The quality of your salt-cured fish will depend greatly on using coarse sea salt for the curing process.
| Step | Action | Purpose |
|---|---|---|
| 1 | Pat fish dry with paper towels | Prevents ice crystals from forming |
| 2 | Package in vapor-proof material | Maintains freshness and prevents freezer burn |
| 3 | Insert wax paper between portions | Keeps pieces from sticking together |
You'll want to portion your fish into meal-sized packages before freezing – this makes it more convenient when you're ready to start the curing process. Remember to maintain a consistent thickness in your fillets, as this will guarantee even curing later. If you've caught the fish yourself, it's important to chill it immediately using ice (one pound of ice per two pounds of fish) before moving it to the freezer. When you're packaging the fish, remove as much air as possible from the container or wrapping to prevent freezer burn. Store your packaged fish at 0°F or below until you're ready to begin the salt-curing process.
Initial Temperature Control Steps
Temperature control stands as the foundation of successful fish curing, starting with precise cold storage between 34°F and 38°F (1°C to 3°C).
You'll need to store your cleaned and filleted fish in the coldest part of your refrigerator, using a nonmetal container to maintain even temperature distribution. If you're short on fridge space, you can use ice or chilled water to achieve the ideal temperature range.
Before you begin the cooling process, verify you've properly prepared your fish. You should rinse it thoroughly under cold water, remove scales working from tail to head, and clean out the cavity.
After filleting, pat the fish dry with paper towels to promote effective salt absorption later. Remember to remove any remaining bones with tweezers for uniform curing.
Monitor your fish's temperature regularly to prevent fluctuations that could compromise food safety. You'll want to check periodically for any signs of spoilage, even during cold storage.
Keep in mind that skinless fillets will cure faster than skin-on portions, as they allow the cure to penetrate from both sides. This initial temperature control phase is vital for achieving consistent and predictable curing results.
Cold Room Setup Guidelines
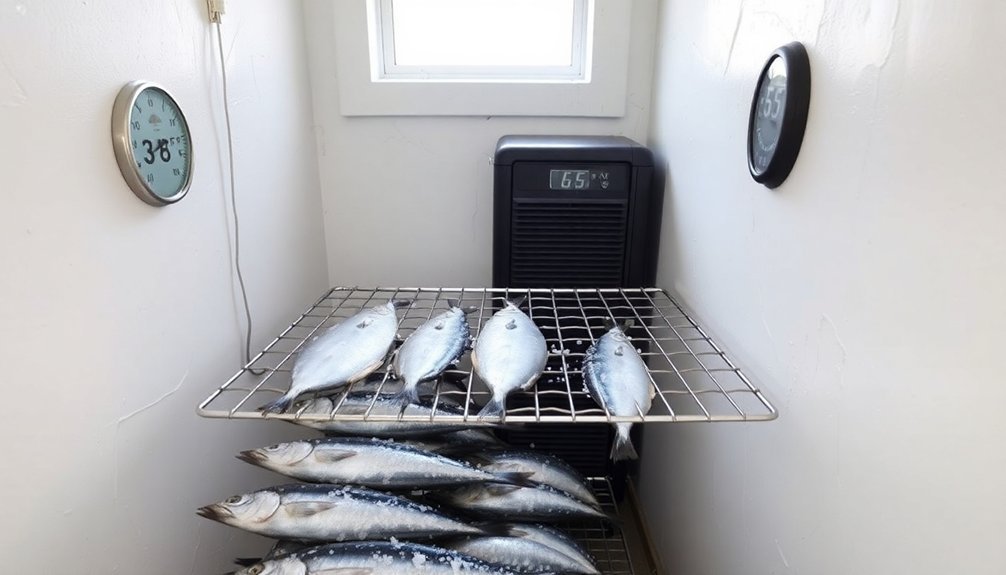
A successful cold room setup requires precise environmental controls beyond standard refrigeration. You'll need to maintain temperatures between -5°C and -12°C for temporary storage before beginning your salt-curing process. Standard home refrigerators won't provide the consistent temperatures required, so consider investing in a professional cold storage unit.
Ensure your cold room has continuous airflow to maintain stable temperatures throughout the space. Don't overpack the storage area, as proper air circulation is essential for temperature consistency.
Install stainless steel panels and blue hydrophilic aluminum foil fins to protect against corrosion from the fish's salt content. You'll want to set up a separate storage area specifically for fish to prevent cross-contamination.
Use ice slush mixtures (2:1 ice-to-water ratio) during transport and initial storage. Place thermometers at different points in your cold room to monitor temperature variations, and check them regularly.
Keep your storage area dark and cool, using airtight containers with desiccants for any room-temperature items. Clean all surfaces thoroughly before use, and maintain strict cleanliness protocols to prevent bacterial growth.
Remember to avoid temperature fluctuations by keeping fish away from warm areas.
Temperature Control During Brine Preparation
Successfully controlling brine temperature is critical for salt-curing fish, with the ideal range not exceeding 60°F (15.5°C).
You'll need to adjust your salometer readings when working with temperatures below 60°F by subtracting one degree for every 10°F decrease. This correction guarantees you're maintaining the proper brine strength throughout the curing process.
If you're planning to brine for more than 4 hours, you must keep the solution refrigerated at 38°F or use ice packs.
Don't add loose ice directly to your brine, as it'll dilute the solution. Instead, use reusable ice packs to maintain the desired temperature without affecting the brine's concentration.
You'll need to stir your brine regularly to prevent uneven salt distribution and check its strength with a salometer frequently.
When measuring brine strength at lower temperatures, remember to apply the necessary corrections. For example, if you measure 80°SAL at 40°F, your actual reading should be 78°SAL.
Keep your brine solution consistent by changing it daily and monitoring both temperature and strength to guarantee proper salt penetration and prevent bacterial growth.
Managing The Curing Environment
You'll need to set up a well-ventilated room with proper air circulation to maintain consistent temperatures throughout the curing process.
Your essential equipment should include a reliable temperature control system, such as a thermostat-controlled fan or cooling unit, to keep the environment stable.
Installing digital thermometers at different points in your curing space will help you monitor temperature variations and make quick adjustments when needed.
Room Setup and Ventilation
Maintaining proper control over your curing environment stands at the heart of successful fish preservation. You'll need to select a location with abundant direct sunlight and fresh air, though you should provide partial shade during the first day to prevent sunburn on your fish.
Set up your curing station on a flat surface or wooden grate, guaranteeing minimal contact between the fish and wood. Proper ventilation is vital for moisture control and preventing bacterial growth. You'll want to maintain consistent air circulation around your curing area while monitoring humidity levels closely.
Keep the space clean and free from contaminants, and regularly check for any signs of spoilage, such as rust, mold, or reddening. When storing your cured fish, confirm there's adequate air space above them in containers.
You'll need to maintain the right salt concentration in your brine solution and keep the fish fully submerged throughout the process. If humidity becomes an issue, you can use moistened cloth to help lower temperature and reduce moisture levels.
Remember to position your setup in a way that promotes continuous airflow, which helps evaporate excess moisture and creates an environment inhospitable to bacteria.
Temperature Control Equipment Needed
Three essential pieces of equipment form the foundation of temperature control in fish curing: climate-controlled chambers, refrigeration systems, and automated controllers.
You'll need specialized equipment like Pesciugatore® chambers that maintain precise temperature and humidity levels while monitoring pH. These chambers can transform raw fish into cured products in just 7 days, complete with integrated steam and cold smoke generators.
Your refrigeration system must keep temperatures consistently below 70°F to prevent bacterial growth. When hot smoking, maintain temperatures between 120°F and 180°F, while cold smoking requires temperatures below 85°F.
Install automated controllers like the SFC® to create custom programs and use HACCP data loggers to track conditions every 4 hours.
- Climate-controlled chambers feature sensors for real-time monitoring of temperature, humidity, and pH
- Refrigerated containers with proper insulation maintain stable temperatures for consistent curing
- Heating and cooling elements distribute temperature evenly throughout the curing space
- Automated systems alert you to any deviations from ideal conditions and store historical data
For effective temperature control, verify your heating and cooling elements are evenly distributed and properly maintained to support uniform conditions throughout the curing process.
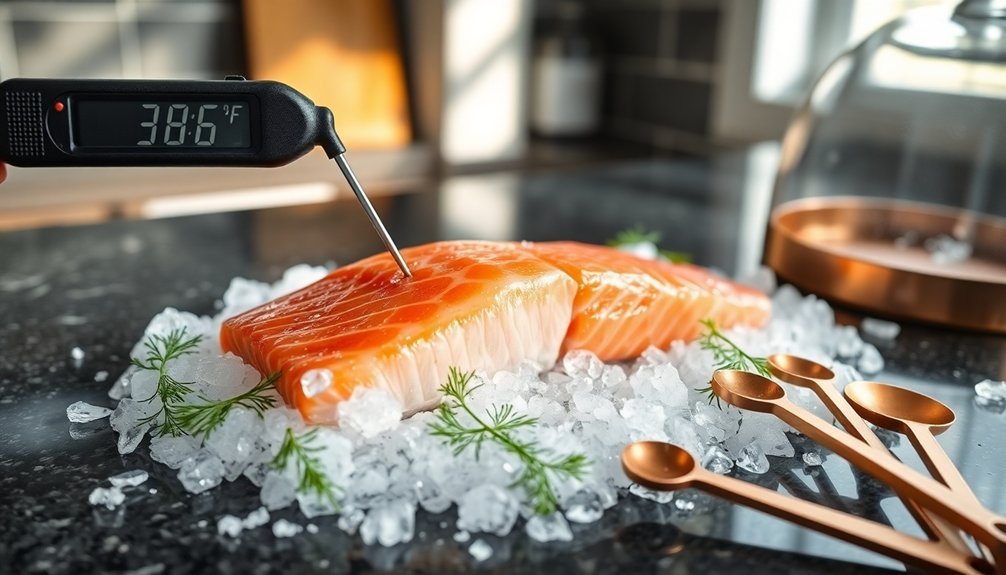
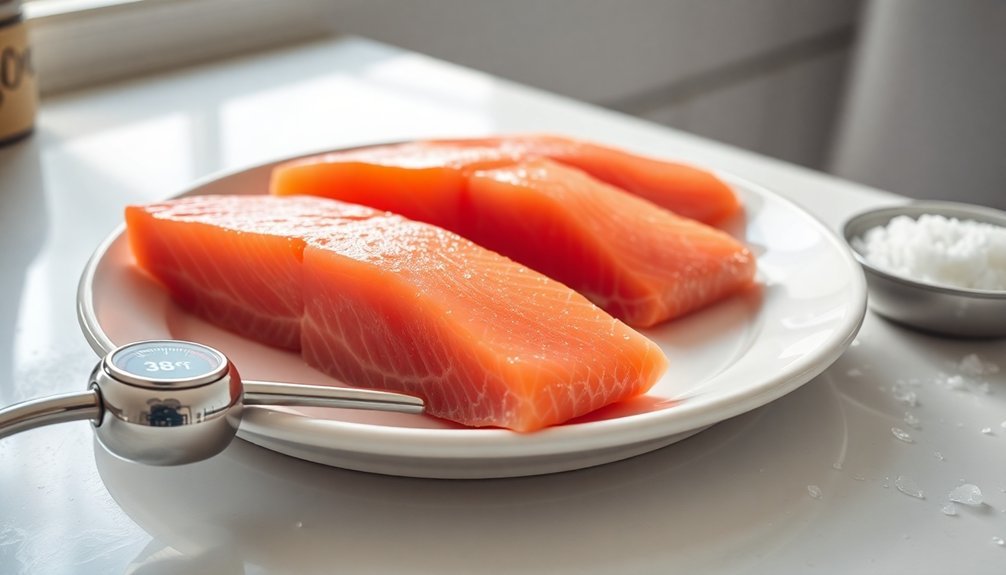
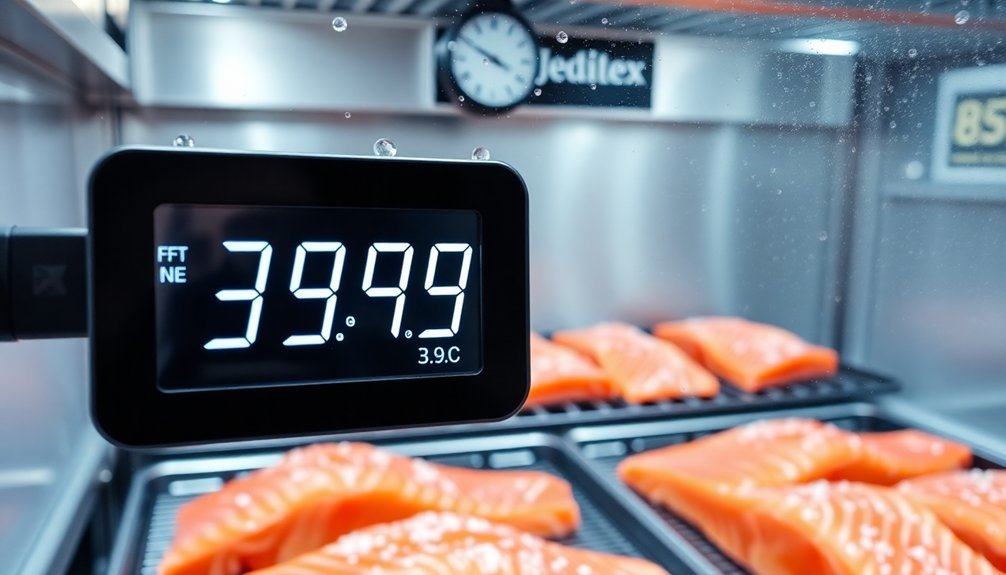
Monitoring With Digital Thermometers
Beyond automated systems, precise digital thermometers serve as your front-line defense in temperature monitoring.
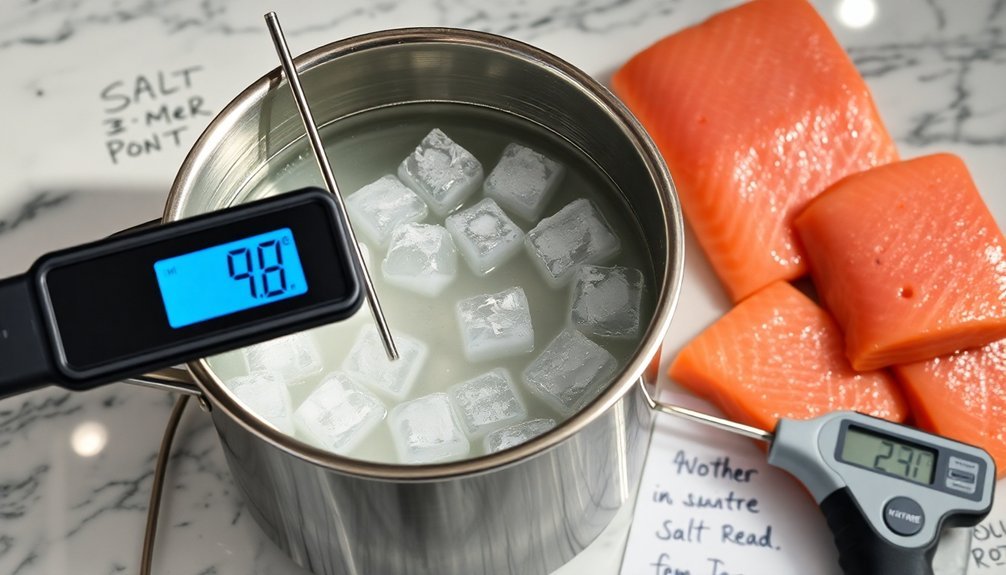
You'll want to select a hand-held digital thermometer with a probe-type sensor that can read within 0.5°C of the true temperature. For versatility, consider an IPX7-rated submersible model like the Lifegard LED or Fishpond Riverkeeper, which work well for both water and air measurements.
You'll need to calibrate your thermometer daily using an ice water bath to guarantee accuracy. This simple method is just as effective as traditional mercury-based calibration and much safer. Keep detailed records of your calibration checks and temperature readings throughout the curing process.
When taking measurements, insert the probe deep into the fish's flesh, reaching to or past the backbone. It's essential to measure the thermal center, which isn't always at the thickest part. Work quickly to avoid warming the fish through excessive handling.
Remember that temperature control is critical for your fish's shelf life – cod, for instance, stays edible for 15 days at 0°C but only six days at 5°C. Incorrect readings can lead to errors exceeding 20°C, so proper technique is paramount.
Cold Room Setup For Success
A successful cold room setup is the cornerstone of perfect salt-cured fish. You'll want to maintain temperatures between 34 to 38 degrees Fahrenheit, creating an environment that promotes even curing without slowing the process too much.
If you don't have a dedicated cold room, convert a section of your basement or garage into a temperature-controlled space using refrigeration units or cooling systems.
Position your curing station away from windows and heat sources to prevent temperature fluctuations. You'll need a cool, dry space where you can consistently monitor and adjust conditions as needed.
Remember, direct sunlight is your enemy in this process, as it can create unwanted temperature variations and potentially compromise your fish.
- Storage shelves positioned away from walls to allow air circulation
- Non-reactive containers placed on sturdy, level surfaces
- Digital thermometer mounted at eye level for easy monitoring
- Adequate space between containers to maintain consistent airflow
Make sure your cold room has proper ventilation while maintaining temperature stability.
If you're using a refrigerator, keep it dedicated to curing to avoid frequent door openings that could disrupt the temperature balance.
Temperature Monitoring Tools And Methods
For successful salt-curing, you'll need reliable temperature monitoring tools and methods to maintain precise control throughout the process. The most effective tool for home curing is a handheld digital thermometer with a probe that you can insert at least 75-100mm into the fish's thermal center, near the backbone.
| Tool Type | Best For | Key Consideration |
|---|---|---|
| Digital Probe | Daily Use | Insert 2.5cm past backbone |
| Thermocouple | Freezing Time | Choose appropriate wire thickness |
| Dial Thermometer | Backup Option | Regular ice-water calibration |
To get accurate readings, you'll need to position your thermometer correctly. When measuring whole fish, insert the probe towards the backbone, sliding it 2.5cm past it. For fillets, press two pieces together with the sensor between them. Don't forget to calibrate your thermometer daily using ice water or boiling water to verify accuracy.
For continuous monitoring, you might want to invest in a digital system that can alert you via smartphone when temperatures exceed your set limits. This'll help you maintain consistent conditions and comply with food safety standards, especially during longer curing periods.
Long-Term Storage Temperature Requirements
Once you've mastered temperature monitoring during the curing process, proper storage becomes your next priority. For long-term preservation, you'll need to maintain specific temperature ranges based on your chosen storage method.
In your refrigerator, keep salt-cured fish between 32°F and 39°F, ensuring it's tightly wrapped in wax paper or plastic wrap for up to two weeks of storage.
If you're planning for extended storage, your freezer offers the best solution. Vacuum-seal your cured fish and store it at 0°F or below for up to six months. When you're ready to use it, transfer the frozen fish to your refrigerator and allow 24 hours for proper thawing.
For room temperature storage, you'll need thoroughly dried fish kept in airtight containers below 50°F in a cool, dark place.
- Store vacuum-sealed portions in your freezer's coldest section
- Place refrigerated fish in the back of your fridge where it's consistently cold
- Keep room-temperature storage containers away from heat sources and direct sunlight
- Monitor storage temperatures daily using reliable thermometers
Consider complementary methods like smoking or additional drying if you're aiming for even longer preservation periods.
Frequently Asked Questions
Can I Use an Outdoor Shed for Salt-Curing Fish in Winter?
Yes, you can use a winter shed for salt-curing fish. You'll need to monitor temperatures between 32-39°F, guarantee good ventilation, and protect your fish from temperature swings using an insulated container.
Does Using Ice During Brining Affect the Final Salt Concentration?
No, adding ice won't change your brine's salt concentration. The ice will simply dilute as it melts, but since it's just frozen water, it maintains the same ratio of salt to liquid throughout the process.
How Do Power Outages Impact Partially Cured Fish?
Power outages can disrupt your fish's curing process by raising temperatures above safe levels. You'll need to monitor closely and use ice to maintain temperatures below 40°F, or you'll risk bacterial growth and spoilage.
Should Different Fish Species Be Cured at Different Temperatures?
While you'll cure most fish below 40°F, you should keep fatty fish like salmon slightly cooler than lean fish to prevent oil rancidity. However, the temperature difference is minimal and refrigerator settings work well.
Can UV Light Exposure Affect Temperature Control During Outdoor Drying?
No, UV light won't affect your temperature control during outdoor drying. You'll still need to manage temperature separately through proper cooling methods, as UV light only helps with sterilization, not temperature regulation.
In Summary
You'll find that maintaining precise temperature control throughout the salt-curing process makes all the difference in your final product. Keep your fish between 35-38°F during curing, and don't let your brine solution exceed 40°F. By monitoring these essential temperature points and using reliable thermometers, you're ensuring both food safety and ideal flavor development in your home-cured fish.


Leave a Reply