
You'll discover seven time-tested Norwegian methods for preparing perfect stockfish. Start with the classic cold-water soaking method, requiring 6-7 days with twice-daily water changes. Try salt-curing for a quicker 1-2 day preparation, or embrace the traditional Lofoten boiling technique with Nordic vegetables. Experiment with open-fire cooking over juniper wood for authentic smoky flavors, or grill with Nordic herbs at medium heat. The Arctic seasoning blend adds depth with capers, olives, and crispy bacon, while the wooden rack drying process concentrates flavors. These centuries-old techniques hold the secrets to transforming dried cod into tender, flavorful dishes.
Classic Water Soaking Method
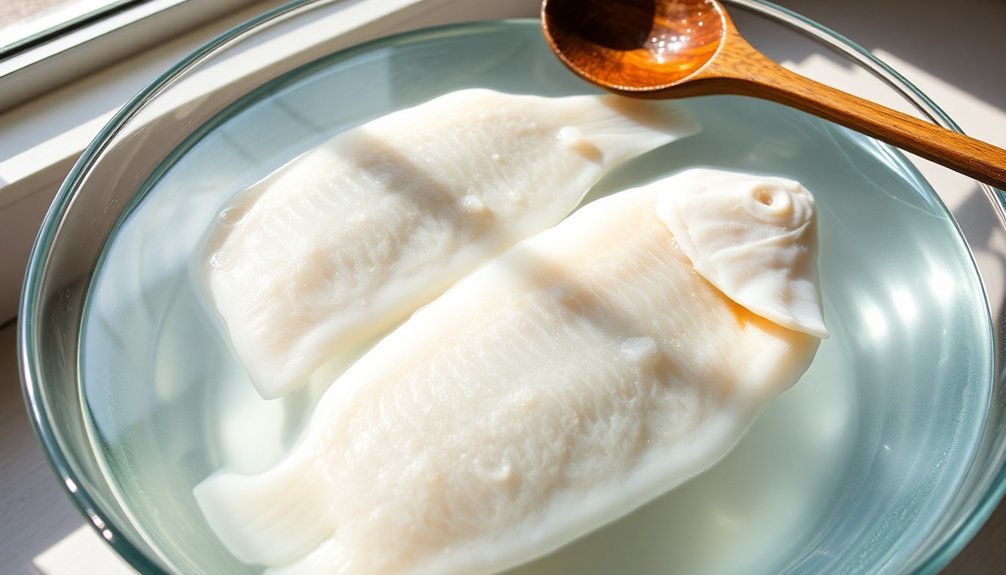
The classic water soaking method consistently remains the most reliable way to prepare traditional Norwegian stockfish.
You'll need to plan ahead, as proper rehydration takes between 6 to 7 days of careful attention. Start by placing your stockfish in cold water, which is essential for preventing bacterial growth during the lengthy soaking process. The process transforms the fish from its highly concentrated protein state back to a more familiar texture.
You'll want to change the water twice daily, or if possible, use a setup with continuously running cold water. After about two days of soaking, you can remove the skin and bones, making the subsequent preparation easier.
While some people pound the fish to reduce soaking time, it's not a common practice in traditional Norwegian preparation.
Once your fish is fully rehydrated, you'll notice it's become tender and has regained much of its original texture. At this point, you can fillet it or cut it into cutlets for cooking.
Remember that rehydrated stockfish doesn't keep long, so you'll need to either cook it immediately or freeze it for later use. If you're planning to cook it right away, store it in a cool place until you're ready to prepare your meal.
Salt-Cured Stockfish Preparation
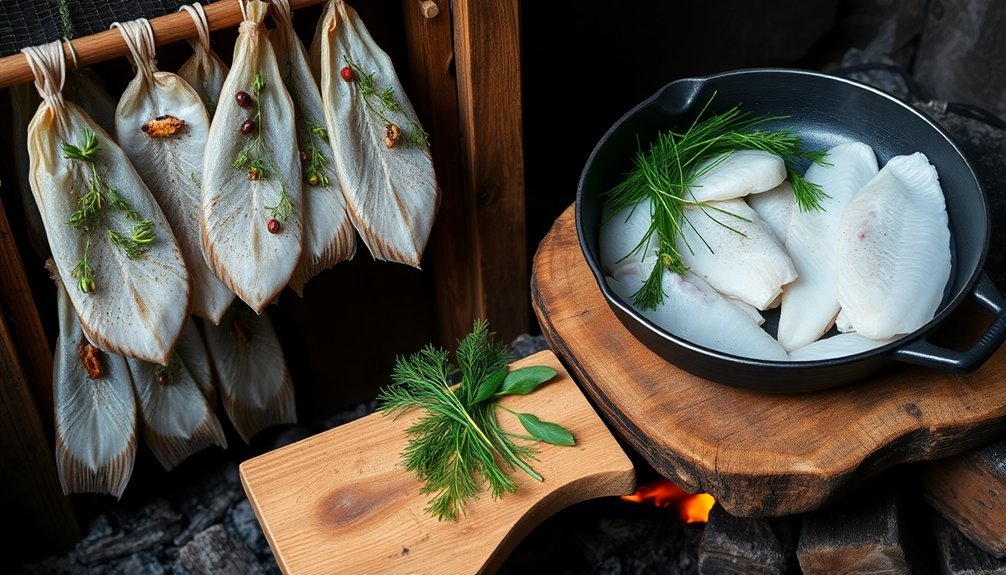
According to traditional Norwegian methods, salt-cured stockfish requires a distinct preparation process compared to regular stockfish. You'll need to start by soaking the fish in cold water for 1-2 days, changing the water several times to remove excess salt and properly rehydrate the meat. Since the Viking Age tradition, stockfish has been a cornerstone of Norwegian food preservation and cuisine. If you're aiming for an exceptionally tender texture, you can extend the soaking time up to a week.
After two days of soaking, you can remove the skin and bones, then tear the fish into bite-sized pieces. For cooking, you'll want to use gentle methods to prevent the fish from becoming tough. You can poach it in lightly salted water for 10 minutes or simmer it slowly in a stew.
| Step | Process | Duration |
|---|---|---|
| 1 | Cold water soak | 1-2 days |
| 2 | Water changes | Multiple times daily |
| 3 | Skin/bone removal | After 2 days |
| 4 | Size preparation | Bite-sized pieces |
| 5 | Cooking | 10 min poach/gentle simmer |
To enhance the dish, you can pair your prepared stockfish with hearty ingredients like tomatoes, garlic, and olives. Traditional Norwegian recipes often incorporate the fish into stews with vegetables like fennel, carrot, and celeriac.
Grilling With Nordic Herbs
When you're grilling stockfish, keeping your grill at a steady medium temperature (around 350-375°F) helps achieve the perfect flaky texture without burning.
You'll want to enhance your grilled stockfish with a Nordic herb butter, which you can make by combining softened butter with finely chopped dill, parsley, and chives, along with a pinch of cardamom. Consider serving the dish with tender root vegetables that have been boiled in lightly salted water until perfectly cooked.
The herb butter should be spread on the stockfish during the last minute of grilling, allowing it to melt and infuse the fish with traditional Nordic flavors.
Nordic Herb Butter Recipe
Nordic cuisine's signature herb butter elevates grilled dishes with its aromatic blend of fresh herbs and rich, creamy texture. You'll need 250g of softened butter combined with finely chopped parsley, dill, chives, and mint. Add minced garlic and fresh lemon zest to enhance the flavors, then season with salt and white pepper to taste.
| Herb Combinations | Best Pairings |
|---|---|
| Dill & Parsley | Grilled Fish |
| Chives & Mint | Chicken |
| Lovage & Sage | Beef |
| Basil & Chives | Vegetables |
| Rosemary & Thyme | Pork |
To prepare, let your butter soften at room temperature, then mix it thoroughly with your chosen herbs and seasonings. Shape the mixture into a log using parchment paper or plastic wrap, and refrigerate for at least an hour until firm. You can store your herb butter in the freezer for up to 6 months, making it an excellent way to preserve summer herbs. Whether you're grilling meats, fish, or vegetables, simply slice the butter and let it melt over your hot dishes for an instant burst of Nordic flavor.
Grilling Temperature Guide
Mastering the right grilling temperatures transforms your stockfish into a perfectly charred delicacy, especially when paired with Nordic herbs.
You'll want to preheat your grill to medium-high heat, reaching 375-400°F (190-200°C) for best results. Before placing your stockfish on the grill, make sure you've properly rehydrated it overnight and patted it dry to achieve that coveted sear rather than steam.
- Brush your stockfish with a mixture of olive oil and Nordic herbs (dill, parsley, and juniper berries) before it hits the grill.
- Place the seasoned fish on a lightly oiled grate and grill for 4-5 minutes per side.
- Monitor the temperature closely to prevent overcooking while achieving light char marks.
For the best herb-infused flavor, you'll want to create a paste using your chosen Nordic herbs mixed with oil and minced garlic. You can apply this both before and after grilling.
Don't forget to keep your grill lid closed between flips to maintain consistent temperature. If you're using a grill pan indoors, these same temperature guidelines apply – just make sure proper ventilation.
Remember to serve your grilled stockfish immediately with fresh lemon wedges to enhance its natural flavors.
Traditional Lofoten Boiling Technique
To enhance the dish's flavor profile, you'll want to incorporate classic Nordic vegetables like fennel, carrot, and celeriac.
These vegetables complement the rich, concentrated flavor of the stockfish that develops during its months-long drying process.
For the final touch, garnish your dish with fresh parsley and crispy bacon bits, adding both color and texture to this traditional Norwegian preparation.
[DIRECTIONS]:
Open Fire Cooking Style
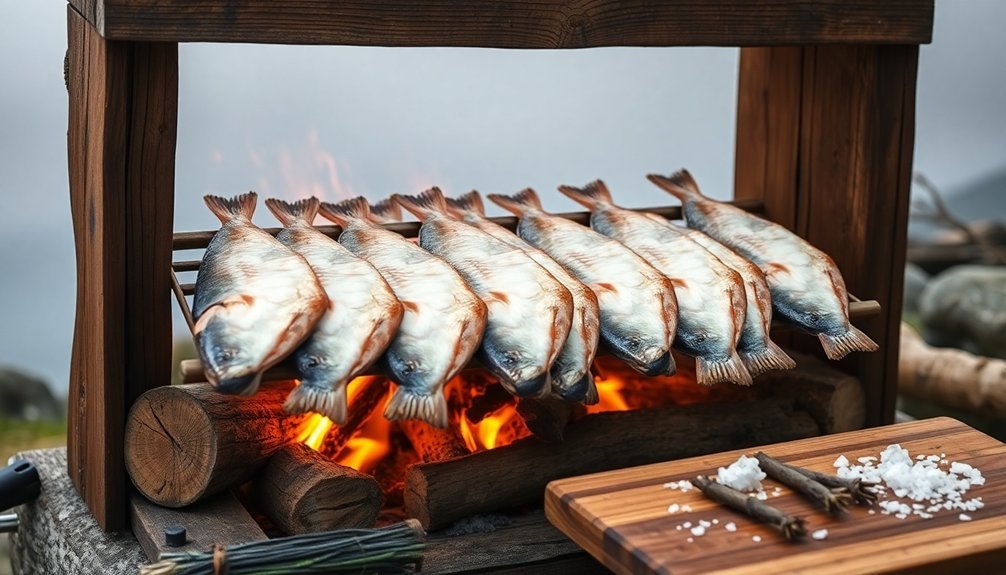
When you're setting up your traditional Norwegian fire pit for stockfish, you'll need to arrange dry, seasoned wood in a well-ventilated area away from flammable materials.
You can achieve the characteristic charred exterior by positioning your pre-soaked stockfish pieces on a sturdy cooking grate about 6-8 inches above the flames.
Be sure to maintain a moderate flame and turn the fish regularly to create an even char without burning, letting the smoke infuse the flesh while cooking for about 10-15 minutes per side.
Traditional Fire Pit Setup
The craft of building a traditional Norwegian fire pit begins with a precise log foundation. You'll need to position two substantial logs parallel to each other, keeping them 20-30 centimeters apart. This creates the vital base for your stockfish cooking setup.
Cross these base logs with two additional logs to form a small chamber in the center, which will house your kindling materials.
For ideal results when preparing stockfish, you'll want to follow these important steps:
- Create a pyramid of dry kindling in the center chamber using birch bark or small twigs.
- Add wood chips around the kindling to guarantee the fire spreads evenly.
- Build additional log layers while maintaining proper airflow through the structure.
Position your cooking rack or tripod over the established fire pit, making sure it's stable enough to support your stockfish.
You'll want to cook at the pit's edge where the embers provide consistent heat rather than direct flames. If you're cooking in snowy conditions, remember to create a chute leading to the fire pit to maintain proper airflow.
Keep extra dry wood nearby to sustain the fire's intensity throughout the cooking process.
Charred Stockfish Over Flames
Building on your established fire pit, preparing charred stockfish brings an authentic Norwegian flavor to outdoor cooking. After properly rehydrating your stockfish for 6-7 days, you'll want to prepare it for the flames by cutting it into manageable pieces. Create a bed of burning leeks directly on your fire to infuse an additional layer of smoky flavor.
Use two skewers to secure your stockfish pieces, which helps you achieve an even char across the surface. If you're using juniper wood or branches, add them to your fire now for that distinctive Nordic taste. You'll notice the fish developing a beautiful charred exterior as you grill it over the open flames.
| Step | Action | Time | Temperature | Notes |
|---|---|---|---|---|
| 1 | Rehydrate | 6-7 days | Cold water | Change water 2x daily |
| 2 | Cut/Fillet | 30 min | Room temp | Remove bones after 2 days soaking |
| 3 | Prepare Fire | 20 min | High heat | Add juniper wood |
| 4 | Burn Leeks | 5-10 min | Direct flame | Create smoking bed |
| 5 | Char Fish | 8-12 min | Medium-high | Turn frequently |
Enhance your charred stockfish with a butter-based sauce and seasonal vegetables. Consider adding traditional accompaniments like fennel, carrot, and celeriac, steamed or boiled to complement the smoky flavors of your perfectly charred fish.
Arctic Seasoning Blend
Nordic culinary traditions combine simple yet powerful seasonings to create the distinctive Arctic seasoning blend for stockfish.
You'll find that this blend balances the naturally salty flavor of stockfish while enhancing its robust character. The key is to layer your seasonings thoughtfully, starting with a base of sautéed onions and garlic for a rich foundation.
- Start with the aromatic vegetables: sauté diced onions, celery, and carrots until they're tender and fragrant, then add minced garlic for depth.
- Include your core seasonings: sprinkle black pepper generously, add fresh parsley and chives, and consider incorporating fennel for an authentic Nordic touch.
- Balance the flavors: mix in capers and olives for tanginess, add raisins to counter the salt, and finish with crispy bacon bits on top.
For a creamy variation, you'll want to incorporate dairy elements like heavy cream or brown butter, which help mellow the intense flavors.
When you're working with tomato-based preparations, combine tomato pulp with your seasoning blend to create a rich sauce that complements the stockfish's texture while maintaining its traditional taste profile.
Wooden Rack Drying Process
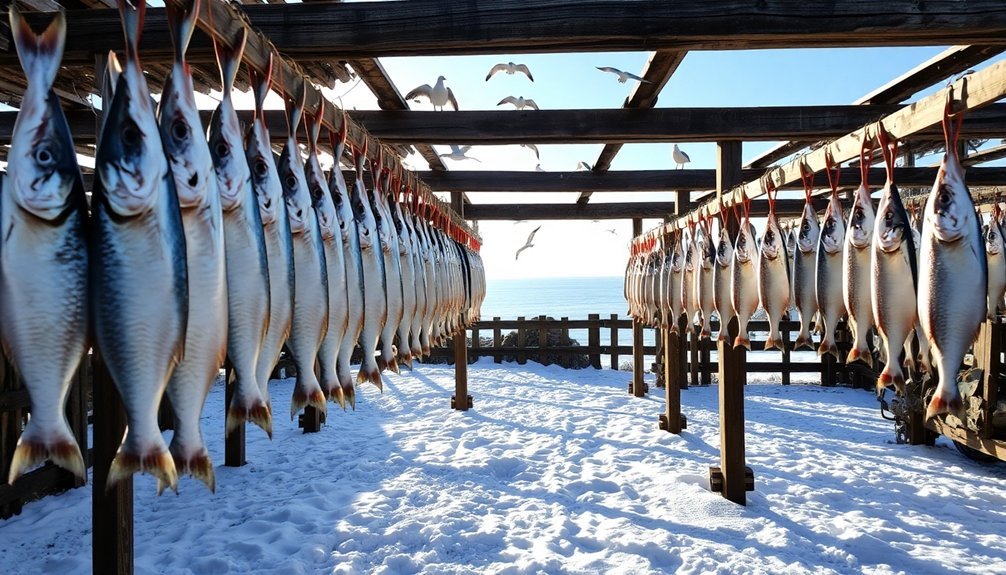
Anyone familiar with traditional Norwegian stockfish production will recognize the distinctive wooden racks, or "hjell," that dot the coastal landscape of Northern Norway. These racks serve as the vital infrastructure for the time-honored drying process that transforms fresh fish into premium stockfish.
You'll find the process begins immediately after capture, when the fish is gutted and either dried whole or split along the spine, keeping the tail intact. The fish are bound in pairs and hung by their tails on the hjell, where they'll remain for nearly four months, from February to June. During this time, you'll want to guarantee each fish hangs freely to maintain peak quality.
The climate in Lofoten and Vesterålen provides ideal conditions for this process, with temperatures hovering just above freezing and gentle breezes that ward off insects while preventing unwanted bacterial growth.
As the fish dries, you'll see it lose 70-80% of its water content, concentrating its nutrients into a protein-rich product. Following outdoor drying, you'll need to mature the stockfish indoors for an additional 2-3 months in a dry, well-ventilated environment to achieve the perfect result.
Frequently Asked Questions
How Long Can Properly Dried Stockfish Be Stored at Room Temperature?
You'll find that properly dried stockfish can last up to 3 years at room temperature if you store it in a cool, dry place away from moisture, sunlight, and metal containers.
Why Do Some Norwegian Families Use Birch Wood for Drying Stockfish?
Based on the background information provided, there's an error in your question. Norwegian families don't traditionally use birch wood for drying stockfish. You'll find they use standard wooden racks and lofts instead.
Does Moonlight Affect the Traditional Outdoor Drying Process of Stockfish?
You won't find any evidence that moonlight affects stockfish drying. The process relies on temperature, wind, and humidity levels. Norwegian producers focus on these weather conditions rather than lunar phases for successful drying.
Can Stockfish Be Prepared Using Freshwater Fish in Norwegian Tradition?
No, you can't use freshwater fish for traditional Norwegian stockfish. It's exclusively made from saltwater cod or skrei (Arctic cod) that's caught off Norway's northern coast. The ocean fish's properties are essential.
What Traditional Tools Are Used to Pound Stockfish Before Soaking?
You'll typically use wooden mallets or hammers to pound your stockfish. You can also use traditional mortars and pestles or a meat pounder. These durable tools help break down the tough fibers before soaking.
In Summary
Try these seven time-tested Norwegian stockfish methods to bring authentic Nordic flavors to your kitchen. You'll discover that whether you're soaking, salt-curing, or grilling with herbs, each technique offers its own unique taste and texture. From the traditional Lofoten boiling to open-fire cooking, you're preserving centuries of Norwegian culinary heritage. Don't forget the distinctive Arctic seasonings and proper drying process for the best results.


Leave a Reply