Building a snow cellar requires careful planning and execution across seven key steps. You'll start by selecting an ideal storage location away from water sources and analyzing the terrain for proper drainage. Next, you'll prepare the site by clearing vegetation and compacting the ground. The foundation comes third, followed by constructing sturdy support walls that extend below the frost line. Fifth, you'll install a protective roof with snow guards, then set up climate controls to maintain optimal temperature and humidity. Finally, you'll enhance storage space and create secure entry points. These essential steps guarantee your snow cellar will serve as a reliable food preservation system for years to come.
Planning Your Snow Storage Location
Three key factors should drive your snow storage location planning: the size of your community, local weather patterns, and critical access points.
You'll need to carefully assess your neighborhood's characteristics and analyze historical snowfall data to determine the ideal storage capacity needed for your snow cellar.
When selecting your storage location, you'll want to avoid areas near water sources, drainage systems, or catch basins to prevent contamination from snowmelt.
Choose a spot that's away from parking areas to minimize snow drift issues, and guarantee it doesn't obstruct visibility for drivers or pedestrians.
Your storage zone should be large enough to accommodate expected snow accumulation while allowing easy access for removal equipment. A north-facing slope location will help maintain consistently cold temperatures throughout winter months.
Consider the proximity to essential facilities like schools, hospitals, or emergency exits when positioning your snow cellar.
You don't want stored snow to interfere with critical access routes or handicapped spaces.
The location should also facilitate efficient snow removal routes, making it easier for your maintenance team or contractors to clear and transport snow during winter weather events.
Remember to plan for proper drainage and sediment collection to manage springtime snowmelt effectively.
Site Preparation and Ground Work
You'll need to carefully evaluate your terrain to guarantee proper drainage, choosing a spot that's level and away from areas where water naturally pools.
Start by clearing the site of all vegetation, debris, and topsoil until you reach firm, stable ground that can support your structure. For optimal stability, any fill material used must be compacted to 95% of its maximum density.
Once you've exposed the subsoil, check for any hidden obstacles like tree roots or utility lines that could interfere with your snow cellar's foundation.
Assessing Terrain and Drainage
Proper assessment of terrain and drainage stands as the foundation for building a successful snow cellar. You'll need to analyze the slope angle carefully, as it directly impacts both construction stability and water management.
Calculate the slope percentage by measuring elevation changes over horizontal distance, and look for signs of potential ground instability. Similar to how indigenous communities historically selected sites for their food storage, choosing the right location is crucial.
Start by examining your soil composition through basic field tests. Perform a shaking test and assess the soil's dry strength to determine its classification.
You'll want well-graded soil that provides adequate support and proper drainage characteristics. Dark, spongy soils with high organic content aren't ideal for your cellar's foundation.
Next, evaluate the site's drainage patterns by identifying areas where water naturally accumulates. Look for surface features like embankments or vegetation that might affect water flow.
You'll need to account for both regular precipitation and seasonal snowmelt. If necessary, plan for drainage solutions such as ditches or culverts to direct water away from your cellar.
Consider how snow typically distributes across your chosen location, as this will affect both the cellar's performance and long-term structural integrity.
Ground Clearing Basics
After completing your site assessment, ground clearing marks the first physical step in snow cellar construction. You'll need to clear the area during ideal weather conditions, with winter being the most efficient time after deep ground freezing occurs.
For smaller trees under 4 inches in diameter, you can leave the roots in place for summer disking, while larger trees require complete root removal during warmer months.
Use the right equipment with proper specifications for efficient clearing:
- Straight or angle blade dozers for shearing trees at ground level
- Brush or toothed blades with 12-17 inch spacing for clean piling
- Chained dozers for removing trees in late fall
- Bulldozers for creating clear strips and swaths
- Specialized blades for separating organic debris from topsoil
When piling cleared material, create high, narrow berms that keep topsoil in the field. Position trees parallel to each other during removal to simplify the piling process.
If you're working in winter, avoid including snow in your debris piles, as this can complicate final cleanup. Schedule your final site preparation during dry summer conditions to guarantee thorough ground preparation for your snow cellar foundation.
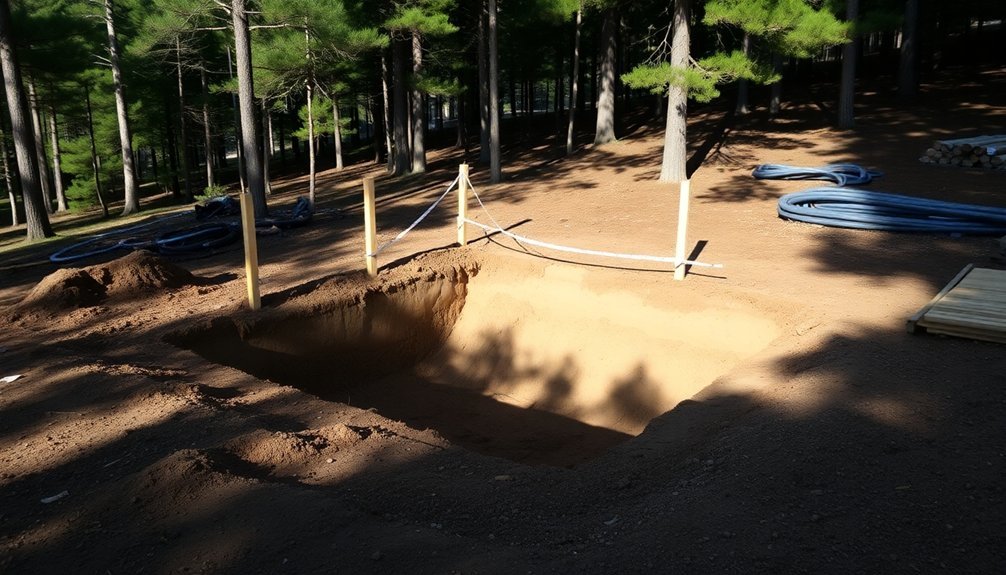
Digging the Foundation and Base
Before you start digging, you'll need to clearly mark your snow cellar's perimeter using stakes and string to guarantee accurate excavation boundaries.
You'll want to establish proper slope angles from the center outward to support natural drainage and prevent water from pooling around your cellar's foundation.
Install filter fabric and a perforated drainage pipe around the excavation's edge, connecting it to a daylight drain to keep your cellar dry year-round.
Marking Your Dig Site
To begin your snow cellar project, marking the dig site accurately guarantees both safety and compliance with local regulations.
You'll need to outline your excavation area using white paint, stakes, or flags before contacting the one-call service. In winter conditions, you can switch to black markings for better visibility against snow.
For your snow cellar's rectangular foundation, use either a full continuous line or the four-corner method. Draw a 1-inch wide line around the entire perimeter, or mark the corners with 6-inch dashes connected by shorter dashes spaced 4 inches apart.
Essential elements for proper dig site marking include:
- Your company or personal identifier on all markings
- Clear boundary lines that match your submitted ticket details
- A safety buffer zone around the planned excavation
- Only the specific area that needs utility location, not the entire property
- Consistent marking width of 1 inch throughout
Remember that precise marking helps utility locators work efficiently.
Don't submit your locate request until you've completed the marking process, and confirm all markings are visible and unobstructed. This careful preparation prevents delays and potential utility conflicts during your snow cellar construction.
Proper Drainage Setup
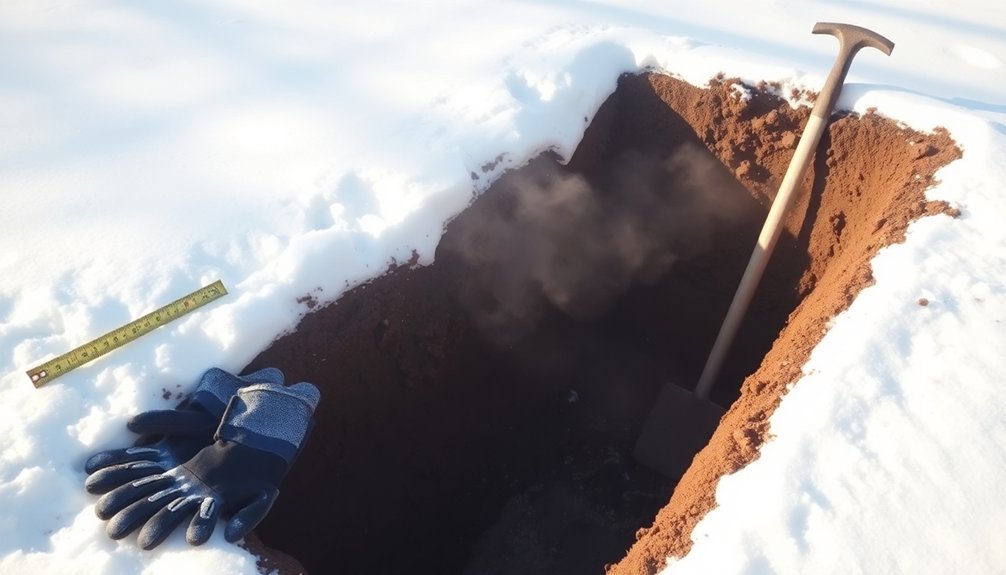
Proper drainage serves as the cornerstone of a successful snow cellar installation. You'll need to excavate around your marked perimeter to a depth below the frost line, ensuring your structure remains protected during freeze-thaw cycles.
Line the excavated area with geotextile fabric and add a 4-inch layer of 3/4-inch crushed stone.
Install a perforated drainpipe system, choosing either 4-inch or 6-inch diameter pipes based on your soil type and water volume. Position the pipe with perforations facing downward and connect it to an unperforated pipe that leads to your designated drainage point. Cover the pipe with another 6 inches of gravel before wrapping it with geotextile fabric.
You'll want to integrate both exterior and interior drainage systems. Install French drains along the footing with a slight downward slope, and apply a waterproof membrane to your cellar's exterior walls.
For interior protection, excavate a perimeter trench and install a drainage system that connects to a sump pit. Don't forget to install a reliable sump pump that'll direct water away from your foundation.
Remember to backfill carefully in layers to maintain proper soil density without over-compacting.
Constructing Sturdy Support Walls
Building sturdy support walls for your snow cellar begins with understanding frost wall design and proper insulation techniques. You'll need to extend your walls below the frost line to prevent soil freezing and maintain structural integrity. Choose materials with high R-values, like Insulated Concrete Forms (ICFs), which offer excellent thermal mass and insulation properties.
For effective support wall construction, consider these essential elements:
- Install a proper capillary break between foundation and wood components
- Extend frost walls at least 12 inches below the frost line
- Apply waterproofing to all load-bearing sections
- Use pressure-treated wood for additional protection
- Incorporate a rain screen system for moisture control
You'll want to position your load-bearing frost walls in direct contact with the outside environment, while non-load bearing walls should include an air gap from the exterior wall.
Don't forget to implement proper drainage solutions around the perimeter to prevent water accumulation. Regular maintenance is vital – inspect your walls periodically for moisture issues or damage.
If you're using wood components, make certain they're properly treated and protected from ground contact to extend their lifespan.
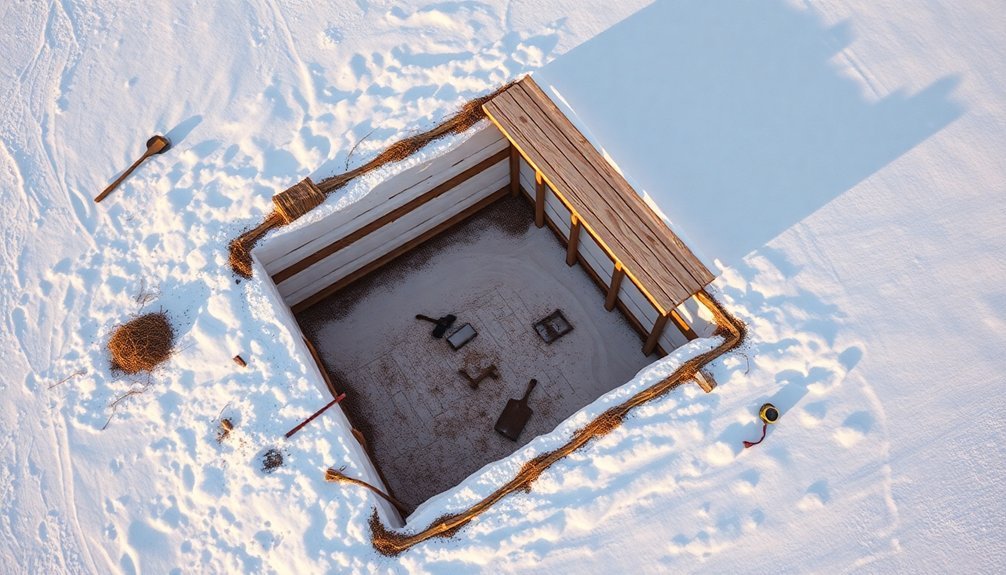
Installing the Protective Roof
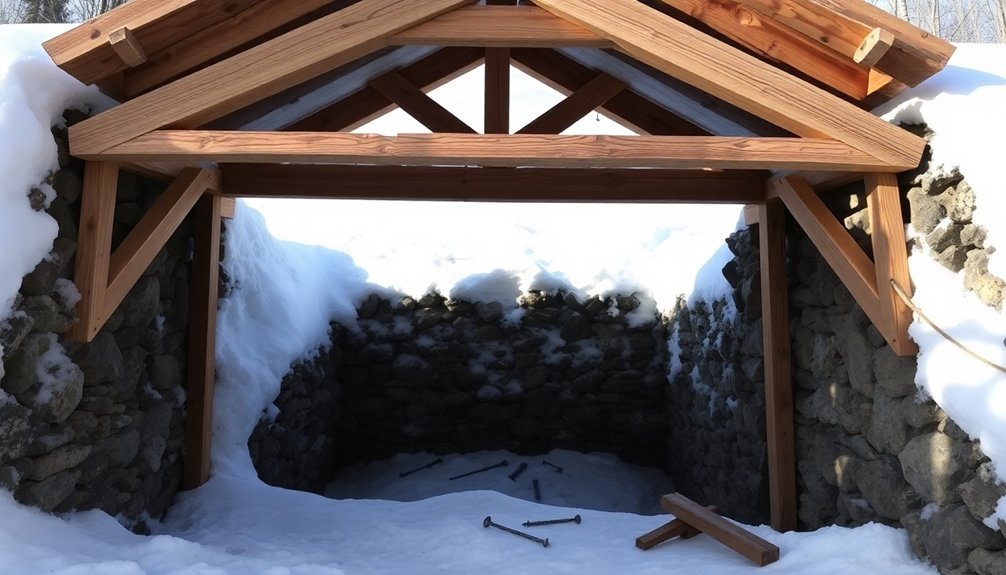
With your support walls firmly in place, your attention should now turn to installing the protective roof – a critical component that shields your snow cellar from the elements.
Begin by measuring and marking your roof's placement, guaranteeing it extends 12-18 inches beyond the support walls to protect against snow accumulation.
You'll need to install snow guards strategically across your roof's surface, particularly in areas prone to snow buildup. Choose guards that match your roof material and can withstand your local climate's snow load.
For steep-pitched sections, opt for robust pipe-style or fence-style guards to prevent dangerous snow slides.
Before securing the roof panels, mark spots for snow guard placement using a chalk line. Install the guards evenly across the lower third of the roof, focusing on areas above the cellar's entrance.
Whether you're using clamp-on or screw-in guards, make sure they're properly sealed to prevent leaks. Apply adhesive or sealant according to manufacturer specifications, and double-check that all fasteners are secure.
Once you've installed the roof and snow guards, seal any penetrations thoroughly and verify that all components are firmly attached.
This careful attention to detail will guarantee your snow cellar remains protected year-round.
Setting Up Climate Controls
Setting up an effective climate control system can make or break your snow cellar's functionality. You'll need to maintain a consistent temperature between 55-58°F and relative humidity of 50-70% for ideal wine storage. For a snow cellar, where external temperatures can drop considerably, you'll want to focus on systems with low ambient control and electric heat options.
Consider these climate control options based on your cellar's size and requirements:
- Through-the-wall systems for smaller spaces and quick installation
- Ducted systems when you need versatility and self-contained operation
- Split systems for maximum flexibility and customization
- CellarPro systems if your space is under 2000 cubic feet
- Breezaire systems for spaces up to 1000 cubic feet
Once you've selected your system, verify proper insulation with double-paned glass and commercial-grade doors with sealed thresholds.
You'll need to install an internal condensate evaporator to manage moisture levels, and set up proper ventilation to prevent mold growth.
Don't forget to include monitoring systems with LED displays to track temperature and humidity levels consistently.
For energy efficiency, choose systems that adjust speeds based on ambient conditions and include multi-level vibration suppression features.
Finalizing Storage and Entry Points
Proper storage organization and entry point design serve as the final essential elements of your snow cellar project.
You'll need to select appropriate containers based on your produce types – wooden boxes work well for fruits, mesh bags suit onions, and 5-gallon buckets are ideal for root vegetables. Remember to place furring strips between containers to maintain proper air circulation.
For peak storage conditions, you'll want to line your containers with insulating materials like dry leaves, hay, or sphagnum moss. Keep different produce types separated to prevent cross-contamination, and make sure your storage area maintains 80-90% humidity at 32-40 degrees.
Don't forget to create efficient pathways for easy access from field to storage.
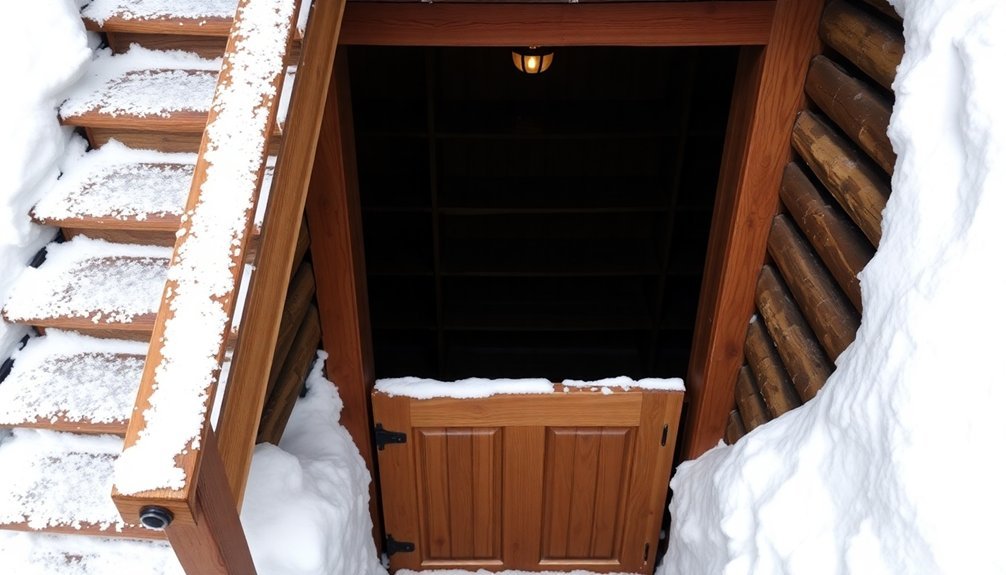
When it comes to entry points, you'll need to install a sturdy door that can withstand the elements. Steel doors with weather-resistant polyester powder coating offer maximum security and durability, while aluminum doors provide a lighter alternative.
Install high-quality weather stripping to seal any gaps, and consider adding an egress window for emergency exits and natural light. Make sure your door design accommodates any sloped masonry areaways and integrates seamlessly with your home's architecture.
Frequently Asked Questions
How Long Can Fruits and Vegetables Stay Fresh in a Snow Cellar?
You'll keep your vegetables fresh for 3-8 months in a snow cellar if you maintain temperatures between 32-40°F and proper humidity levels. Carrots, potatoes, and onions last longest with ideal storage conditions.
What Backup Systems Are Recommended During Power Outages?
You'll want a layered approach: install a battery backup system like Tesla Powerwall, add a solar generator for clean energy, and keep a traditional generator as backup. This combination guarantees reliable power during outages.
Can Snow Cellars Be Built in Areas With High Water Tables?
You can build in high water table areas, but you'll need extensive waterproofing, proper drainage systems, and elevated construction. It's costlier and riskier, so consider alternative locations if possible.
How Often Should Temperature and Humidity Monitors Be Calibrated?
You'll need to calibrate your temperature and humidity monitors at least once a year. If they're in harsh environments or critical applications, calibrate them every six months to maintain accuracy.
What Natural Pest Control Methods Work Best in Snow Cellars?
You'll find peppermint oil, bay leaves, and diatomaceous earth most effective for snow cellar pest control. Place them near entry points and combine with airtight storage containers for maximum protection against rodents and insects.
In Summary
Building your snow cellar isn't a quick weekend project, but you'll appreciate the results when you've got reliable cold storage year-round. Remember to monitor the temperature and humidity levels in your first year of operation to make any needed adjustments. If you've followed these steps carefully, you'll have created a sustainable, energy-efficient storage solution that'll serve your needs for decades to come.


Leave a Reply